Unlike many other website builders that aim to please everyone, Shopify focuses on just one thing. As you can already guess from its name, everything about Shopify is related to creating and managing online shops.
This popular platform with more than 1.7 million users, allows anyone to start a free 14-day trial. During this period, you can create your first online store, add a product, and customize a theme to create a beautiful-looking eCommerce website. This is more than enough time to understand what Shopify can do for you.
If you like it, you can join with a paid plan at any time and publish your first online shop.
How to Make a Website using Shopify in 8 Easy Steps
- Step #1: Create a new Shopify account
- Step #2: Add your first product
- Step #3: Choose a theme
- Step #4: Make design changes to your online store website
- Step #5: Add a blog to your eCommerce website
- Step #6: Get to know the dashboard
- Step #7: Add extra functionality to your Shopify site
- Step #8: Optimizing the site
This entire process is straightforward, but let me walk you through it step by step so that you can be sure to get everything right the first time.
Step #1: Create a new Shopify account
Your Shopify journey starts on their website, where you will create an account, spend some time modifying your own site and manage your store.
1. Go to Shopify.com.

2. Click the “Start free trial” button.
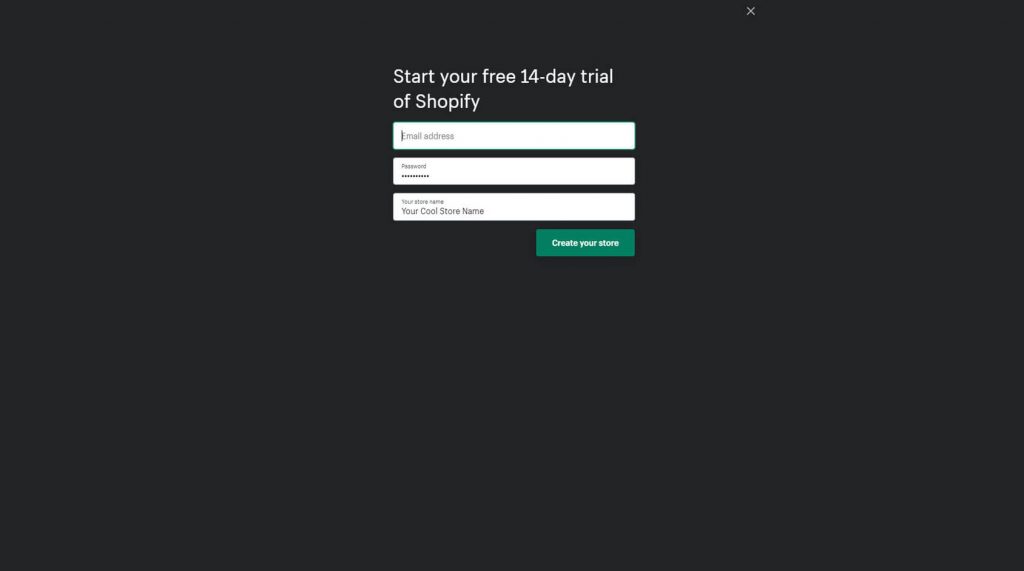
3. Enter your email address again in a new popup window, choose a password, and add your unique store name.
4. Click on the “Create your store” button.
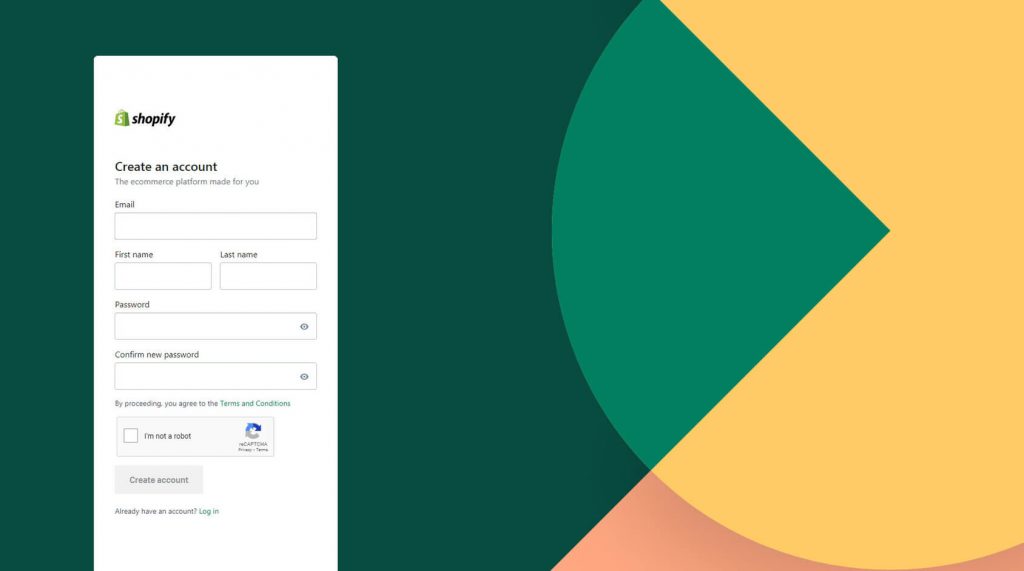
5. Fill in the details again, and click on the “Create account” button.
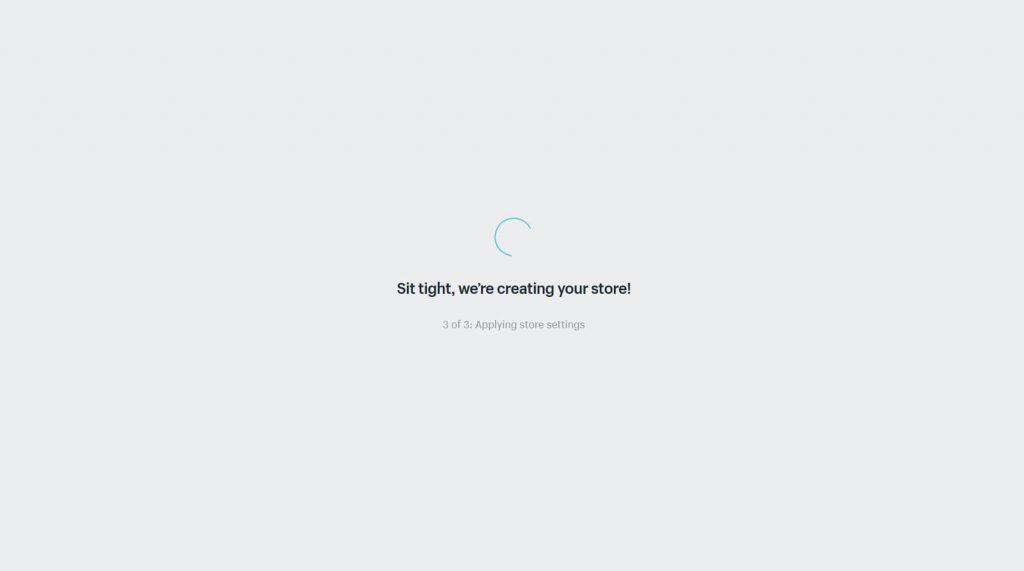
After this, you will see a minimalist loading screen where Shopify will show you what’s happening on the backend (it’s not actually important, but fun to watch). After just a few seconds, your account and your store will be ready.
If you’re serious about creating your store, I suggest answering the questions that show up on the next screen. Don’t worry; there are no math problems. It’s just a few questions about your new website that will help Shopify to set up your account. You can also choose to skip the steps if you wish. Either way, you will then see the dashboard that holds all of the crucial elements to building your website.
Step #2: Add your first product
The first thing that you will see when you land on the dashboard is a button that allows you to add a new product. This is just another reminder that Shopify is entirely focused on creating online stores. Instead of giving you themes and colors to work with, it focuses on managing your products the first time you log in. And that’s ok! After all, you are creating an online store, not a blog.
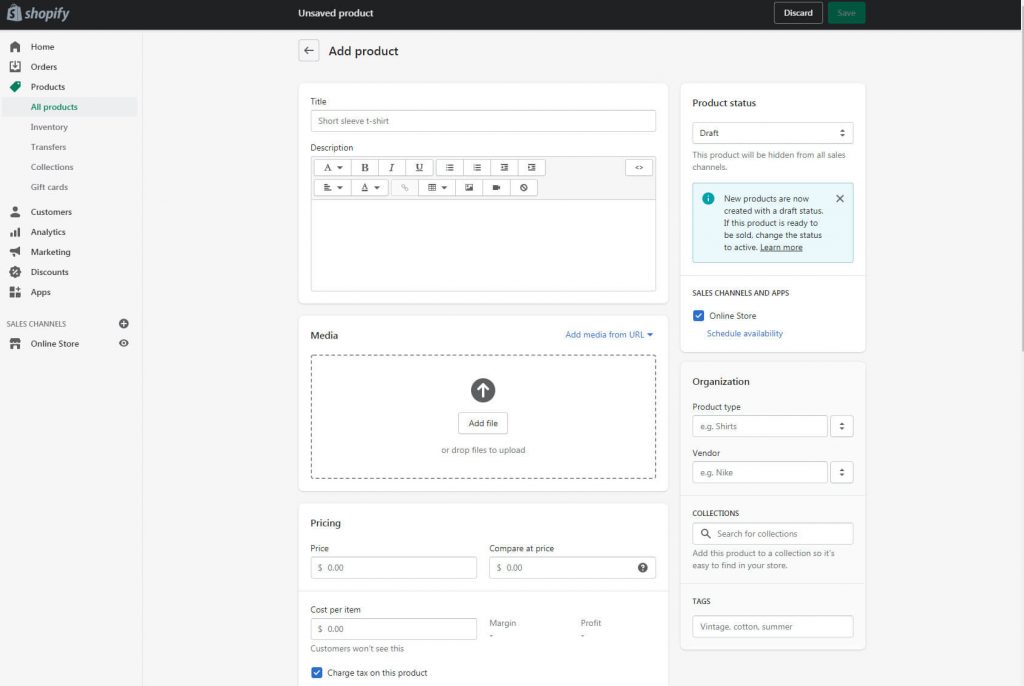
To start, click on the “Add Product” button. A neat-looking and straightforward editor will appear that will let you enter the details about your first product. This is where you write the product title and descriptions, add media files, set pricing, add SKU and barcodes, and everything else you may need to sell your first product online.
Don’t forget to take a look at the right-hand side of the screen where you can add tags, choose product types, enter vendors, and more. Once you’re ready to publish your first product, go to the top right corner of the screen where you can change its status from draft to active.
Believe it or not, that’s all you need to do to add your first product!
Step #3: Choose a theme
The second step to creating your Shopify store is customizing a theme. Go back to the dashboard, and select the second tab from the list, appropriately named “Customize Theme.” Click the button to move forward.

The first item that will pop up is the current theme that is active on your newly created site. Before clicking the “Customize” button, scroll to the bottom of the screen where you can find the theme library. This is the location to explore free themes or to visit Shopify’s theme store that’s home to premium templates. These are paid templates that usually look better and contain more features than the free ones.
Once you choose a new theme, you will see its image and be able to select a few styles. Take your time and browse through the list until you find a theme that you really like. Then click on the “Add to the library” button that will load the template to your account so that you can start working on it.
Now you’re ready to start customizing your theme. Click on the “Customize” button next to the theme that you selected.
When the editor loads in your browser, you’re ready to start modifying your site.
Step #4: Make design changes to your online store website
Unlike some other popular website builders that allow you to click your way through the theme to reveal its options, Shopify is simpler. The editor shows a menu on the left-hand side of the screen, while most of the screen has a preview of your site in its current state.
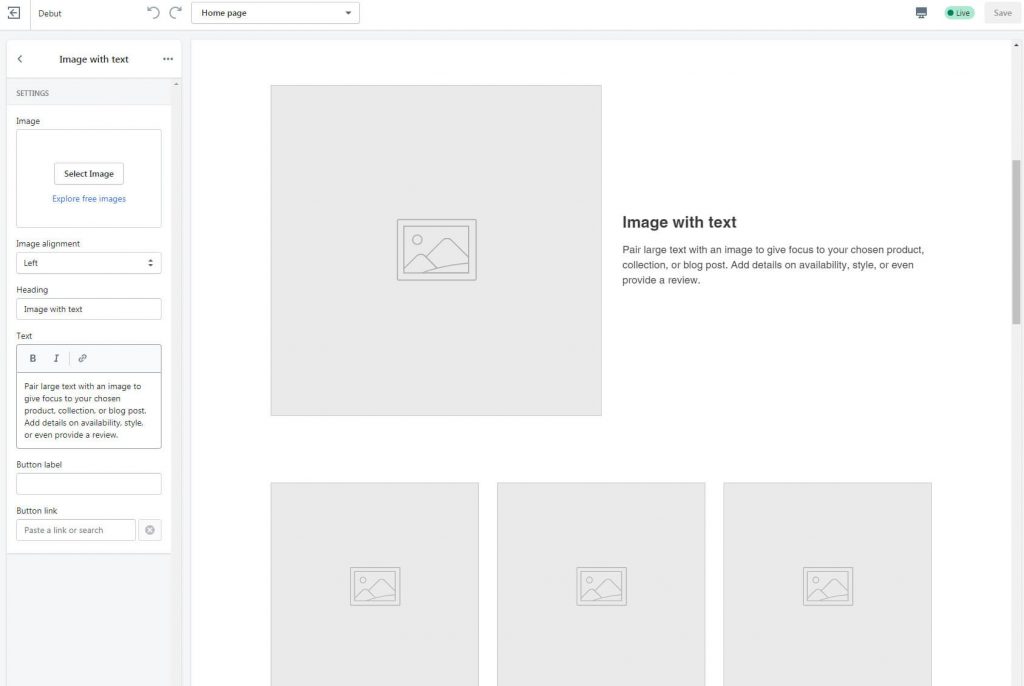
To modify your new site, you can move through the menu and change the header, images, text columns, collections, galleries, and so on until you make it to the footer.
Each element comes with its own set of options, so take your time and go through them all.
Step #5: Add a blog to your eCommerce website
Yes, Shopify is all about creating online shops, but that doesn’t mean that you shouldn’t have a blog on it to write about your experiences or the products that you sell.
If you do wish to add a blog, you will be happy to know that Shopify comes with a simple blogging feature that can be set up very quickly.
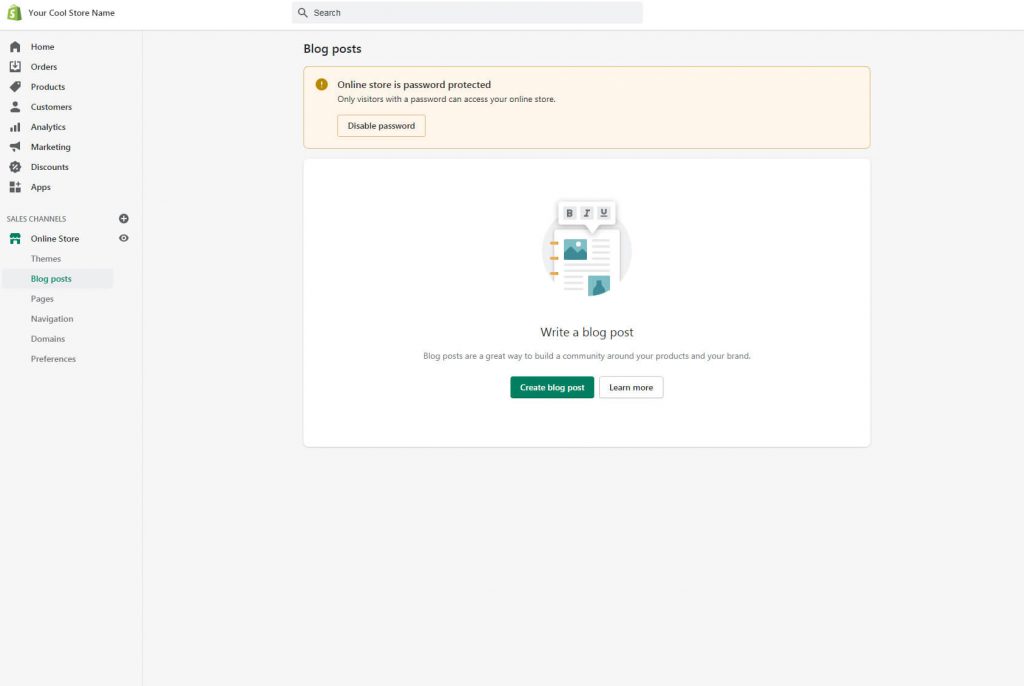
- From the main menu on the dashboard, find the “Online Store” button and click on it.
- Select “Blog Posts.”
- Click on the “Create blog post” button.
A new editor will appear, allowing you to create your first blog post. Honestly, don’t expect much from Shopify’s blogging features. Pretty much all you can do is add a title, and content, set a featured image, add tags, and a few more features, and that’s it.
If your main focus is selling, and you want to write a blog post occasionally, this will be more than enough. If you want to focus more on blogging, then you should explore other platforms like WordPress or even Wix.
Step #6: Get to know the dashboard
When you log in to Shopify, the dashboard is the first thing that you will see. This is the place that connects you to every other segment of the editor.
From the center of the page, you will be able to follow the first steps, and add your product, customize themes, add domains, and set up payments.
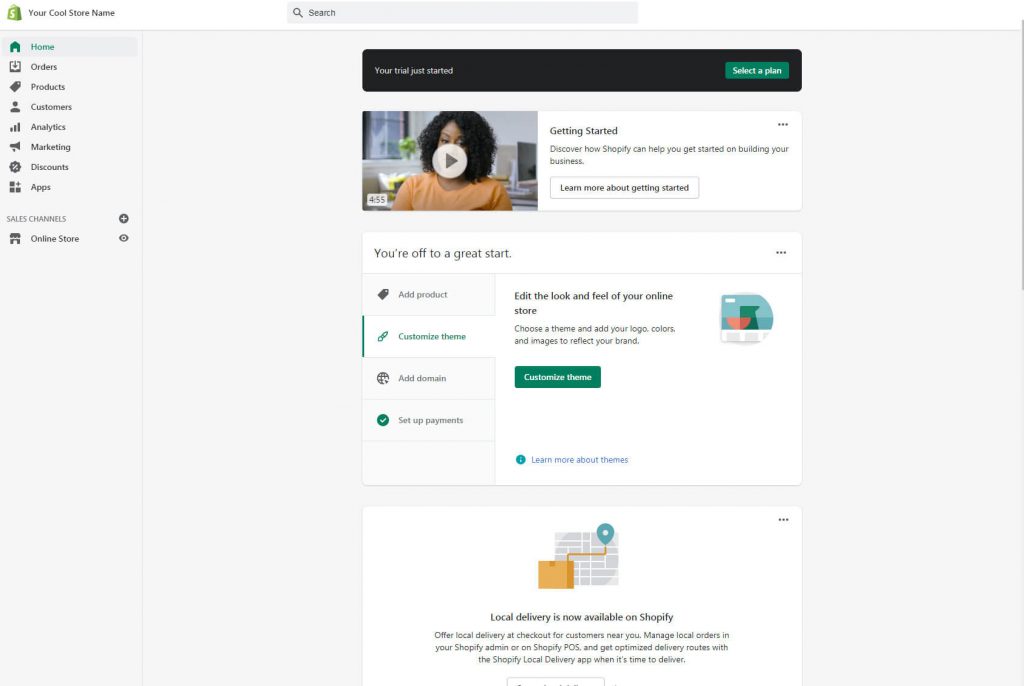
You can always access your account settings from the top-right corner. By clicking your name and image, you will get access to managing your account, the help center, and forums, hire a Shopify expert or learn about keyboard shortcuts.
On the left-hand side, you will find the main menu. It holds links to all of your essential pages. This is the place to manage your orders, products, and customers, see analytics, start working on your marketing efforts, handle discounts, and access the editor. One of the options also gives you access to Apps.
The main settings are available from the lower-left corner of the dashboard.
Step #7: Add extra functionality to your Shopify site
The Shopify App Store is a place that holds additional apps that you can use to enhance your site. There are close to 6000 apps on the Shopify app store. Picking the right apps for your online store can help you make your site better.
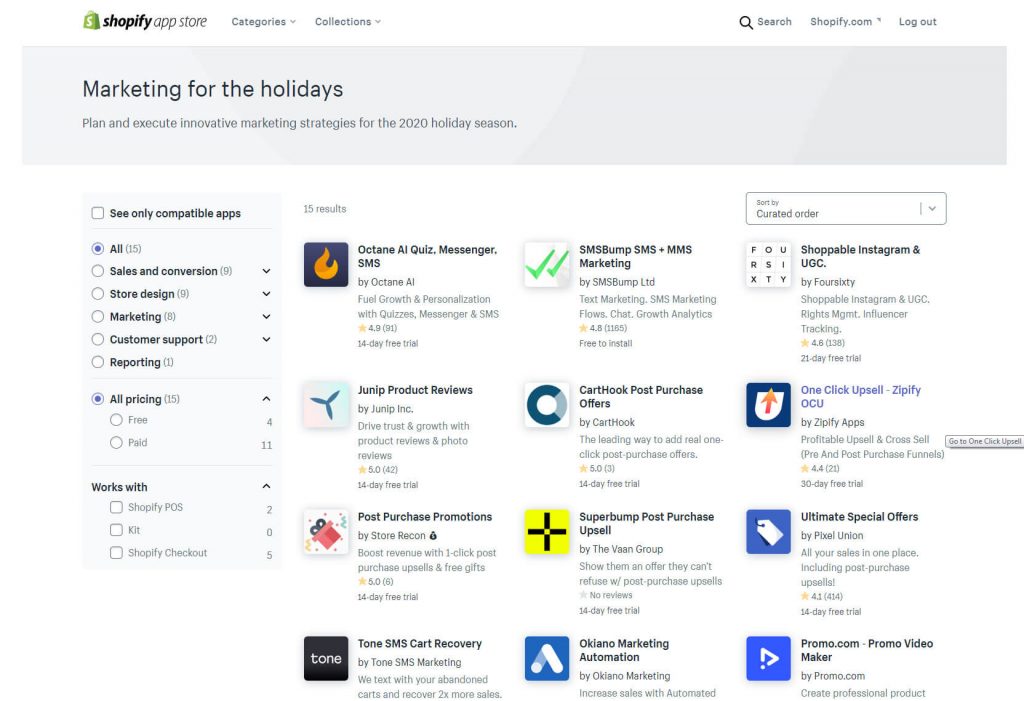
Here you can expect to find messenger and quiz apps, text marketing apps, cart recovery tools, and so on.
Feel free to browse, but do note that these apps aren’t free. Most of them have a 14-day free trial, but you will have to pay for any app that you decide to use on your live site past the trial period.
Step #8: Optimizing the site
Before going public with your site, it is crucial that you do everything in your power to optimize it for search engines and social media.
Luckily, Shopify makes this easy. If you click on the “Online Store” menu item from the left-hand side menu, you will find preferences that reveal several optimization options. Here you can customize homepage titles and meta descriptions, which are important for Google and other search engines. You can also add a social sharing image that allows you to share your pages on social media with a proper image.
If you want to track your site stats via Google Analytics and Facebook Pixel, this is the place to paste the code from these services.
Publish your online store to make it live
After completing all of the previous steps, it is finally time to publish your Shopify site. If you are still on a free trial, please note that you will have to choose a paid plan to publish your site.
Once you have upgraded your account, publishing your site is only a click away.
If, for some reason, your new site is not showing up, please refer to our short tutorial: Why Is My Shopify Not Working? (4 Possible Fixes)
FAQs
While you can try Shopify for free for the first 14-days, the service is not free to use. During this two week trial, you can test out Shopify, create your site, and see all of its features. However, when you decide to make your site public and continue working on it after the trial period, you will have to choose a pricing plan that suits your business.
Shopify comes with a user-friendly editor that lets anyone create an online site. You do not have to be a designer or know anything about the web to create a custom site. Choosing and customizing themes is fun & easy, and all you have to know is how to upload images and modify text.
If you have a custom domain, it is easy to connect it to your Shopify site from the store’s admin. You can also buy a new domain name through Shopify or any third-party provider and then connect it to your new online store.
Check out our tool to generate creative names + check available domains.
Conclusion
For anyone who is trying to build their first online shop, Shopify is definitely a platform worth considering.
Creating an eCommerce site with Shopify is fun and easy, and you can go live with your first shop in a matter of days. Although it isn’t free, it’s definitely worth the money, especially if you’re an individual who is not technologically well-versed and wants to create a fully functioning online store by yourself.