How to Translate WordPress Website to Any Language
By default, WordPress speaks English and that’s the language you can expect on every backend page of your system. Since WordPress has become one of the most popular CMS in the world, it is normal to expect the platform to be translated into additional languages. And it is.
If you want to install WordPress and have everything written in your own language, you can do it. Let us show you how to in this article.
How to install WordPress in your language
Before we start talking about translation and different methods of installation, let’s go the easy way.
Select the language from settings:
- Navigate to Settings-> General
- Find “Language Settings” option located on bottom of the page
- Scroll through the list
- If your language is on the list, select it and save changes
- Smile because you’re done – WordPress is now speaking your language
If your language can’t be found on the list, don’t be sad; you can still work things around.
While some teams have translated WordPress completely, others have done most of the work. You can still find your language on the list of available languages.
Currently, WordPress is available in 169 different languages, but only 55 of them are up to date.
Manually install the language
You can open the link leading to WordPress in your language and follow further instructions. Some languages will give you the option to install additional files in order to use the language, while others will ask for help in translating. If you’re interested in translating WordPress into your language, there is contact information available on each language page which you can use to contact the translation team.
- Navigate to the list of available languages
- Find your language and open the site
- Download the .mo file
- Connect to your FTP server
- Create /languages folder in your /wp-content folder
- Upload .mo language file into that folder
If you’re using WordPress v4.0 or any newer version, you can now change the language by navigating to Settings->General and selecting your newly installed language from the dropdown list.
If you still using the older version of WordPress, you are one step away from activating your language:
- Open wp-config file on your server
- Search for “define (‘WPLANG’, ”);
- Modify the code according to your .mo file.
- You will need WP locale code for your language/country so open the list again
Here are a few examples of the codes for different languages:
Croatian: define ('WPLANG', 'hr');
Danish: define ('WPLANG', 'da_DK');
English (Australian): define ('WPLANG', 'en_AU');
- Save your changes
- Open your WP admin panel which should now be translated into your language
If you’re running a multisite, you can change each and every site in the network separately like we have shown you in this part of the article. If you want to set the language for your entire network, you can do that from Network Admin > Settings panel (“Default Language”).
How to translate WordPress themes and plugins
WordPress speaks the English language by default. Since it is user-oriented, it has also learned many other languages that you can quickly change from the Settings page. Depending on the language you want to translate the backend (admin pages) of your WordPress site, the chances are that you will just have to select it from the list. There are also many other languages that haven’t been completed yet, but it is possible to install them manually if that’s something you really wish.
But even if you successfully translate WordPress to another language, that still doesn’t mean that your site is fully localized. You can get the original WordPress strings to display something more understandable to you, but what about themes and plugins that aren’t part of the translation?
Translate WordPress themes and plugins
If you want or need to localize the entire backend, it will be necessary to translate WordPress themes and plugins as well. Luckily, many popular themes and plugins will already have the translation files ready. If so, you won’t even have to budge in order to have them in your language. But that is usually true only for a few popular languages like French, Spanish, German, Chinese or Italian to name a few.
But before you give up on the whole idea of localization, let us show you how easy it really is to translate WordPress themes and plugins.
How to know which items are translatable
Unfortunately, not all WordPress themes and plugins are easily translatable. So before you can start working, you will have to check the items’ descriptions and their language files. More often than not, the developers of particular themes and plugins will accentuate that their products are translation ready. You will find the confirmation message in the item description.

The other option is to check files and folders directly. When you download a plugin or theme, open its folder and search for the “language” or “lang” folder. If it exists, you should find all or just some of these file types:
- .pot – Portable Object Template which contains the original strings
- .po – Portable Object which holds the actual translation
- .mo – Machine Object that is typically used to translate the code
If the theme or plugin has the files, you can put a smile on your face because that means it is quite easy to translate. Now set your mind to another language, prepare, and install a free plugin that will be your translation guide.
Loco Translate plugin
PRICE: Free
Here’s a free plugin that provides a built-in translation editor which works directly from your browser. Unlike other applications like Poedit (which is also a very popular choice among users) that you have to use outside of WordPress, Loco Translate is just another plugin.
Once installed and activated, Loco Translate will settle on the admin dashboard menu. Hover over it, and it will let you select a group that you want to translate. You can select themes, plugins or WordPress Core:
- Navigate to Loco Translate -> Plugins or Themes
- Select a plugin/theme from the list
- Click “New Language” button
- Choose a language you are translating the plugin/theme into
- Select a different location of the translation files if you want to (we suggest leaving the “author” option selected)
- Click on “Start translating” button
Themes and plugins without files
Even if the item you are trying to translate doesn’t come with the needed template files, Loco Translate can help. If you choose the option, the plugin will scan the entire code of an item and try to create the template file. Obviously, such generated file may not be as perfect as the one that developer can build. But it is a nice feature to have in those cases when you just have to translate the untranslatable items.
Start translating
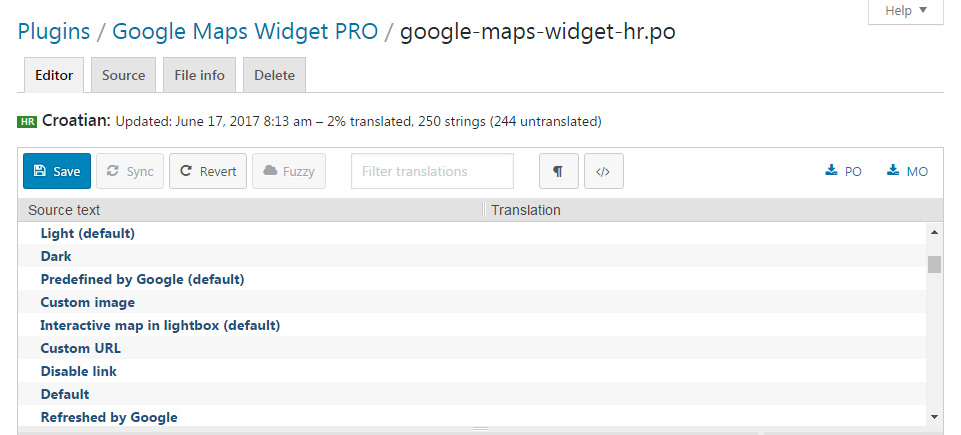
After clicking the button, the plugin will prepare everything and open the translation editor in front of you. The editor contains four parts:
- Source text
- Source text in English
- Translation in the language you selected
- Comments
The first part has all strings that are available for translation. For testing purposes, we selected the free Google Maps Widget plugin. The plugin contained 250 strings available for editing. They were all nicely displayed in a list which allows you to choose rows one by one. By picking a line, Loco Translate will automatically populate the English translation and show comments if there are any. Now it is your time to shine – keep selecting string by string and start modifying text.
As soon as you begin to type, the plugin will mark the selected string with a yellow star. Once you get to finish hundreds of lines, this will help you identify those that you’ve already worked on. Also, the source text will get the new translation loaded right next to the original string so you can quickly see the changes.
Managing translations
On top of the editor, you will find several buttons and labels that help you manage the translation. The first label will let you know what is the language that you’re currently editing and the time of the last update. The most interesting part is the percentage and the number of strings left for translation.

Just below that, you can find a few buttons. Save changes, synchronize translations if they’re out of sync, and revert changes when necessary. If you are not sure that the translation is good enough, you can mark a string as “Fuzzy”. This will let you identify lines that still need some work. Also, you can exclude fuzzy lines from loading in the translation files and leave them to be translated in the future or by someone else.
Loco Translate also makes it easy to search for specific strings. If you want to modify just a few particular ones or you remembered a line you forgot to mark earlier, use the search function to find it quickly.
On the very right side of the screen, you can find download icons. Just in case you cannot save changes due to permission problems, you can download PO, MO, or POT files (depending on files you’re working with).
How to activate the translation
Luckily, Loco Translate allows data to be used at any time. That means that you don’t have to complete the translation entirely before you can use it. So even if you have translated just a few strings, it is still possible to load the translation into WordPress. Of course, there’s not much sense in having just a few strings translated, but it is a good thing when you decide to give it a test.
There are no buttons you should click to activate the translation nor anything similar. Once the files are saved, you just have to switch the language of your WordPress site.
- Go to Settings -> General
- Find “Site Language” option
- Switch language to the one you translated the plugin/theme to
- Save changes
- Open plugin’s or theme’s settings to see the translation in action
Keep on translating
After spending a few minutes with Loco Translate, having WordPress themes and plugins in different languages will seem as easy as one, two, three. Well, it actually is, but the only difference is that you will have to count to a few hundred or even thousand in some instances to complete all the lines.
Not only that translating can help you and your users, but you can apply the same files on other sites. Usually, all themes and plugins found in the official directory will welcome new translations. So just contact the developer and ask them if they want to include yours as the language option for the product.
Also, everyone who’s registered on WordPress.org can now translate themes and plugins directly from the website. Just select an item, choose the language and start suggesting strings. After that, editors in charge of the language will go through your suggestions and approve them if done correctly. When a specific language reaches just enough translated strings, that theme or plugin will automatically get the available translation files, and everybody will be able to download the item in that language anytime. How awesome is that?!
How to translate WordPress.com website the right way
When you decide to create your blog with WordPress, you have two ways to go. Self-hosted WordPress and WordPress.com are not the same things, and you will have to know the differences before you register accounts and reach into your wallets to pay for hosting. If you plan on translating your website, you should also take extra caution when choosing your WordPress solution.
As you may already know, there are more than a few plugins and services that allow you to translate your site. But since WordPress.com doesn’t let you install additional plugins unless you have a business account, you may think you’re in trouble. But wait; before you start panicking, stay with us because we’re about to prove you wrong!
In this part of the article, we’re about to show you three methods to translate the wordpress.com website.
1. The old school way
If you ask search engines for help when it comes to translating the WordPress.com website, one of the first things you will see is the article about setting a multilingual blog. Although the article shows you three ways of achieving practically the same thing, all three are outdated and will ask you to do the same thing twice.
If you decide to go with the old school way, you will be able to translate a site to another language only if you manually retype the entire text. This might be a good idea if you have a simple brochure website with the minimum amount of text and maybe just a few posts. But what if you need to translate the entire site to more than just one language? What if you have hundreds of posts? In that case, you better call Tom Cruise because it’s mission impossible.
2. Google Translate Widget
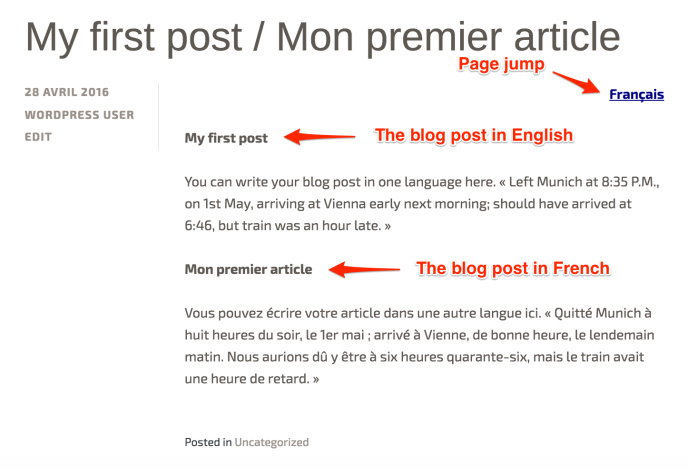
Since you probably can’t reach Tom this time, you must have searched for another solution. Luckily, a few months ago, WordPress.com developers introduced a simple Google Translate widget that you can use on your website.

The widget is as simple as possible; you just need to select it from the list, give it a title and save changes. After that, your visitors will be able to choose any language from the list. Or if you are a bit more advanced user, you can send your visitors directly to the desired language by using specialized URLs. To learn more about this, we suggest reading the article about Google Translate Widget.
Although the widget will translate your site to practically any language, you probably already know how good an automatic translation is. But wait, you still have a better option if you want to translate the WordPress.com website the right way. Keep on reading.
3. Translating WordPress.com website with Weglot
Making your WordPress site multilingual is an effortless process when you choose a website translation solution, Weglot. 100% compatible with all WordPress themes and plugins (even page builders such as Elementor and Gutenberg editor), Weglot automatically translates and displays your website content in less than 5 minutes, with more than 100 languages available.
And, the easy part, there’s no code required or any developer time needed. Simply install and activate the Weglot plugin, enter your API key, the original website language and your new languages, click save and your multilingual site is live!
The Weglot translation plugin comes with a fully customizable language switcher automatically added to your site. You can choose the position, flag, language name and more, to fit the design of your site and without the use of any custom code.
Trusted by more than 50,000 websites owners and developers and with a 5-star rating on the WordPress directory – you can have a multilingual website up and running in minutes!
For websites with 2,000 words or less, take advantage of Weglot’s free plan and for websites with a higher word count, plans start from as little as €9.90 a month. Start your 10-day free trial to see how the Weglot translation plugin works for yourself.
4. Translating WordPress.com website with GTranslate
Although this fantastic service works nicely even as a free WordPress plugin, you will be interested in the extra features GTranslate offers. Of course, if you host your site at WordPress.com, you can forget about installing the plugin, but we will show you the way around that.
It offers a translation proxy solution which allows translation of any website hosted on any server by simply adding a DNS record. That means you can get any translation for any website since this is controlled on a network level.
Get the most out of your translated WordPress.com site
Now that you know what’s GTranslate capable of, you can forget about manually translating each post. You can even forget about Google’s automatic translation widget. Instead of all that, you can easily translate the entire WordPress.com website like a professional.
Depending on the plan you choose, you can:
- Have all the languages
- Edit the translations quickly from the user-friendly interface
- Translate URLs
- Host languages on top-level domains
- Translate metadata
- Have your translated sites indexed by search engines
Take a closer look at the service on the official website.
Another amazing thing about using GTranslate is that, even if you decide to transfer your WordPress.com site to a self-hosted option, you can continue using the service as nothing happened! In that case, you would just need to install the plugin and tweak a few things if you changed the domain name. Fantastic isn’t it?!
Conclusion
We love using WordPress in English. But if you’re not comfortable with it, you can still have your website completely translated into your own language.
Although it might take some time to translate everything if your language isn’t that popular among WordPress users, it will help you get the website to a user who doesn’t speak English at all. The translation system in WordPress is improving all the time, so it’s just a matter of time when there will be even more strings, themes, and plugins translated to new languages.