
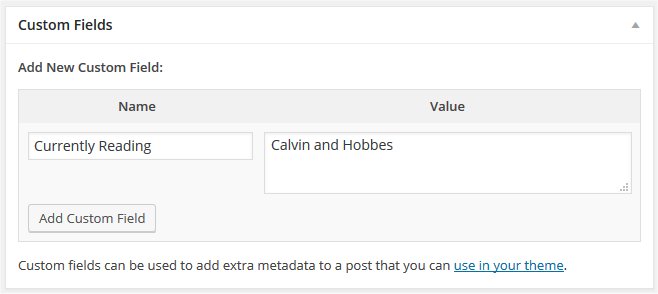
While you were writing your previous article, you might have scrolled over the Custom Fields area in the post editor.
This simple, yet so powerful WordPress feature, might go unnoticed by beginners but it’s actually a feature which can undoubtedly transform your simple and plain website into a dynamic portal which will attract new visitors.
Let us show you more about custom fields and how to use them on your site.
What are Custom Fields and how do they work
What are exactly custom fields? These little fields allow any user to enter extra information about the post. This is known as meta-data, i.e. “data about data” and allows you to attach additional information to your posts. Values you can enter in custom fields can range from something simple as adding a text or a number to your post, adding images, changing styles through the field, or actually doing anything that goes through your mind.
Maybe everything will be clearer with an example.
Imagine that you’re running a website dedicated to video games. You write news and publish trailers, play around with gaming hardware so you can talk about it and of course you write reviews after new games arrive. After you have written a review and placed screenshots and gameplay videos in the article, you probably want to display important information about the game.
Instead of hiding the most important information about a game in the lengthy text, you might want to display a game’s score, developer and publisher names linking to their website, release date, etc. Yes, custom fields are something that can help you do the magic.
If you let your authors enter that information in a custom field, you can easily extract the information and display it in addition to the review. You’ve seen infoboxes on review sites. If you do so, all reviews can have a standardized template – this can improve user experience, both on the front and the backside.
Following the gaming website example, you would end up having several custom fields which your authors can enter and which you show to your readers:

This is the information your authors would enter into custom fields, and you can display the same in a post. But how?
Display all custom fields:
If you only have one field or you want to show all of your fields on the same spot, you can hook you meta-data all at once with a simple function:
- Open single.php
- Find the_content () function and paste this code before or after it (depending on where you want to display custom fields):
<?php the_meta(); ?>
- Save changes
Display specific custom field:
That’s it. That simple function will now stay hooked and it will show all custom fields from a post. But what if you want to show different field in a different position or if you only want to show one specific key? Then you will use a slightly different approach and define the key which will be displayed:
- Open single.php file
- Find the content and c/p the following:
<?php echo get_post_meta($post->ID, 'key', true); ?>
- Replace ‘key’ with the actual custom field you are using in a post. For example: ‘Publisher’
- Save changes
This function will check each and every post in the loop and search for a custom field named “Publisher”. If the key was found, its value will be displayed. You can further customize the way a custom field is being displayed by adding a class to it and style the class with CSS or you can directly enter HTML into the field value.
Conditional Custom Fields:
If you want to, you can use custom fields as conditional. Let stay with the example and let’s say there are times that you won’t be able to know a release date for the game you’re writing about. Instead of typing a custom field, you can automatize the process and tell WordPress to write “TBA” (to be announced) into Release Date field if there isn’t any data added by the user:
<?php $release_date = get_post_meta($post->ID,
'Release Date', true);
if ($release_date) {
?>
<?php echo $release_date; ?>
<?php } else { ?>
<p>To Be Announced.</p>
<?php } ?>
OK, we’ll wrap it up from here. This is the most basic way of using custom fields. But now that you have covered the basics, you can actually do pretty much anything with them. You can, for example, show your mood or a song you’re listening to. Or, you can show a list of posts which contain specific key and/or value. The sky is the limit.
How to list posts with a specific custom field
Custom fields are a great way of extending your posts’ functionality. Instead of letting users deal with the code, you can let them enter a value in a custom field and do something with that information – there are endless possibilities.
Sometimes, when you are already using specific custom fields, you may need to list posts with those fields.
For example, if you are writing game reviews and already have different custom fields where you display publisher, genre, score, etc. in a separate information box in your review, you might want to display only games from that specific publisher, games from FPS genre or only those reviews with a score of 10.
This kind of information could really be interesting to your visitor. You can allow them to browse your game reviews in much more details or allow them to see the top 10 rated games on your site. Even if you don’t want to publish a new list, this method can help you with data mining – instead of creating an article from it, you can list all posts with certain property for research purposes only.
In our opinion, the best way of listing posts sorted by a custom field is by creating a new page template and showing a list on a new page. This method allows you to organize your pages and to easily use a new page for displaying what you need. In the following lines, we are about to show you how to find all posts with a specific custom field and/or its value and show it on a new page.
1. Create a custom template:
Let’s stay with the game review example where we want to display all games from Bethesda Softworks (did anyone say Fallout?). For starters, you will need to create and prepare a custom template:
- Create a custom page template and name it bethesda-games.php
- Copy and paste the following code into the file:
<?php
/*
Template Name: Bethesda games
*/
?>
<?php get_header(); ?>
<?div class="container">
<?div class="indent">
<?php
query_posts(array(
'meta_key' => 'publisher’,
'meta_value' => 'Bethesda'
));

if ( have_posts() ) while ( have_posts() ) : the_post();
echo '<?li>';
the_title();
echo '<?/li>';
endwhile;

wp_reset_query(); ?>
<?/div>
<?/div>
<?php get_footer(); ?>
- Save changes
The code is ready to go through all custom fields and to find only ‘Publisher’ keys with the value of ‘Bethesda’. You can change the key and value to anything you want. If you would like to display all posts with ‘Publisher’ custom field containing any value, simply remove ‘meta_value’ row entirely.
Don’t forget to change the title of the template to something you will recognize later.
2. Add the page:
Now your template is ready so you can continue creating the list:
- Navigate to Pages->Add New
- Add a title
- On the right side, find “Page Attributes”
- Select your template from the “Template” dropdown list
- Publish the page
That’s it! Now if you open your new page, you can see the list of all your posts which contain custom fields with the values you have chosen.
Now you have to add some text to your new page, style the list and find the best way to show it to your visitors. We hope that this method will help you sort your posts on a whole other level and that you will enjoy it.
Show sidebar by using custom fields
A sidebar was introduced in WordPress version 2.2. Since then, it has become a popular way of showing extra content and more often than not, WordPress themes will have one by default where you can place any widgets you want.
Although very useful, you don’t want your sidebar to be present everywhere. Usually, these bars are shown anywhere but the home page. And there is no such option to easily turn the sidebar on and off.
So, why not make it yourself. In this part of the article, we will show you how to put your sidebar into a custom field and call it only for posts you want.
1. Prepare the template:
- Open page.php or single.php file
- Find the following code: <?php get_sidebar(); ?>
- Replace the code with this one:
<?php $sidebar = get_post_meta($post->ID,
"sidebar", true);
get_sidebar($sidebar);
?>
- Save changes
- Create a custom template where your sidebar will be
- Open the sidebar.php file
- Copy everything from sidebar.php and paste into your custom template file
- Save changes.
Now you have to open a post or a page where you can find “custom fields” under the Text/Visual Editor. To add a sidebar to that post/page, do the following.
2. Using the sidebar in custom fields:
- Type “sidebar” under the name of your custom field
- Type the name of your custom template as a field value
That’s it. If you have left your custom fields empty, your post will be without sidebar while in the other case, your sidebar should load if you have done everything correctly.
Change header, footer or sidebar for individual posts with custom fields
Usually, a WordPress website will have only one header, footer and sidebar already defined by the theme you are using. Each one has its functions and design stored in separate files which are called by the theme and then displayed on the site where needed. Because each part of the theme is stored in a different file, you can easily modify them without worrying you will mess up the entire site, and you can change the way only a header, footer or sidebar behaves on your site.
But sometimes, one element won’t be enough and for example, you will want to change your header. If you want to change it for the entire site, you’re already ready to go – open header.php and modify it the way you want it. But what if you wanted to add an ad in a header only for your single posts? Or maybe modify the header only for one post in your entire collection without changing the rest?
Once again, custom fields will help you.
1. Prepare the file:
Before we use a custom field to change headers, footers or sidebars, you should have a file prepared. Let’s say you want to change a header for a post or two and you have created a new file called header-header2.php where you have changed the design or inserted a specific advertisement to the post. Before you can continue with creating a custom field, make sure that the file is coded properly and is working on your site. Once the file is up and ready, you may proceed.
Be careful about naming the file – if you are trying to change the header, your new header file should look like this: header-newname.php
2. Replace the code:
- Open single.php file
- Search for get_header(); part of the code which is usually on the very top of the single.php page
- Replace the function with the following:
global $wp_query;
$postid = $wp_query->post->ID;
$header = get_post_meta($postid, "header", true);
if (!empty($header)) {
  get_header($header);
} else {
  get_header();
}
wp_reset_query();
- Save changes
With this code, you told WordPress to check for a “header” custom field in every single post. If a custom field with that name was found, WordPress will take its value and use the filename as a header for that post only.
3. Change a header via custom field:
If you have header-header2.php uploaded in your theme, you can now call it in a custom field:
- Open a post for which you want to change a header
- Scroll down and navigate to custom fields
- Enter a new field and name it “header”
- Type in “header2.php” in the field’s value
- Update or publish the post
If there aren’t any errors in your header-header2.php file, the new header should appear on top of the post for which you’ve made the change. Still, all the other posts will load your standard header file defined by the theme.
As you may have noticed, you are only required to type in the filename of your new header file after the “header-” part. Because of that, it is important to name your new header file correctly and add “header-“ part before the actual name you’re using in the custom field.
The same goes for sidebar or footer file, of course, by changing get_sidebar() and get_footer() part of the code.
Implement Advanced Custom Fields more easily with ACF Theme Code
Custom Fields are the inevitable part of practically every WordPress theme out there. These fields allow everyone to include extra information about the post, but unfortunately, this standard WP feature is quite raw. Beginners need some time to get accustomed to using custom fields and developers have to spend a lot of extra time when coding around them.
That’s the reason why Advanced Custom Fields (ACF) plugin is so popular among WordPress users all over the world. This free plugin counts more than 1 million active installs at this moment, and we don’t see why the number will start dropping. ACF allows you to create powerful, professional, and intuitive custom fields through a visual editor.
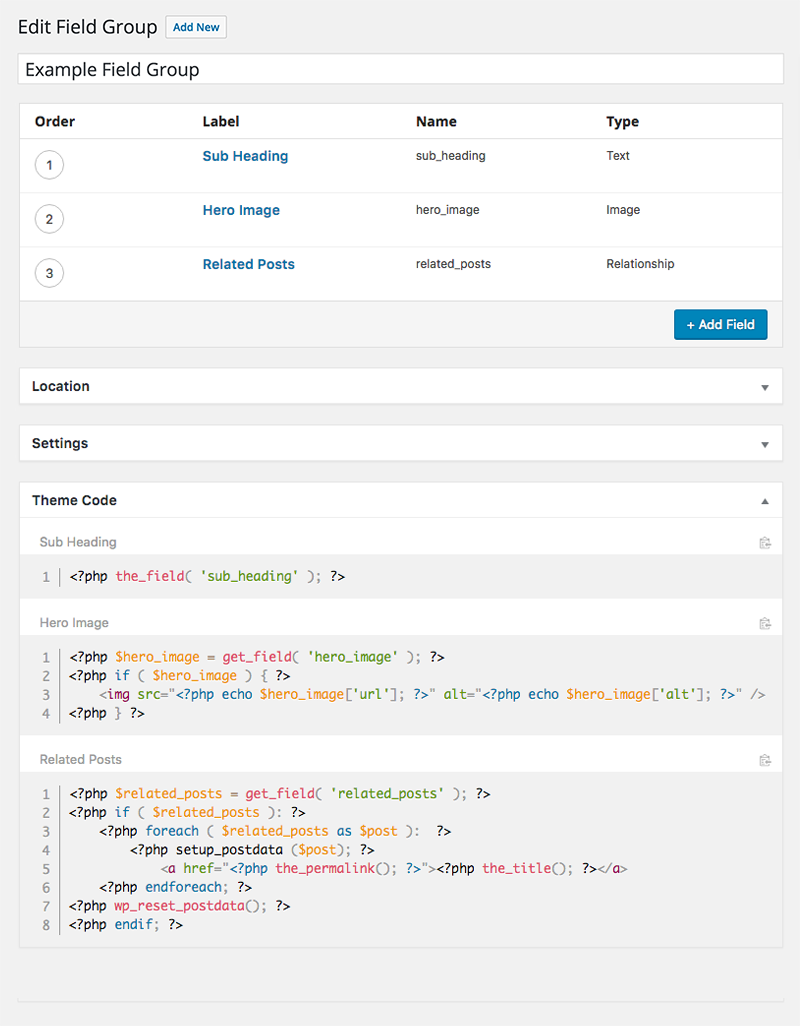
Although quite popular, ACF still requires coding knowledge and a lot of your time if you plan on implementing those fields in a theme. Yes, creating a field group is easy, but displaying those fields isn’t such a piece of cake. And that’s where ACF Theme Code steps in to save developers.
ACF Theme Code
PRICE: Free
This awesome plugin is a product of two developers who decided it’s time to stop wasting time on repeatedly writing the same code over and over again. When developing a theme or modifying an existing one, Advanced Custom Fields requires a developer to implement the right code in the right place within a theme. Since there was no easier way, a developer had to memorize snippet and all of the features of an API in order to do the work.
Aaron Rutley, one of the creators, explained on his blog:
“When implementing a field within a WordPress theme, it’s likely I’ll forget the field name, was it ‘profile_image’ or ‘profile_photo’? I’m also likely to forget how I’ve set that field to be returned, was it ID, URL or Array? I found myself constantly editing the field group to find out.”
And this is where ACF Theme Code can help out a developer. After you install this free plugin which is now downloaded more than 4,000 times, you can save time when dealing with the code. Whenever you publish, edit or update a field group in Advanced Custom Fields, this amazing plugin will automatically generate code need for implementing the fields into any theme.
You will find this code rendered at the bottom of the page. Next to each snippet, you’ll find a clipboard icon which will make it easy to copy the code. Now you don’t have to memorize anything and you can relax when working with custom fields.
Although the plugin is already a must-have for any developer out there, Aaron says they’re already planning to expand ACF Theme Code:
“We plan to add support for more popular third-party fields in the future. We also plan to give developers more control over the code that’s generated.”
While the plugin is free when paired with the free version of ACF, you will need a PRO version if you use an extended version of Advanced Custom Fields. ACF Theme Code Pro generates code for all the other ACF Pro field types like the Clone, Gallery, Repeater and Flexible Content field.
Display your mood or a song with custom fields
Blogging should be fun. Even if you’re writing articles about serious subjects, your blog could still have that thing or two which makes it a bit more fun for an average reader. It can be anything – a little note from the author, a funny image or you can maybe add a mood you were in while you were writing the article. Maybe you would even like to add a song title you were listening to.
In this part, we’re about to show you how to easily implement a feature for displaying a mood/song in your posts. You won’t have to install any additional plugins and the feature won’t take much of your space. It is a simple line of text which can be added automatically on top or bottom of your post.
1. Let’s add a “mood feature”:
- Open single.php file
- Copy and paste the following code on the spot where you want to display your mood:
$customField = get_post_custom_values("mood");
if (isset($customField[0])) {
echo "<span class='my_mood'>" . "Mood: "
.$customField[0] . "</span>";
}
- Save changes
Now that you have prepared WordPress for your moods, you’re ready to display them in any post that you want. By default, WordPress won’t show your mood and there won’t be any default moods it will load until you decide to show one. If you wanted to add a song instead, simply change the “mood” into “song” on the first line of code and you can also change the class name on the third line.
2. Add your mood/song to a post:
To enter a mood or a song, you will need to write it in a custom field:
- Open a post for which you want to write a mood
- Scroll down until you see “Custom Fields”.
If you don’t have Custom Fields displayed below the post content, click on “Screen Options” on top of your editor screen and check the checkbox next to “Custom Fields”.
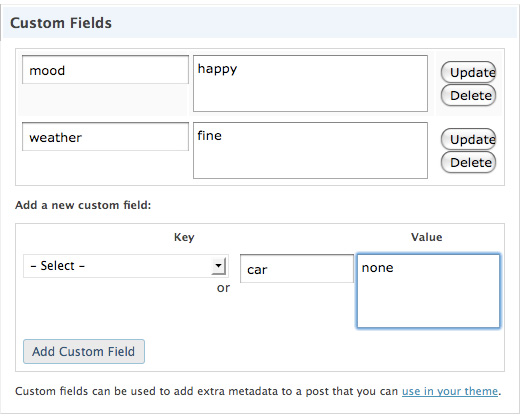
- Write “mood” in the name field or “song” if you have decided to go with it
- Write anything you want in the “Value” field – this will be the mood/song displayed in your post
- Click on the “Add Custom Field” button
- Publish your post
3. Style it:
As you can already see from only three lines of the code, this is the simplest form of adding a new custom field. If you want to style your mood with some CSS, you can see that the code already added the “my_mood” class to your text. To modify the styling, do the following:
- Open style.css file
- Copy and paste the code:
.my_mood {
color: blue;
}
- Add any CSS styling that you like
- Save changes.
Hopefully, this will be enough to get you started with customizing “the mood/song feature” for your own blog and we hope that “blue” won’t be a frequent value which you deal with. If you don’t want to publish your mood, simply don’t write anything in the “mood” custom field.
Summing up
If somebody else has created a custom field for you (like a theme or plugin developer), using it to improve your blog is quite easy. But we hope that this article has helped you with customizing the fields on your own.
With simple modifications to the code, we showed you, you can create and manage your own custom fields which will help you generate a unique blog. You will be able to extract the information you need, and you will simplify the process of writing and generating content. What do you think about custom fields in WordPress?
