WordPress header is the topmost section, and unquestionably the most important visual element of a WordPress blog. As it is the first thing visitors will see after loading your site, it is crucial that you pay some extra attention when customizing the header.
Usually, the WordPress header displays a picture or a video that is used to capture the visitors’ attention. More often than not, you can expect a navigational menu there as well. Since social media has become popular, many WordPress users tend to put social icons in there as well so that others can get to their profiles faster.
Although this element is a standard module that can be found on every site, the features of a WordPress header solely depend on the theme you’re using. While most of the free and premium themes will let you handle images and videos that you can adjust in detail, some won’t let you customize the header at all. Hopefully, you’ve selected a good WordPress theme from the first group, and now you’re interested in how to customize your WordPress website header. If not, you’ll have to edit theme files. There’s no way around it.
How to add images and videos to a WordPress header
To get to the editor, please navigate to Appearance -> Header from the WordPress dashboard menu on the left side.
Alternatively, you can find the Header editor from Appearance -> Customize -> Header Media. As the options depend on each theme, please note that “Header Media” may carry a different name or it might not appear on the list at all. For the purposes of this tutorial, we will focus on the great Twenty Seventeen theme.

The first thing to notice after clicking the link is that WordPress opened a demo page of your site with all the options on the left side. This allows you to see changes to the header as you’re doing them. It’s always nice to see how the new image or video will affect your homepage even before you save new settings. With the live preview, you can freely experiment with different videos and images without affecting your visitors.
Header video
Videos are considered to be more important than images. So, if you add one to your header, it will replace the image that’s already there. You can add a video to your WordPress header in two different ways. Usually, videos that you add here will be without sound as it would otherwise irritate visitors.
Upload video in .mp4 format
To use a video from the Media Library or upload a new one, you will have to use the .mp4 format. That’s the only format that WordPress accepts at the moment, so you will have to accommodate that. Since those types of videos can get quite big, it is important that you reduce the file size as much as possible. MP4 video can easily get over a few hundreds of megabytes per file, and that’s something just not acceptable for a blog.
The recommended size of a video in pixels will depend on your theme. With Twenty Seventeen, it is recommended that your video is 2000×1200 pixels.
If you have such a video, click on the “Select video” button. Then choose one from your Media Library or upload a new video. You will immediately see the results on your page.
Use a video from Youtube:
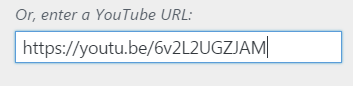
Using a video from Youtube is much simpler. Once you find one that you like, just copy and paste its URL into the form. As soon as you paste the link, WordPress will load the video and show you the preview of your site.
[tip]If you use a video, WordPress will use the header image as a fallback.[/tip]
What is a fallback image? Until the video loads, your users would traditionally see an empty space on its location. To avoid that, the fallback image allows them to see a picture instead. Also, since not all browsers are able to reproduce videos, an image will be used in cases when people can’t see the video you picked. Because of that, even if you’re using a video, it’s crucial that you choose a header image for those edge cases.
Header image
By default, WordPress automatically shows a header image that you can see from Appearance -> Header editor. Here, you can see the current header image, a previously uploaded one (if you haven’t uploaded header images, you won’t see this option), and a suggested photo.
If you don’t want to have a header image, just click on the “Hide Image” button.
To change a picture, click on the “Add new image” button which will open Media Library. Here you will be able to select photos that you have already added to your site or upload new ones.

After choosing a picture, it will be possible to crop it to the recommended dimensions. If you want the image to fit perfectly with your theme, we suggest that you do crop it. Also, it is advised that your image has the same dimensions as your video (if you use one, of course).
If there is more than one uploaded or suggested image, you can click the “Randomize uploaded/suggested headers” button. WordPress will then randomly choose one image for your header. This is a nice option for those of you who want to swap between images every few days.
Don’t neglect your WordPress header
Both from a visual and functional perspective, the WordPress header is a crucial feature of your blog. That is why you shouldn’t just overlook its design. Since your theme grants you the privileges to customize the header in detail, use those available options to change videos and images to your liking. Your users will be happy to see that you’ve invested some time in the customization.
