It’s been a long time since images were something too big to load over the Internet. Today, websites can’t exist without them. Even though Internet speeds have dramatically increased over the years, it’s vital that you take care of pictures on your blog.
Just because it’s easy to upload images to your site, that doesn’t mean you should do that without any preparation. Unoptimized images can, in fact, hurt your site in many ways; from affecting the way visitors think of you to the speed of your website and SEO rankings. If you still haven’t thought of that, we’re here to show you several ways of improving images in WordPress.
How to optimize images for WordPress so that you speed up your site and improve SEO
Why should you optimize images for WordPress? If you make an effort, you can expect the following:
- Faster site
- Better SEO
- Smaller backups
- Less bandwidth usage
- Happier users
You should also know that there are different stages at which you can optimize the images. You can take care of the pictures even before you upload them to a blog or you can do that after the upload.
Quickly test images on your site
Before you start working on the optimization, you can quickly check your site for speed and performance. By using any of the tools from the list, you’ll quickly get to know in what shape are the images on your site.
We like to use GTmetrix which will even show you the exact images that are causing your site to load slower.
Optimize images for WordPress before upload
While blogging, most people don’t take all the necessary steps in order to optimize their images. Usually, people would just take a photo from their camera or smartphone, download one from the Internet or create one by using computer software.
They don’t think about formats, image dimensions nor the file names. If the picture looks good, they just assume that it’s ready for the Internet. If you don’t check your images, you’re building towards a disaster.
Resize images
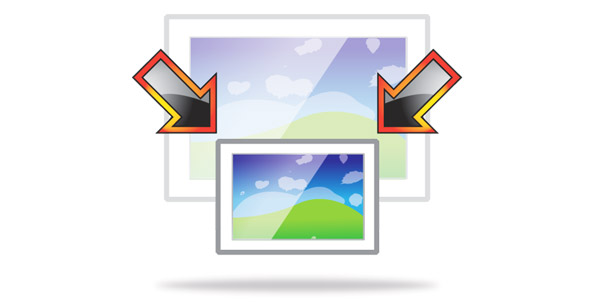
Don’t upload images to your WordPress website before checking the width and height of each picture. If you display images at a maximum of 700px, for example, there’s really no need for uploading a wider picture. If you do so, you will have a larger file which will make your site slower, while the output will be the same. WordPress will create additional size, but that’s not the excuse not to prepare the images before upload.
Resizing images is quick and easy. There are many free tools like Microsoft Paint that will help you with that. You can even find free online tools for resizing images like Colorcinch.
Image dimensions will vary from theme to theme. If you aren’t sure which one you should use, take a closer look at your WordPress theme and inspect pictures, search for documentation or ask support for help.
Change the quality
After changing dimensions, you should consider changing the quality of images. Depending on the software, there are different ways of modifying the quality of pictures. For example, always popular Photoshop allows you to save images for the web. This option will allow you to save images at a lower quality, but they will be optimized for your site.
Also, if you choose to save a picture as JPEG, Photoshop will ask you to choose the quality level. In this case, lowering the quality from 12 to just 8 will dramatically reduce the size of an image, while the difference in quality won’t be that big.
If you are still not using any software to change the quality of your pictures, you can try the free online Tiny PNG tool. Just upload a picture and see what difference can it make.
Choose the right format
Even after the changes in size and quality, you should consider changing the format. For starters, just by selecting the right format, you can take off a few kilobytes from an image, if not more.
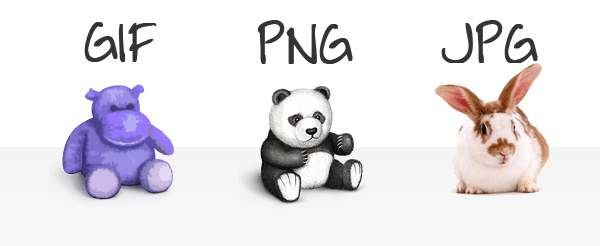
The general rule is very simple. If you have a photograph, make it JPEG. If you have a logo, vector image or a very simple computer-generated graphic, go with PNG. If you have a really small image without gradients or you want to show a simple animation like the one shown above, you can use GIF. Generally, PNG images will be quite larger than the JPEG ones, and you can benefit from changing the format.
In many cases, reformating images won’t make significant quality differences, while you can expect a difference in size. Next time before you upload a PNG photographs, give it a shot and try saving it as JPEG to see the difference. For a more detailed explanation, please check out the difference between PNG, JPEG, GIF, and SVG.
Take care of filenames
While filename might sound unimportant, it’s actually something you should be very aware of. The name of your image file holds a valuable info for SEO. If you want others to be able to find your image on Google and other search engines, you should give it a proper name.
We suggest that you name images without using spaces. Don’t forget to include keywords if you want the page and the image to rank. For example, if you’re uploading a picture of Ferrari California, the file name should be “ferrari-california.jpg.” If you use an SEO plugin for WordPress, you already know that it checks your alt tags for keywords. Yes, it really is that important to have a proper image name.
Optimize images for WordPress after upload
After preparing images on your computer, you can proceed with the upload. Hopefully, your images are just the right size and quality. You made sure the format and filename are correct. After the upload, WordPress will ask you for additional info. Don’t skip the meta information; fill in the details about your images so that you can easily organize them and prepare for SEO.
Title, description, alt text and caption
While taking care of the technicalities, you shouldn’t forget about the SEO. Always add the title and description to your media. This will help you with WordPress media management, and it will also work towards better SEO. Also, don’t forget the alt tag which will be displayed for visitors who can’t properly see your image. Not only this will be helpful for your users, but it will also help you with SEO. Your page will rank better, and users will be able to find your new images easier.
Although you won’t need captions all the time, make sure you add ones for images that need additional explanations (for example, screenshots).
Edit images with WordPress
If you realize that a picture still needs further editing, you should know that WordPress allows you to do so even after you’ve uploaded the file. Change the rotation, crop, and scale pictures you already uploaded. You can even edit just a thumbnail or all the other sizes. WordPress’ native editor is very simple, but it can you save from time to time.
Regenerate all thumbnails
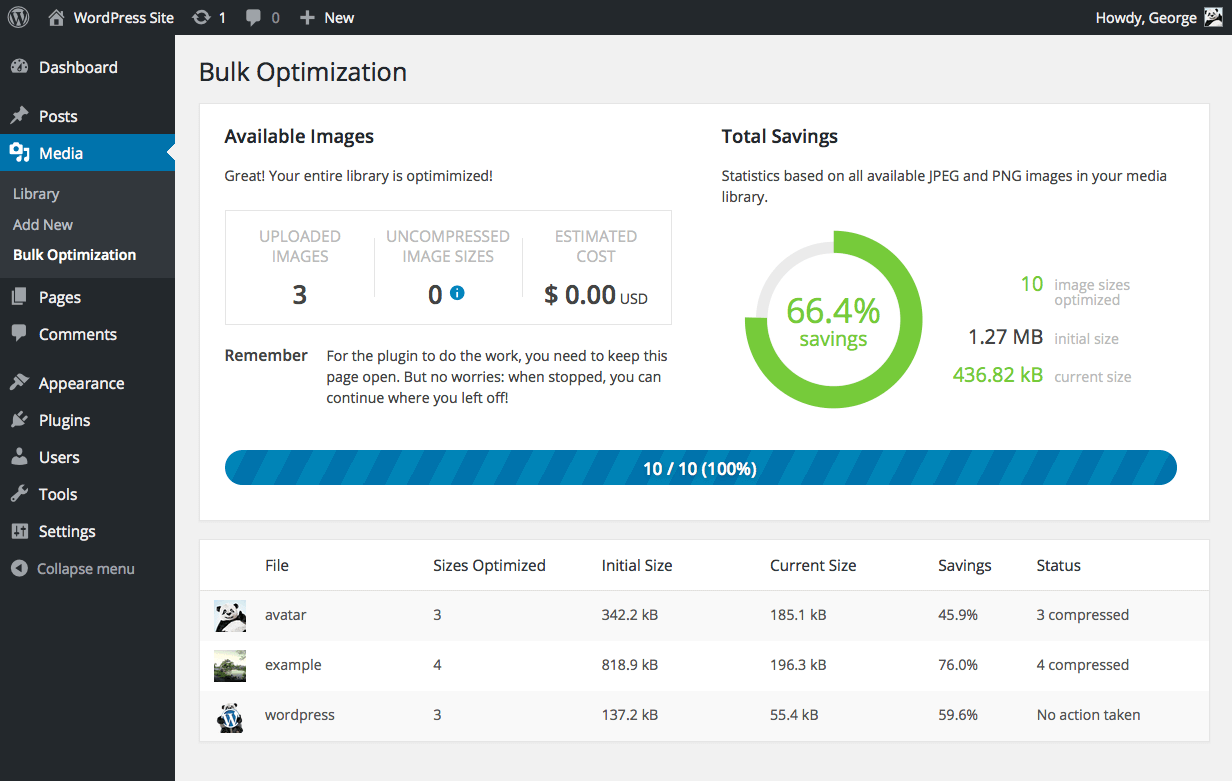
Most of the previous techniques will help you with new image files that you are still about to upload. But what if you have hundreds if not thousands of files already uploaded to your WordPress site? Don’t worry; you can still optimize those images and change their sizes.
For a quick fix, you may be interested in a free Regenerate Thumbnails plugin that’s been used by more than one million users. If you want more control over images, you should check out some of the best WordPress plugins for image optimization which we’re going to show you in the following lines of this article.
Use WordPress plugins
Of course, there are dozens of WordPress plugins that can help you optimize images on your site. Scroll down to see the best WordPress plugins for optimizing images.
Lazy Load images when necessary
Sometimes, the quality of the pictures will be much more important than their size. This is mostly true for photographers who want their photos to be top-notch. They can’t risk reducing the size nor quality of files. Still, that doesn’t mean you should forget about optimization. To optimize images for WordPress in this case, you should consider lazy loading.
Lazy load is a technique that loads images only when users need them (scroll to them). For example, if you uploaded twenty high-quality photographs in one article, they would tremendously slow down your site. But if you lazy load the images, the article would be lightning fast and photos would load only when needed – at the moment when a user gets to them.
Have responsive images
Although the majority of WordPress themes are responsive, that doesn’t necessarily mean that your images are responsive as well. Since you don’t want a large image to load on a small screen, you will need to register additional image sizes for your site. If your theme isn’t using responsive images, consider hiring a professional for the job – it isn’t as easy as it might sound.
Optimize images for social media
If you want to make sure that your images look good on social media, you will have to take an extra step and optimize meta tags and schema markup.
If you’re using an SEO plugin like Yoast, don’t forget to check the settings. For example, Yoast will let you set up a few things related to social media. So, navigate to SEO -> Social and enter the information on Facebook, Twitter, Google+ and Pinterest.
If you want more, and you want to optimize images for additional social media websites, check out WPSSO – Accurate Meta Tags + Schema Markup for Social Sharing Optimization & SEO plugin.
Change the way WordPress compresses JPEG images
If you are uploading a bunch of JPEG images on your WordPress website, you might have noticed they are losing on their original quality. If you have wondered if WordPress is to blame, now you will have your answer – yes, it is!
Once you upload an image in JPEG format, WordPress automatically changes the compression and decides you want the image to lose on quality. To be more specific, WP uses 90% compression on your JPGEs. That’s great if your images are only there to be used as post thumbnails or to be shown in a post, but if you are uploading your photographs, you want them to be as best as possible, right?
Luckily, you will only need one line of code to change this.
Stop JPEG images compression:
If you don’t want your JPEG images to be compressed, simply copy and paste the following code into your functions.php file:
add_filter('jpeg_quality', function($arg){return 100;});
Don’t forget to save the changes and you’re ready to upload new images.
On the other hand, images might not be that big of a deal for you. So you might want them to be even more compressed and save you time on loading your site. If you change the last number in that line of code, you will be changing the quality of newly uploaded images.
Compress JPEG images even more:
The lower the number, the more images will be compressed. For example, to compress those JPEGs even more, you will need this code:
add_filter('jpeg_quality', function($arg){return 80;});
Don’t forget; default compression level is 90.
Important: This will only affect images that you upload after you pasted the code in the functions.php. To change the size and quality of the images you already have in the library, you will need a plugin.
The most popular image optimization plugins for WordPress
At the beginning of this article, we talked about how to optimize images for WordPress so that you speed up your site and improve SEO. As you could have seen, there are a few different methods you can use. It’s important to take care of images even before you upload them to your blog. But when pictures are already up on the site, it may become impossible to reoptimize each and every image separately and then upload them once again.
Don’t worry; no one expects you to do so in the first place. Stay with us in the following minutes as we’re about to show you the most popular image optimization plugins for WordPress.
To optimize images, you will just have to select the plugin from the list. You will have to configure it and choose things the plugin will do for you. After that, you’ll be able to relax and delegate the work to the plugin of your choice, while you can start organizing your media files.
The following plugins will help you compress the images on any WordPress site you have. They will make the site load faster and ultimately help you to improve SEO.
WP Smush plugin
PRICE: Free
With more than 700,000 active installs, WP Smush has to be one of the best image optimization plugins for WordPress. It can quickly optimize images by using different compression techniques. The great thing about compressing images with WP Smush is that images won’t lose on quality. Don’t believe us? Test the plugin.
When we talked about preparing pictures for WordPress, we mentioned that resizing is a crucial part of the optimization process. With this plugin, you won’t have to worry about that since WP Smush lets you set maximum dimensions. After doing so, all larger images will automatically scale down before you add them to the library.
This fantastic plugin can work with JPEG, GIF, and PNG files. It works with all of your directories, automatically takes care of the attachments, and even works on multisite. You can manually operate on each image or edit fifty of them in bulk. If you want even better results and more options, check out WP Smush PRO.
EWWW Image Optimizer plugin
PRICE: Free
Behind the funny name, there’s one of the most popular image optimization plugins for WordPress. Just like the previously mentioned one, EWWW Image Optimizer can compress your images without affecting their quality. When you think about that the plugin can speed up your site in seconds, you’ll be already on your way to download it. Once you do that, you’ll get to optimize images in bulk, and galleries like GRAND FlaGallery, NextCellent and NextGEN will even get their own Bulk Optimize pages.
All images that use WP_Image_Editor class in WordPress will be automatically optimized, while you can manually work the magic on all the others. We like that you get to select folders that you want to optimize. For more details about this, and which plugins use the class, please open the official EWWW Image Optimizer page on the WordPress repository.
Compress JPEG & PNG images plugin
PRICE: Free
If cute little panda holding WordPress logo doesn’t make you want to learn more about this plugin, we don’t know what will. And if the panda looks familiar, that’s because it’s the same one that helps you compress images on the TinyPNG website. Yeah, it seems the animal is more versatile than we originally thought. But let’s focus on the plugin.
If you go with this plugin, the Panda will automatically optimize your images. Each time you upload a new one, the plugin will take over and do its job. Still, you can optimize individual pictures or do that in bulk just by going to the media library.
Compress JPEG & PNG images even supports animated PNGs, works perfectly on a multisite, it’s WooComerce compatible and will not have problems with WP Offload S3.
The great thing about the plugin is that it allows you to set maximum width and height attributes for all the images. If you have been worrying about what it will do the metadata, don’t worry; the panda will keep all the info intact.
There are no file size limits, you get to set a dashboard widget, and it even works with the WordPress mobile app. Because all of that, Compress JPEG & PNG images has more than 100,000 active installs and deserves a spot on the list of best image optimization plugins for WordPress.
Imsanity plugin
PRICE: Free
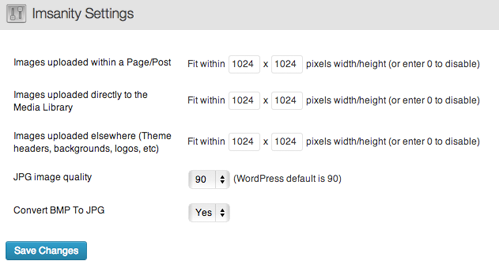
Although the cover image for this plugin might scare you away, take a second and look at all the features of Imsanity. Oh, even the name of the plugin sounds insane, right? Once you’re ok with the name of the plugin, you’ll see that it has a lot to offer.
Imsanity can automatically scale images, allows you to set maximum dimensions, and it even features a bulk resize option. This is important if you already have hundreds of pictures on your blog that need optimization.
This free plugin is a great option if you don’t want to struggle with the plugin’s settings a lot. All it takes is to install and activate Imsanity, set a few options, and you can forget about it; it will manage its own way towards image optimization.
We loved the option that allows you to convert BMP images to JPG. Just in case you have a lot of BMP files you mistakenly uploaded some time ago, this will be a lifesaver.
ShortPixel Image Optimizer plugin
PRICE: Free
With more than 30,000 active installs, ShortPixel Image is still one of the most popular image optimization plugins for WordPress. The plugin is packed with features, and it will be a must-have for sites that have a lot of images to optimize.
ShortPixel Image Optimizer will not only optimize JPG, PNG, GIF, and PDF documents for you, but it will also let you convert any JPEG, PNG or GIF image to WebP. The plugin works well with other gallery plugins, and it doesn’t care if your site uses HTTP or HTTPS. It will let you remove EXIF data from images (something photographers will love to have).
The plugin recognizes images that it already optimized so it will skip them when needed. You get to allow or disallow auto-optimization, and do much, much more with this fantastic plugin. Check out the official page on the repository to see all the features.
Optimus – WordPress Image Optimizer
PRICE: Free
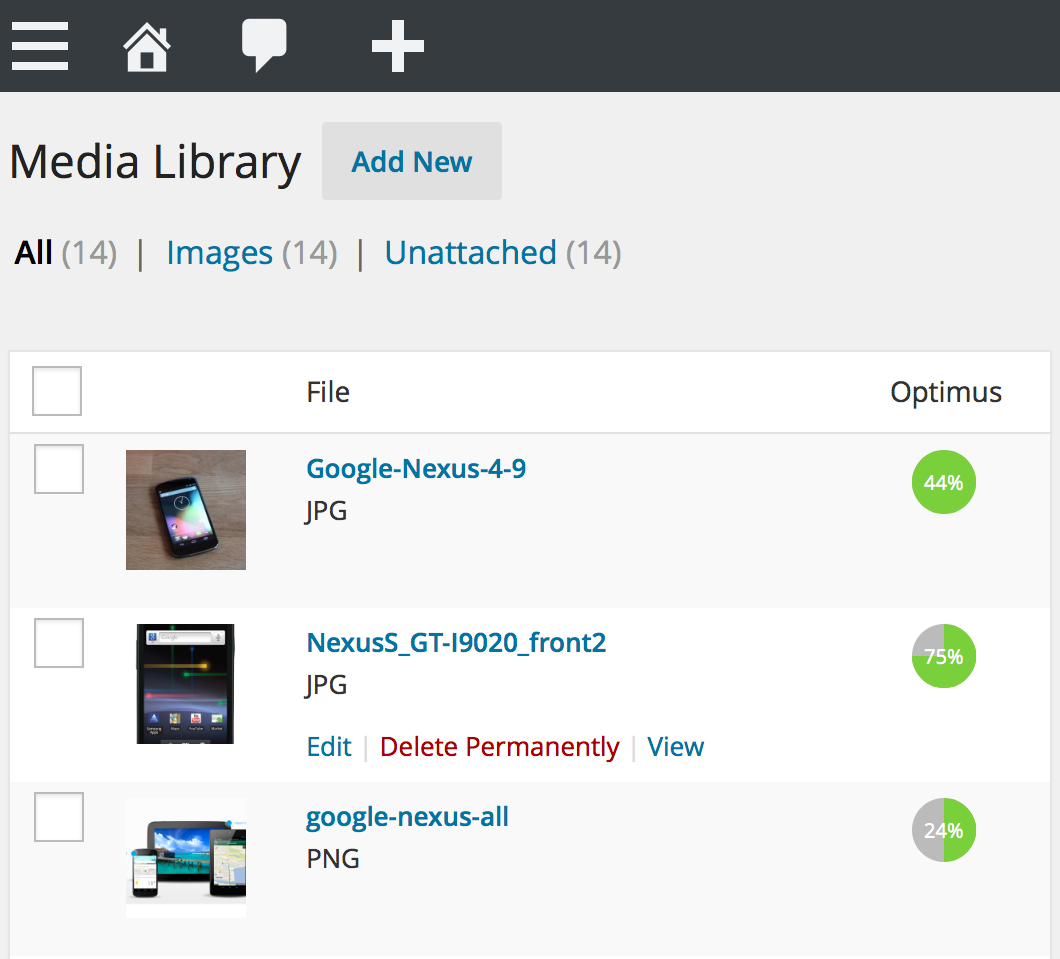
Just like the previously mentioned plugin, Optimus will optimize your images for WordPress, and it will do that without affecting the quality of your pictures. You can let the plugin work out things automatically, or you can turn off the option and only optimize images when needed.
Optimus works on multisite, it’s no stranger to WordPress e-commerce sites, and it’s completely optimized for WordPress Mobile Apps and Windows Live Writer. It will speed up your site without you having to touch a line of code. The plugin offers much more, but you will have to opt-in for the premium version. To see more, please go to the official page on the WordPress plugins repository.
Add lazy loading for your videos and images in WordPress
Once you start adding a lot of video and image material on your website, it is obvious that it will start loading slower. No matter where they come from, videos and big images will act as a heavy weight on your site and will make your visitors wait much longer than needed to load all the content. With WordPress, that shouldn’t be a big deal and here is how you can easily fix the situation.
If you know your way around PHP, there is a great article about adding lazy loading for images and the infinite scroll written by our colleagues on Elegant Themes.
If not, in the next few lines we will mention some of the most popular lazy loading plugins which will make your site load faster. And you won’t even have to do much but to install a plugin and set it up in few quick steps.
Lazy Load for Videos
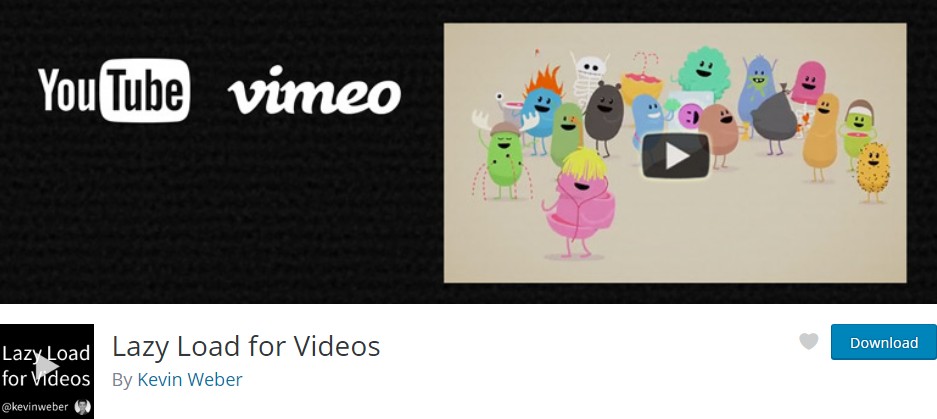
If you have a lot of Youtube and Vimeo videos, you should consider installing this plugin. Once you set it up, the plugin will place an image on your video and because of that, your website will load much faster. Once a visitor scrolls to a video, this image will be shown with a “play” button over it. After a click, the video will start loading and playing. A simple demo can be viewed on the developer’s site.
WP YouTube Lyte
PRICE: Free

This plugin will do its job in a quick and easy way. After installing it, just add a link to your Youtube video or use a shortcode to add one. You can choose between adding a normal video, playlist or only audio from selected video. After that, your Youtube videos will get an image over it which will enable lazy loading. Just click on the image to make your video or audio start.
See a demo on developer’s site.
a3 Lazy Load
PRICE: Free
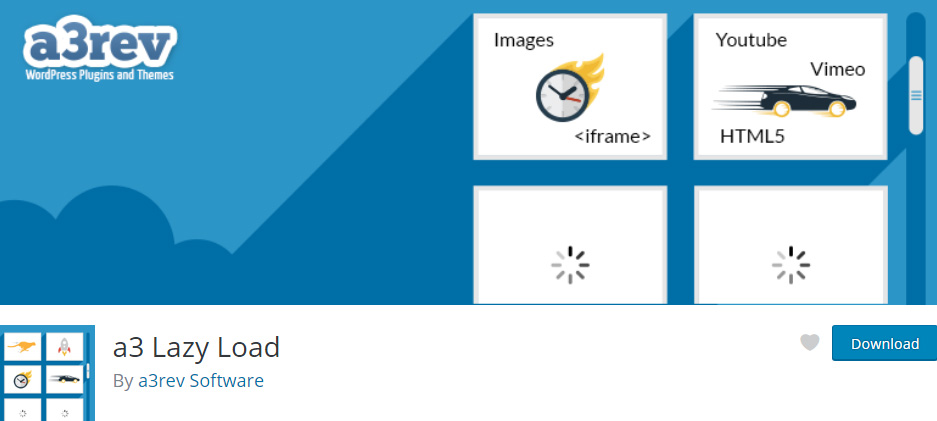
This one is dedicated to your mobile site. If you have a lot of images and/or videos which you want to show to your visitors on mobile devices, you should take a look at a3 Lazy Load. It will allow you to add lazy loading to your images and videos and the plugin will even let you choose transition effects which will appear to users while they scroll through the content which is loading.
In the admin area, you can easily turn on and off the content you want to lazy load. For those turned on, content will be loaded only at the time a visitor scrolls to that part of the content.
There is a nicely shown demo which features 1000 images – each is loaded only once you scroll to it. As this plugin lazy load videos, too, there is a video demo you can see by clicking the link above.
BJ Lazy Load
PRICE: Free
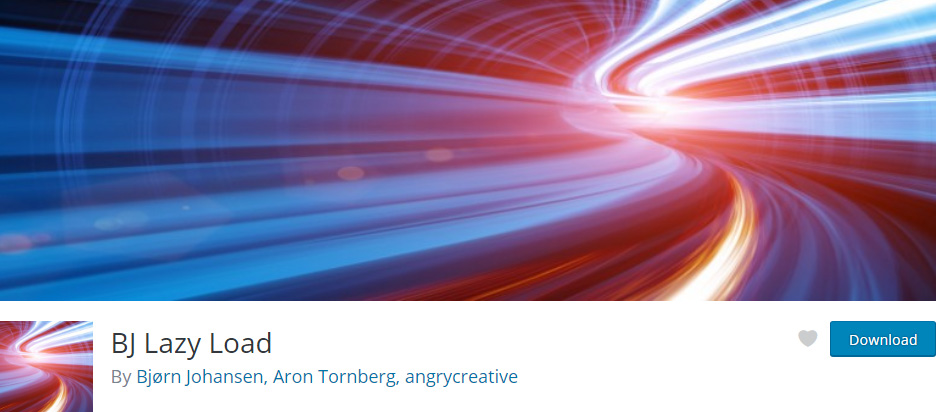
If you don’t need support for videos and only want your images to lazy load, you should check out this WP plugin. Once installed and set up, it will replace your images, thumbnails, Gravatar pictures and even iframes with a placeholder. Similar to a previously mentioned plugin, it will load content only once a user comes to it.
Whether it is images or videos you want to lazy load, one of the above-mentioned plugins will help you in a matter of second. All of them are free so there is no excuse for not trying at least one of the plugins and see how much weight of your shoulders will it take. Of course, there are many other plugins with the same function and you are free to browse and try all of them.
Display before and after images in an attractive way
We are sure you have already seen many examples of before/after images. Don’t know about you, but the first thing we have in mind when we see the “before and after” phrase is fitness training program where people show their bodies before and after a workout program.
If you think about it, most websites use a simple approach to showcase the differences – they take both images and place them one next to another or even one above the other. If you want the same result, you wouldn’t be reading this article because you already know how to do that.
What if we told you there is a visually stunning way to solve this before/after problem and it just in reach of your hand? Well, there is and after a setup, you’ll praise the developers because the final result is really, really cool.
Twenty Twenty
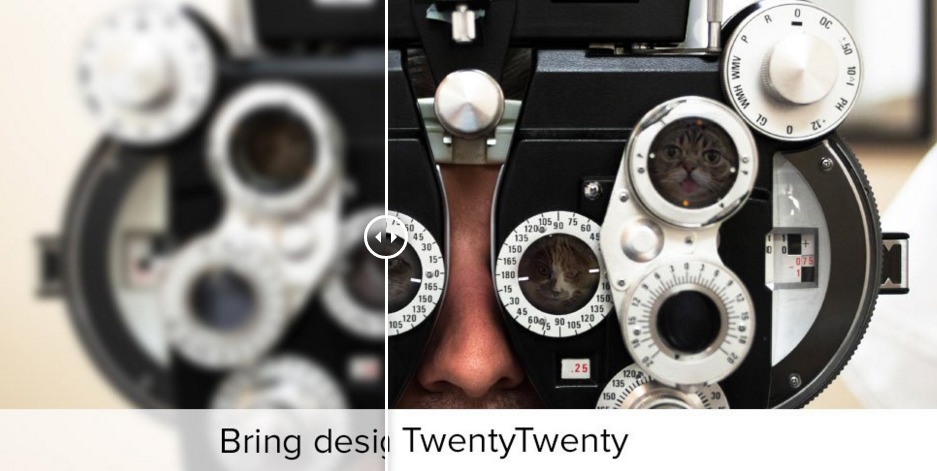
Twenty Twenty is the name of this awesome plugin which you can download for free in WordPress plugin repository.
The plugin will let you place one image over the other and let you play with a slider so you can hide/reveal the image. Please, see the demo and you’ll see what we are talking about.
OK, now when you’re hooked on this little plugin, let’s see how to create this stunning effect. Although it is relatively easy to recreate the demo effect, you will still need to know your way around basic HTML. Let’s go:
- Create a new post or open the existing one
- Insert two images into the post. If you are working in a Visual Editor, you should see the image one above the other one. If you are working in a Text Editor you should see a code similar to this:
<a href="image1.jpg"><img src=
"http://www.loactionoftheimage.com"width="700"
height="200" /></a>

<a href="image2.jpg"><img src=
"http://www.loactionoftheimage.com"width="700"
height="200" /></a>
- Enter
You should end up with something like this in your Text Editor:
[twentytwenty]
<a href=”image1.jpg”><img src=”http://www.loactionoftheimage.com/image1.jpg” width=”700″ height=”200″ /></a>
<a href=”image2.jpg”><img src=”http://www.loactionoftheimage.com/image2.jpg” width=”700″ height=”200″ /></a>
[/twentytwenty]
- Make sure your pictures are the same size to achieve the best results
- Preview or publish your post and enjoy your visually stunning before and after pictures
How to create interactive images – draw, add descriptions and links
Today, it is hard to run a website without multimedia. Images, videos, and music are a part of practically every website. An average Internet user is heavily dependent on visual stimuli, so you have to take care of the visual and the interactive parts of your site. Articles with images receive 94% more views than those without one. Also, it’s already a known fact that multimedia on websites can boost content marketing ROI.
We hope there’s no need in persuading you to take care of images on your site. Even if you don’t use images in articles (which you should), you use featured images, right? There are quite many gallery plugins which can help you manage images on your WordPress site, you can have photography related themes, connect Instagram to your WordPress site, and do so much more. But what if you wanted to create more interactive content?
For starters, you might be interested in adding a before-after image effect that your users will love. Don’t forget about Virtual Reality in WordPress which is getting more popular after Automattic introduced VR to WordPress.com. Still, there’s something missing. Is it possible to make interactive images with clickable parts? Yes, that’s possible, and we’re about to show you how fun and easy that is.
Draw Attention
PRICE: Free
The first thing about this plugin you’ll like is that it is entirely free! Just like with any other plugin from the WordPress repository, you can download, install and activate it in a matter of minutes. The free version will allow you to work with one interactive image. If you want more, you will have to opt-in for the PRO version, but we’ll talk about that later.
The plugin is responsive, and you don’t have to worry about the interactive images being properly displayed on any device. Not just that the image will scale according to the screen size, but it will work in most modern and older browsers (desktop and mobile). Draw Attention uses canvas elements when displayed in new browsers while it will fall back to image maps if you load it in an older one.
Features
Before getting to an example which will show you how powerful this simple plugin is, let’s see what to expect from Draw Attention:
- Draw – After you upload an image, you will get a chance to draw shapes on it. Select any part of your image which will become selectable/clickable
- Colors – Customize colors so that you can make hotspots fit with your site design
- Highlight on hover – Show another part of the image if a user hovers over the selected part
- Show more info – Display more information about the selected part of the image
- Go to URL – Redirect users to any URL if they click on the selection
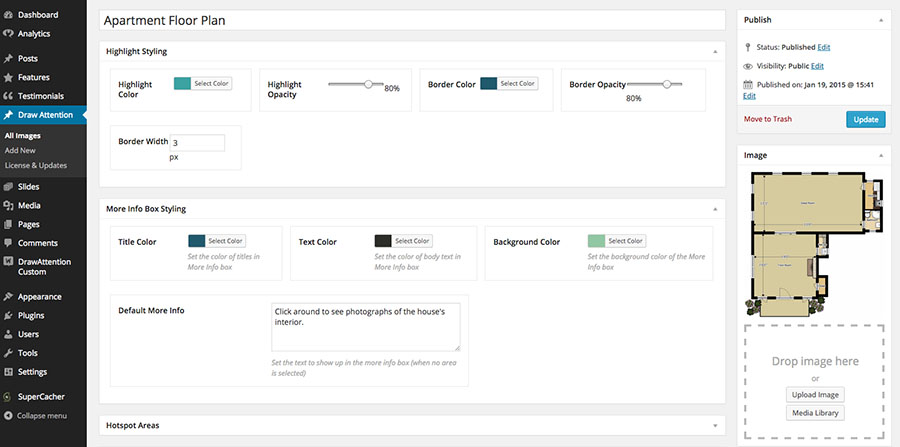
Example – Interactive map of Hawaii
We will use the example from the demo site to show you what exactly you can do with Draw Attention. So, let’s see what an interactive map of Hawaii looks like when created with the plugin.
The first thing you would have to do is to find an image of Hawaii islands. After you navigate to Draw Attention -> Edit Image, you should upload the picture to the area on the right sidebar. Once image loads, the fun can begin.
Here you get to choose colors for highlights (color, border, opacity, etc.), style the “more info box” (image, title, text color, etc.). If you don’t want to select each and every color for the image manually, you can quickly choose a color scheme from the right sidebar.
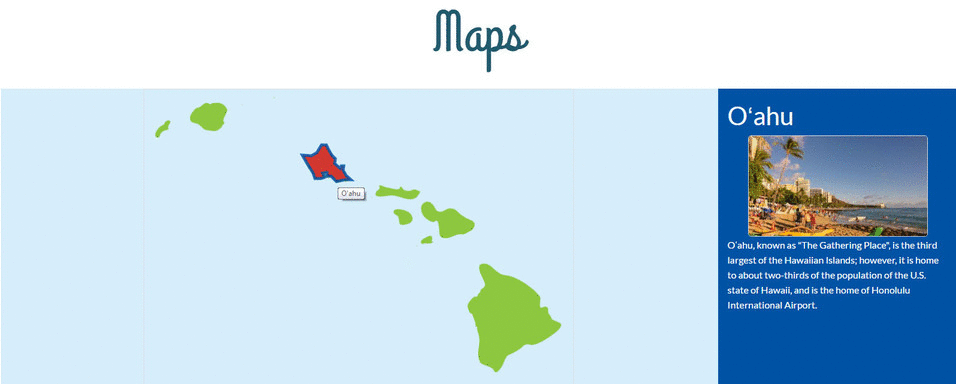
The most magical part happens in the Hotspot Areas settings screen. Here you will get your image loaded to full size. All you have to do now is to start drawing and create a new hotspot. You can add as many points as you want which means that you can create comprehensive selections as you want. You get to create as many hotspots, and each can have its own settings.
So, in this example, you should select one of the islands. Choose a title for the island, add a description and the extra image that will show once a user hovers the hotspot (right part of the GIF image shown above).
You should repeat the process for each of the islands you want to be interactive. Once you have your hotspots ready, just copy the shortcode from the right side. Paste the shortcode into a post, page, widget or wherever you want to show your new interactive map, and you’re done! If you wanted to redirect users to any other page once they clicked on the selections, you just need to select the URL instead of the description. Easy as that!
PRO version
While the free version will be perfect if you need just one image, the PRO version will allow you to have as many interactive images on your site as you want. Although this will be the most important thing to consider, the PRO version will get you even more than multiple images.
Layout Options feature will let you show more information about selected parts of the picture. For example, you’ll get to show info in a lightbox or in a simple toolbar which will pop up after a user hovers over the selected part of the image.
There are also twenty predefined color pallets, so you don’t have to customize each and every color manually. The PRO version will cost you $74 for a single site license, but if you need more than one interactive image, this will be a no-brainer.
How to regenerate additional image sizes
It is relatively easy to register new image sizes in your WordPress theme. After you have told your system how big your images should be, named them and decided how to crop them, you are free to distribute images anywhere you want. But what about the old images?
If you have used one of the techniques we have shown you, you have prepared the turf for new images. Whether you use newly register image sizes for post thumbnails or allow authors to use them in posts, new rules apply only for those images which are uploaded after you’ve made the change in the functions.php file. To change the older images, we suggest using the Regenerate Thumbnails plugin.
Regenerate Thumbnails:
PRICE: Free
- Go to Plugins->Add New
- Search for “Regenerate Thumbnails”
- Install and activate the plugin
- Navigate to Tools->Regen.Thumbnails
If you want to resize all of your images, simply click on the “Regenerate All Thumbnails” button and wait for the plugin to do the hard work.
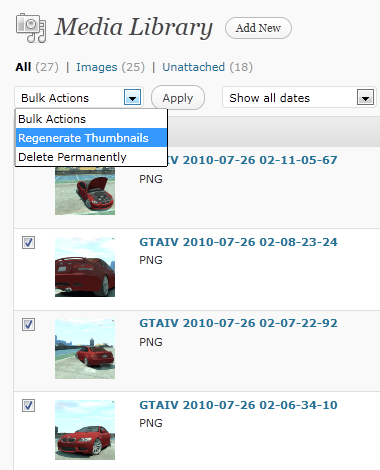
If you want to see the images which are going to be resized, or if you want to resize only some of the images, go to your Media Library where you will find a new option under “Bulk Actions” and one beside each picture in the gallery.
The good thing about the plugin is that it doesn’t delete your original images. It will only create new image sizes which you can use in your theme, while the original ones will be left for you to use them later or delete manually if you decide you don’t need them.
That’s it. Enjoy your new thumbnails or check out Simple Image Sizes plugin which can do the same thing.
Remove width and height image attributes with jQuery
When adding images to a WordPress post, the system automatically adds its height and width attributes to the picture. That’s usually a good thing, but there are times when you won’t like the fact that every image gets those attributes.
If you want to strip the attributes right at the point of upload, you can do that through a simple function which we showed you last time.
But if you read the article or tried the function yourself, you’ve noticed that it only affects images uploaded after the function was installed into your WP system. If you already have a database full of posts with inserted images, the aforementioned function won’t help you much with your old image attributes.
Since you probably can’t go through each and every image manually and delete width and height one by one, you are probably in a need of another function which will strip those attributes for all existing images embedded in your posts. In that case, you’re in the right spot ‘cause we’re about to show you a simple way of automatically removing width and height image attributes with few lines of jQuery code. Don’t get scared with the previous phrase – you don’t even have to know what jQuery is, just follow the next three steps and you’ll be done in a jiffy.
Remove width and height image attributes:
- Open header.php file from your theme folder
- Copy and paste this code anywhere between <head> and </head> tags:
<script src="http://code.jquery.com/jquery-latest.js">
</script>
<script>
jQuery.noConflict();
jQuery(document).ready(function($){
$('img').each(function(){
$(this).removeAttr('width')
$(this).removeAttr('height');
});
});
</script>
- Save changes
And you’re done! The code will do its magic after you open a post which contains an image and will remove width and height tags from it.
How to create custom image sizes in Media Uploader
If you are using Media Uploader to deal with images in WordPress, you have probably seen numerous options for images. Between many, you are able to choose an image size which you can send to your article.
There are the thumbnail, medium, large and full-size options to choose from, but all those options have predefined values. So, if you’re using a custom theme, more often than not you are stuck with changing width and height for each image over and over again.
Actually, you don’t have to do that. There is a neat little function called add_image_size() which is a great tool for developers. And after this article, you will find it useful as well.
Let’s say your theme has a custom width and you want to easily embed images to fit in there perfectly. Let’s say that width is 666px (we won’t go into why you have set the width to this number, it’s your choice). To do that, you need to add an extra radio button to Media Uploader. With the code below, you’ll be adding one more size which is the half size of the original one.
- Open your functions.php file
- Copy and paste this piece of code:
function custom_image_sizes() {
add_image_size( 'one-size', 333, 333, true );
add_image_size( 'another-size', 666, 666, true );
}

add_action( 'init', 'custom_image_sizes' );

function show_image_sizes($sizes) {
$sizes['one-size'] = __( 'Custom Size 1’, 'isitwp' );
$sizes['another-size'] = __( 'Custom Size 2’, '
isitwp' );
return $sizes;
}

add_filter('image_size_names_choose',
'show_image_sizes');
- Save changes
- Try adding an image from your Media Uploader where you should see your new size options under the “Attachment Display Settings”
Create automatic screenshot of any website and publish it as image in your post
If you want to display a thumbnail of a website, you would have to go to the website, print screen it or take a screenshot with a program or a browser add-on. Then you would need to modify the image, cut it to the right size and upload it to your WordPress so that you can use the screenshot in a post.
If you don’t have to take that snapshot every now and then, it won’t be a problem, but if you’re using screenshots of different websites more often, you will be happy to hear that there is an awesome function which will save you time and your nerves.
In this part of the guide, we are about to show you the complete function which creates a shortcode that you can use for taking snapshots of any web page you want.
Create automatic screenshot:
- Open functions.php
- Copy and paste the following code:
function wp_webscreen($atts, $content = NULL) {
extract(shortcode_atts(array(
"snap" => 'http://s.wordpress.com/mshots/v1/',
"url" => 'https://firstsiteguide.com',
"alt" => 'wploop',
"w" => '600', // width
"h" => '450' // height
), $atts));

$img = '<img alt="' . $alt . '" src="' . $snap .
'' . urlencode($url) . '?w=' . $w . '&h=' . $h . '" />';
return $img;
}
add_shortcode("screen", "wp_webscreen");
- Change default variables in the array
- Save changes
This function creates a shortcode that you can easily use anywhere on your WordPress website. Whether you want to use the screenshot of a web page in a post, sidebar widget or your footer, for example, simply c/p the shortcode in the right spot:
[screen url=”https://firstsiteguide.com” alt=”fsg” w=”600″ h=”450″]
What’s great about this function is that it saves the image as dynamic URL which means that once you create a snapshot with the shortcode, it will automatically refresh itself in the future and always show the current looks of the website specified in the shortcode.
Note that you can change the parameters of the shortcode directly from it. You don’t have to modify the code in the functions.php file if you want to take the snapshot of another URL or to take the snapshot in a different dimension.
Example:
Let’s say that you want to take a screenshot of Google and make it 200×400 pixels big:
[screen url=”http://www.google.com” alt=”Google” w=”200″ h=”400″]
You can make everything even easier by saving the shortcode into a button so that you can insert it into a post with a single click of a button.
Conclusion
You don’t have to install all plugins and functions we mentioned in order to improve the images on your WordPress site. But we hope that you have found at least a few tips that will help you to optimize images or make them better in any way.
