
Do you want to improve your online presence and set up your own website?
But, not sure how to build a website without the help of experts.
Most people assume that building a website for the first time is going to be hard and complicated. Let me assure you that with today’s technology, anyone can create a website from scratch.
You just have to follow some simple yet essential rules to do it right.
Hi there, my name is Artem.
I’ve written this free tutorial with step-by-step instructions to guide you through the entire process.
I’ll show you how to create your own website using the most popular content management system (CMS) WordPress.org. Over 40% of all websites on the web are built with this software.
If you are familiar with WordPress and want to build a website using it, use the link below to skip the introductory content.
Jump to “Step #4: Setting up your website with WordPress”
Making a website using the WordPress platform is a straightforward task and you can do it in 20-30 minutes. This guide is designed for beginners (no technical or coding skills needed).
At the end of the day, you will have your own domain name and a fully functional website.
How to Build a Website in 5 Easy Steps
There are five main steps that you need to take seriously to build a website quickly and easily. Here they are:
- Step #1: Selecting the right tool to create a website
- Step #2: Planning your website setup and structure
- Step #3: Choosing a domain name and web hosting
- Step #4: Setting up your website with WordPress
- Step #5: Picking a theme and designing a website
Also, I’ll cover additional (advanced) information to help you start a successful website as a beginner. Extra topics covered in this guide are:
- Content writing
- SEO optimization
- Website promotion
- Monetization techniques (if you are planning to build your website to earn money from it).
If you want a step-by-step guide on how to build a website in WordPress, you can jump directly do Step 4 of this article.
FirstSiteGuide provides free resources and guides to help you get started and grow online. We are 100% supported by YOU – our readers.
Disclosure: If you purchase products through links on our website (e.g. Bluehost, Wix, or Squarespace services), we may earn a commission. This comes at no extra cost to you, but it helps us to create even more useful content.
Step #1: Selecting the right tool to create a website
The first step is to find the most suitable software (foundation) that you will use for building your website.
When making a website for the first time, you will find out that there is a wide variety of options (such as WordPress, Wix, or Squarespace) with all kinds of features. And you can even learn how to code a website from scratch! But how do you pick a good tool/software?
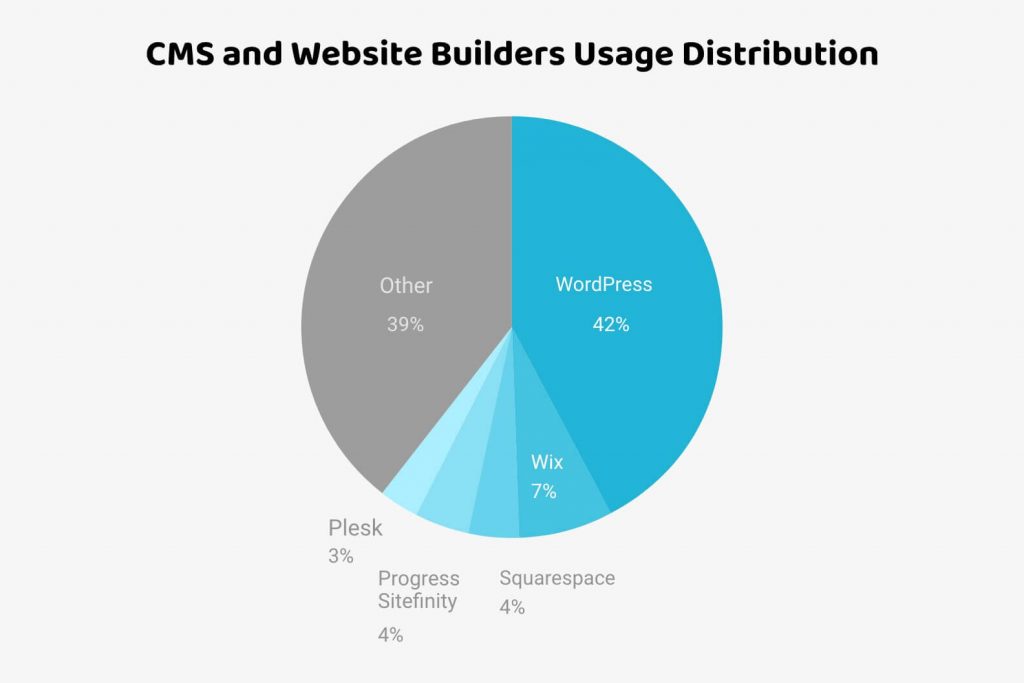
Below, I’ll show you the most popular choice and quickly explain some valuable facts about choosing the best software for your new site.
Here are some statistics showing the distribution of website builder technologies used for websites on the entire internet.
To select the right software, first, you need to determine what type of website you want to make. After that, you will decide what platform is the best fit for setting up your website.
- If you are planning to start a blog or to have a blog section on your website and post new content regularly, then I recommend building a website with WordPress.org CMS. We used WordPress to build our own website, FirstSiteGuide.com.
- If you are planning to create a static website, such as a portfolio, small business, product brochure sites, etc. which will simply have a few pages where you will add content to showcase your company, then you might want to use a website builder.
Since WordPress CMS is the most popular software and can be used for creating any type of website, I will be sharing how to build a WordPress website using a web hosting account and a domain name.
If you’ve done your own research and made a decision about using another platform, we have more guides specific to different website builders. Check out these step-by-step tutorials:
- How to Make a Wix Website in 2024
- How to Build a Squarespace Website in 2024
- How to Make a GoDaddy Website in 2024
- How to Make an Online Store with Shopify in 2024
P.S. If you have any questions about this guide or any other guides, I am more than happy to assist you. You can get in touch with me and ask for free advice.
Keep reading and let’s learn how to create a website with WordPress using an easy one-click install process.
Step #2: Planning your website setup and structure
This step is often skipped by people who are deciding to set up a website for the first time, but I think it’s very important that you spend some time and plan out your new website.
If you are making a website for personal use, you don’t need to complicate things. It doesn’t have to be a detailed plan. You can even draw it on a piece of paper.
Your plan will help you to decide on things like the structure of your website and determine what content, assets, and features you need to prepare.
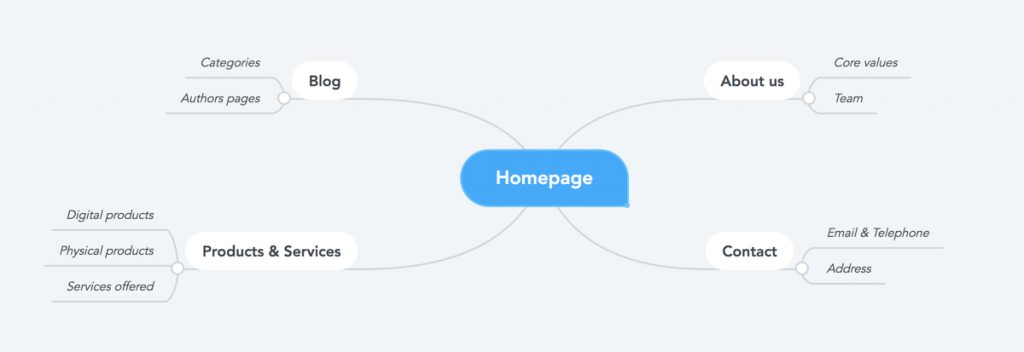
You can choose to simply draw that structure on a napkin or use online tools such as MindMeister.
However you complete this sitemap, it will give you a better understanding of:
- What pages your website will have;
- What content you need to prepare;
- What additional assets or features you need; and
- What software or website builder will suit you better.
Here is an example of a simple website structure plan:
Step #3: Choosing a domain name and web hosting
Along with selecting the right tool, it’s important that you choose an easy-to-remember domain name and a reliable web hosting service to publish your website online.
Let’s cover these two topics together!
Domain name
A domain name should represent your brand appropriately because it is the first thing website visitors and customers associate with you. The name could be your name or your company name i.e. yourname.com or yourcompany.com.
You can get started by checking domain name availability. Register a domain with the “.com” extension if possible.
Recommended tool:
Web hosting service
Choosing a reliable web hosting provider is essential, as this service will make sure that your website and content are available to readers round the clock.
If you are going to use a website builder to set up a website, web hosting is usually included within the services provided by the company.
With most website builders, you can also register a domain name when making a website (that way you can keep everything you need in one place) or you can buy it separately with one of the domain registrars.
Picking the wrong web host can seriously downgrade your website’s performance and functionality. It’s a lot like choosing a mobile SIM company because buying the cheaper one could also mean weak and unpredictable service, making it completely useless.
Hosting plays a major part in the process of launching a good website and making sure it’s always available online.
When it comes to reliability, some of the most popular hosting companies are Bluehost, Dreamhost, and Hostgator.
I recommend checking the comparison table below. The prices presented are special deals that we have negotiated with these companies for our readers only. Use the links below and get more than 50% off discount offers.
How much does it cost to host a website?
Below is a 1-year starter plan pricing comparison table of the 3 most popular WordPress hosting services (where you can register a domain for free).
| Bluehost.com | Dreamhost.com | Hostgator.com | |
| Hosting services price | $4.95 per month (billed for 1 year) | $3.95 per month (billed for 1 year) | $4.03 per month (billed for 1 year) |
| Domain name registration (.com) | First year free, $17.99 per year renewal price | First year free, $15.99 per year renewal price | First year free, $17.99 per year renewal price |
| Custom professional email | Free (4 email accounts) | $19.99 per year (per email account) | Free (unlimited accounts) |
| Storage space* | 50 GB | Unlimited | Unlimited |
| Bandwidth* | Unlimited | Unlimited | Unlimited |
| Total for the first year | $59.40 | $47.40 + $19.99 per email account | $51.53 |
Step #4: Setting up your website with WordPress
WordPress.org is the most popular online CMS (content management system) with a market share of 42% from all websites on the internet.
Let me show you step-by-step how you will make a website using WordPress software.
Creating your web hosting account
WordPress can be installed with one click through many popular hosting sites. No matter which hosting company you use, setting up a WordPress website is very easy (similar to website builders).
BlueHost is the top-recommended web hosting company on the official WordPress.org website. For this tutorial, I’ll be showing you how to create a WordPress website with Bluehost. If you choose to go with another hosting service, the process might be slightly different, but the main steps will be similar.
The section below explains how you can register with BlueHost and install WordPress software using their ‘one-click install’ process.
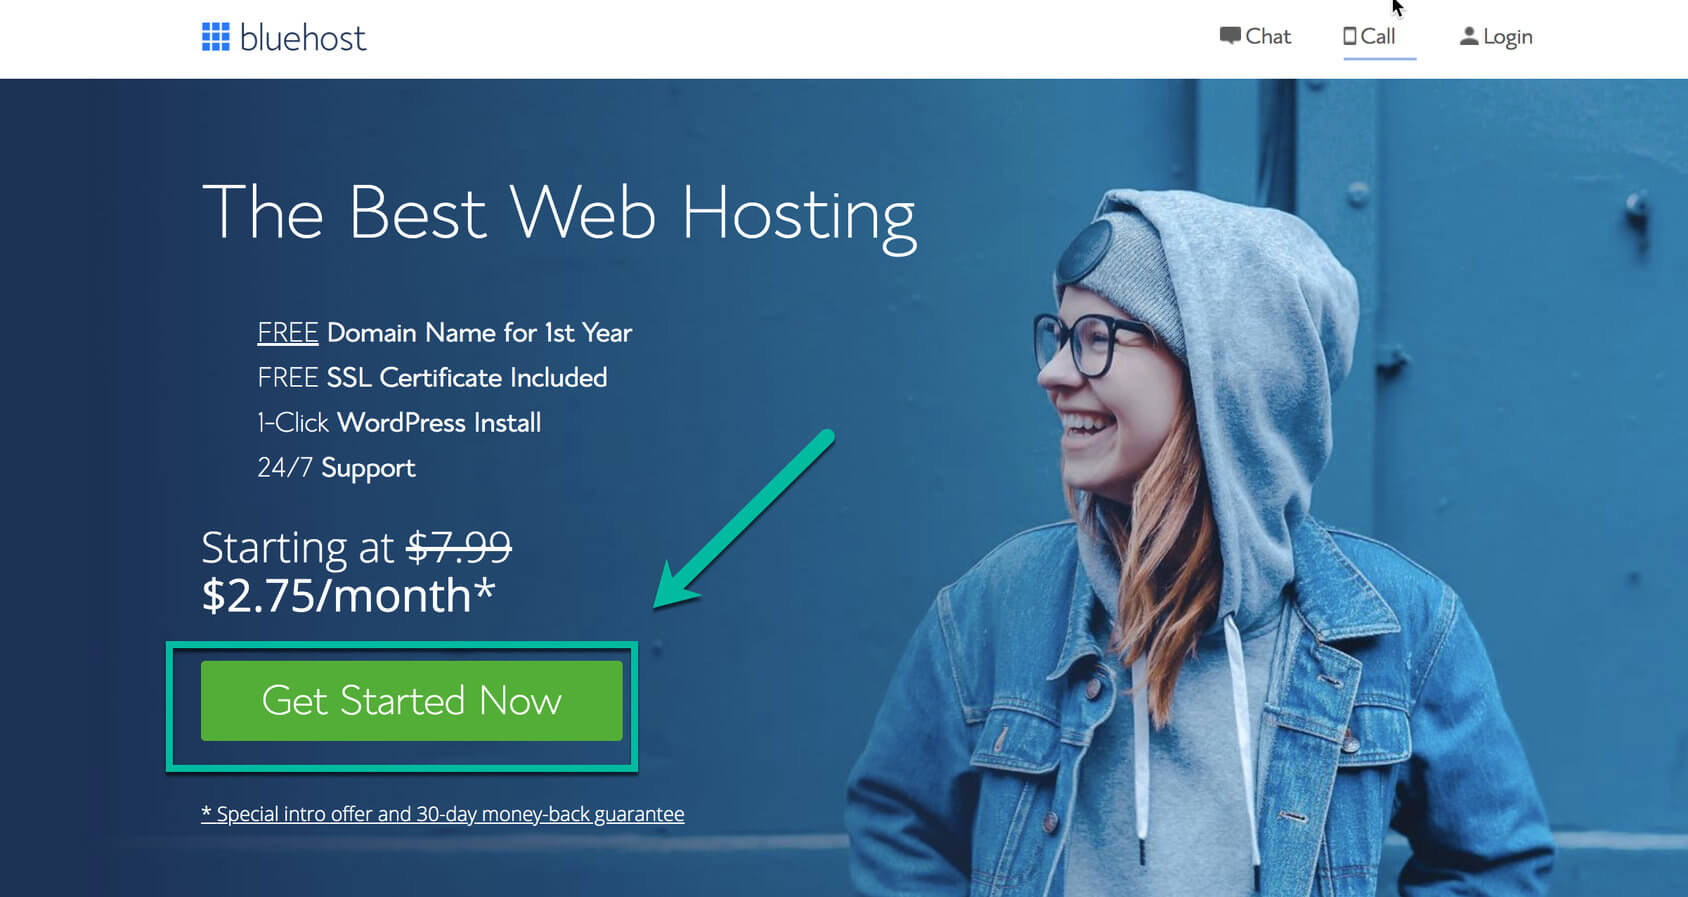
1. Visit the Bluehost site
Go to Bluehost.com and click on the “Get Started Now” button.
2. Select a hosting plan to start a website
If you are a beginner, choose the basic plan as it will cover all of the fundamental needs of your site’s functioning.
Once your website takes off and starts receiving heavier traffic, you can consider upgrading to the prime version of your hosting plan, which offers advanced features better suited to handle a greater inflow of traffic.
3. Input your website’s domain name
The domain name for your site has a significant part to play in its success. So, before you master how to create a website, make sure you invest enough time and effort to come up with a unique and catchy domain name.
Once you’ve decided on your new domain name, type it into the “new domain” box, after which BlueHost will indicate whether your desired domain name is available or not. If it is not available, BlueHost will provide you with a list of alternative domain names that you can choose from instead.
4. Register for Bluehost
BlueHost will then take you to the registration form, where you’ll fill in your billing details along with your personal information.
- Select your hosting package – The 12-month package offers the basics at the lowest price. But you can also consider the other two packages. After all, hosting is a long-term investment in your site’s development.
- Package extras – You can remove unnecessary extras from your package in the initial stages of your site launch and add them back later, if and when you feel the need. I do suggest adding or keeping the option of Domain Privacy + Protection. This service will hide your personal contact information from the global database.
- Payment information – Enter your payment information, check the box that you have read and agree to the TOS (Terms of Service), and click on the green “Submit” button.
Bluehost will send you a confirmation email when the payment goes through.
Next, you will set up your Bluehost account. You are one step closer to launching a website!
Create your account
Let’s create your account with Bluehost.
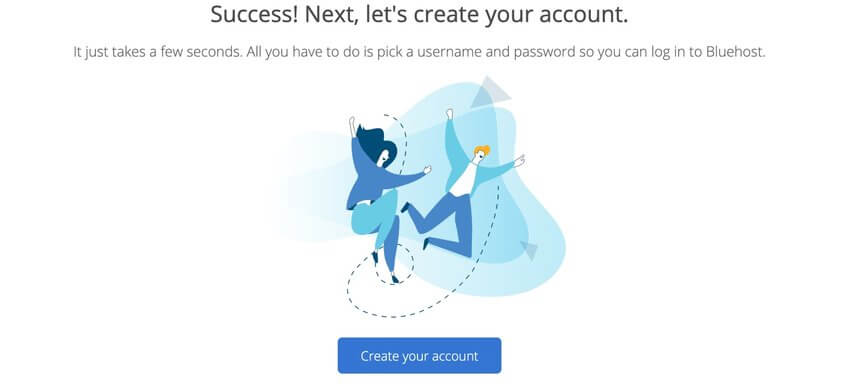
- Step 1. Click the “Create your account” button.
- Step 2. Enter your password and complete the account set up.
- Step 3. Your account is ready to go. Click the “Go to login” button.
- Step 4. Login to your account by entering “Email or Domain Name” and “Password”.
Next, you will start working on building your website.
Installing WordPress with Bluehost
After you log in to the account, Bluehost will offer a 4-step process to help you to create a website. I suggest that you follow this process if this is your first time creating a WordPress website.
You can also click the “Skip this step” button if you are familiar with the website building process, and you can install WordPress software yourself inside your Bluehost account.
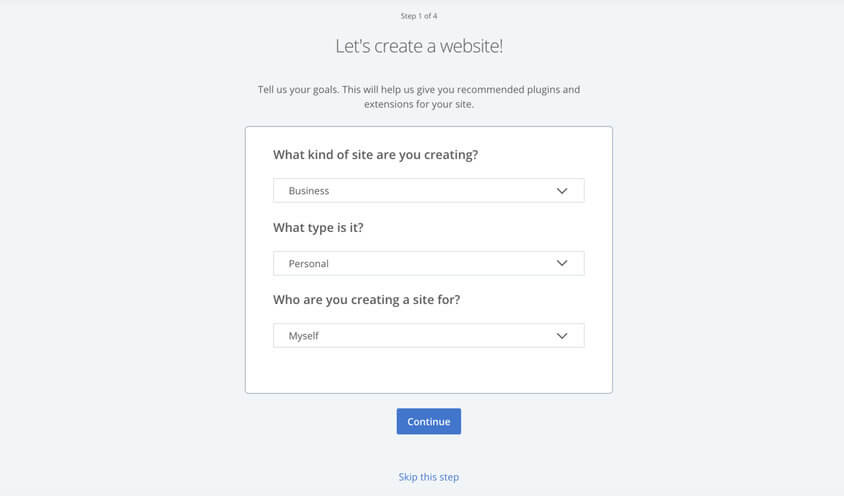
- Step 1. You will start the process by answering 3 questions: What kind of site? What type is it? And who is it for? In my example, I selected: Business, Personal, Myself. You can select the same choices or pick what fits your individual case.
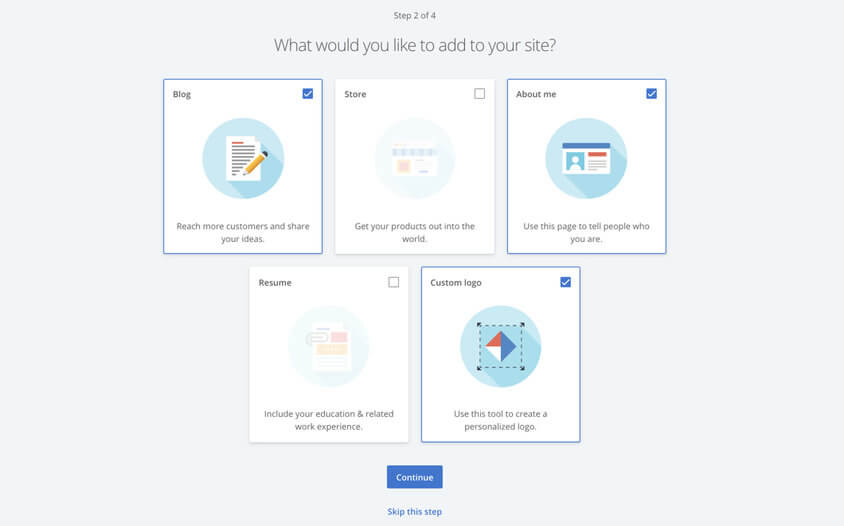
- Step 2. With this step, you can pick what else would you like to add to your site. Bluehost gives you a few options to choose from. There are five choices: Blog, Store, About Me, Resume, and Custom logo. In my example, I will select Blog, About Me, and Custom logo.
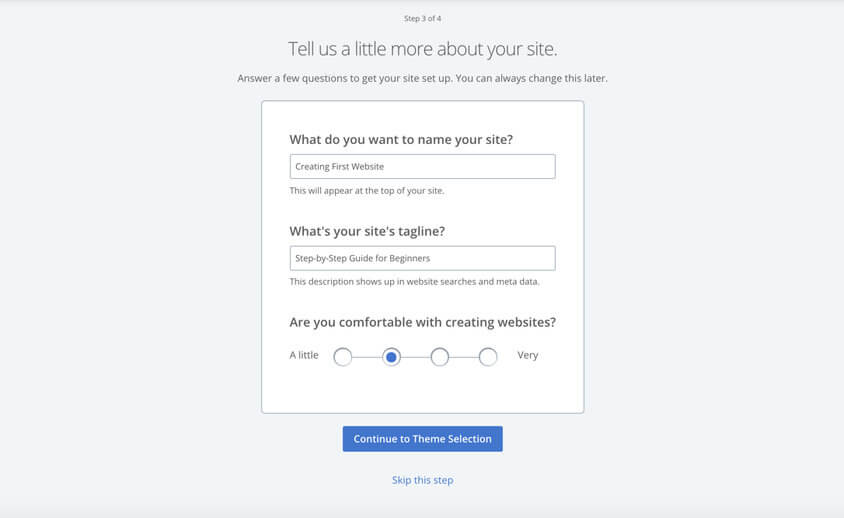
- Step 3. In this step, you’ll need to answer a few questions such as the name of your website, tagline, and how comfortable you are with creating websites. Note that you can always change this later.
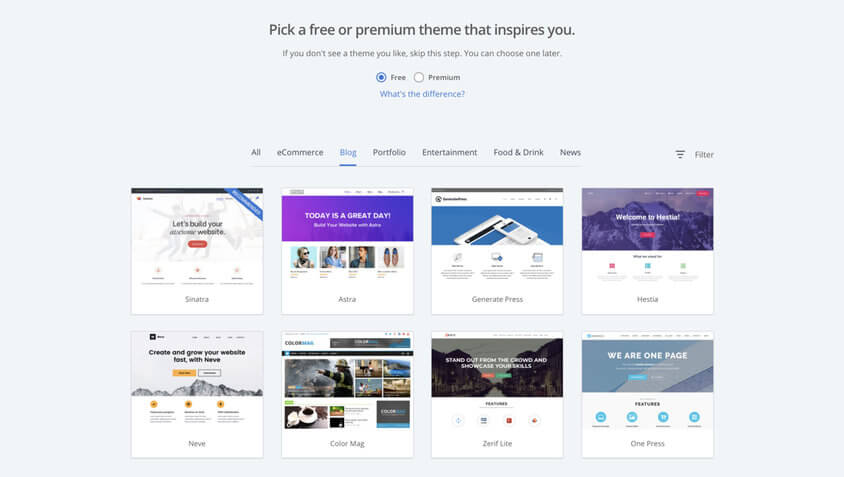
- Step 4. Picking a theme: These are pre-designed templates that you will use to build your website. You can check out the available options and see if you like any of them (if you don’t see a theme you like, skip this step). You can always change it and use a different one later. More information on this further on.
Once you complete these 4 steps you will be taken to your Bluehost account page. At this point, the WordPress software is installed!
Right now, if you enter your domain into your web browser you will see a “Coming soon” page. Let’s finish the process together and launch your website!
Launching your website
Inside your Bluehost account, you will see options to further customize your website based on Bluehost’s recommendations. These options are here for you to do some pre-launch customizations.
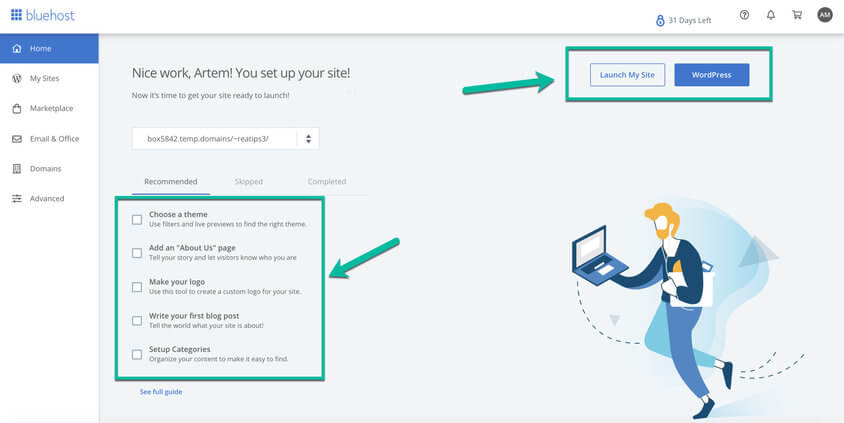
After you click the “Launch My Site” button, your website will go live!
If you open your website URL (Uniform Resource Locator) inside a web browser, don’t get frustrated if it doesn’t look quite right. This is just the default theme of your WordPress website. You can change this theme at any time. Plus, you will have to apply a few changes and add content to make it look complete.
You can access the WordPress dashboard from your Bluehost account by clicking the blue “WordPress” button in the top right corner of your screen.
Managing a WordPress website
WordPress works in two ways:
The front end
As the name suggests, this page will be visible to your visitors whenever they access your site. The tasks usually performed in the back-end like the plugin functionality enhancements and the customization of your theme will be visible to you and your visitors on the front-end of your WordPress website.
It also allows actions like commenting and sharing on other social mediums to be performed from the front-end by you and your incoming visitors as well.
The back end
This is commonly known as the WordPress dashboard – where you can oversee and manage every aspect of your site’s content, functionality, and web design.
If you want to access your WordPress dashboard, type “yourwebsite.com/wp-admin” into the address bar of your search engine. Here you can log in using your WordPress username and the password that you set for your account.
The dashboard
The WordPress Dashboard handles your website’s administration.
The left-side column is the hub of all of the administrative options and is the place where your website’s structure originates from.
The left-side column
The components of the left-side column include:
- Home – the home button takes you back to your main dashboard.
- Updates – this area informs you if any new plugins or themes are available that need to be updated or installed because a new version has been released. If so, you’ll see a red circle with a number in it, which indicates the number of updates that are needed.
- Media – every video, file, or photo that you’ve ever uploaded, either as a separate item or as part of a post, will be shown in this section. You can also upload directly to this section.
- Comments – these are the comments that your visitors leave on the content on your site. If you have any new comments that you haven’t viewed, their number will be shown in a red circle over this item in the left-side column.
- Appearance – this section will show you all of the options related to your WordPress website’s design, i.e. all of the available features, themes, and designs.
- Pages – you can manage all of the pages of your site, for example, the “Contact page” or the “About page” from this section.
- Plugins – these mini-programs are integrated into your website and help to increase its functionality. You can use them to convert your site into a membership site or do something fancy, like adding the social media icons for social sharing.
- Settings – this is where you go when you want to make technical changes to your site. For example, if you want to add a feature to your hosting plan, this is where it’ll happen.
By now, you should know how to set up a website. Next, I’ll show you how to select the right theme for your needs, and customize your website.
Step #5: Picking a theme and designing a website
The importance of a visual effect is no secret for anyone. We all like things that are nicely designed. The same applies to website design. Your visitors will stick around if they like the look and feel of your site or they will leave within seconds if it doesn’t appeal to them.
These days, you don’t have to be a professional web designer or developer to make your website look beautiful (here are some examples)!
Platforms like WordPress come with many pre-designed themes that you can choose based on your preferred layout and color scheme. And, you can do website design changes, add your own content, and make mobile-friendly websites.
If you’re unsure about how to build a website from scratch yourself, you could turn to a professional web developer or designer if you have the budget for it. Costs for professionally done websites depend on the scope of the project. They can start at $1,000 and go as high as $100,000 (learn more about website cost).
However, I’ll show you how you can do it for free on your own.
Finding the right theme
Your theme should suit the style and the brand persona of your company. For instance, a pastel-pink bakery theme might be free to use, but it wouldn’t be the right fit for the site of a steel manufacturing company.
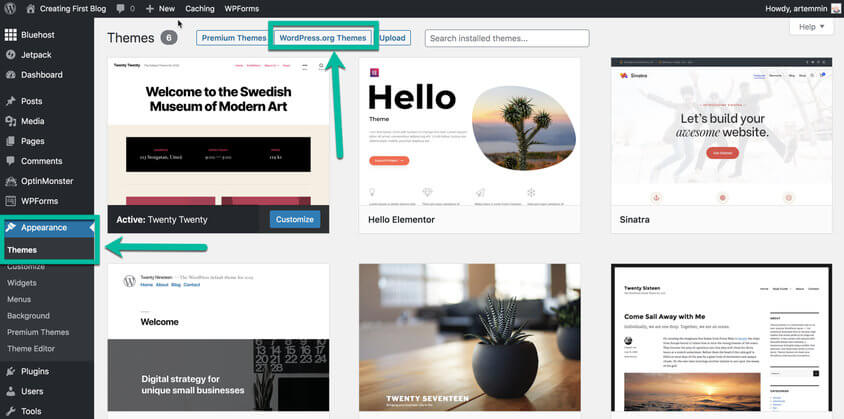
If you use WordPress to make your own website, you’ll have access to a wide variety of themes to choose from. Inside the WordPress dashboard, under the “Appearance” tab, click “Themes”. You will be presented with some popular options. You can click on the WordPress.org Themes button and search for free themes. There are more than three thousand themes available on WordPress.org.
It’s important to have an idea about which features you want to incorporate into your site as it will help you to filter out irrelevant themes.
Here are a few essential points to focus on while you make a list of your most important features.
Clear navigation
It is vital to have an accessible site where your visitors can find and access the info they need quickly. To achieve this aim, you need to have a clear view of the type of navigation you want – ‘Top Navigation’ is the most popular. Also, be aware that your chosen theme might not support the kind of navigation you need.
Integrating social media
Social networks can bring traffic to your site. It’s essential to incorporate sharing icons onto your web page which might not be supported by all themes.
Contact form
If you want to collect leads and contact info from potential buyers, you can add a contact form to your contact page. This will make it easy for visitors to get in touch with you right on the web page without leaving it.
Comments section
This section can help to improve viewership and audience engagement as it allows them to express their opinions and interact with your brand after reading your content. Most sites have a comment section enabled in the blog area to facilitate dialogue.
Search bar
Having a search bar on your site helps your visitors to navigate your site easily by doing a quick searching query. So, if your site holds a lot of content and you want people to easily find what they need, add a search bar to your website. Again, if you don’t want this in-built feature, be watching for themes that don’t offer it.
Logo and favicon
Branding should be one of your top priorities when making your website because the faster it conveys your company’s identity, the better.
If you wish to brand a site with your company’s logo and its color palette to provide an enhanced and more personalized user experience, you should choose from the themes that support such customizations.
Mobile optimization
With the increase in the usage of smartphones, there is a high chance that your visitor is opening your site on their mobile phone. A design that doesn’t fit well on a mobile screen could lead to a high bounce rate.
Therefore, you should make a website using a mobile-friendly theme as it’s an industry-standard in the modern digital age. When you choose a theme, make sure that it looks good on all sizes and types of screens.
Font and color
Your brand’s design and color aesthetics should be used on your website as well. These factors keep your visitors interested in browsing through the content on your site. If the same fonts and colors are used consistently, they can make your branding efforts more effective.
So, when you set up a website, ensure that the theme you choose offers:
- A choice of customized fonts and color palettes apart from the built-in ones.
- An option to manage colors separately for different sections of your site.
eCommerce support
You may not require this feature initially, but you might decide to convert your site into an online shop later. So, to be on the safe side, choose a theme that can support an eCommerce plugin.
Test it out
The proper way to check whether a theme works for you or not is to test it. So, set up your website and let it go live. Take the time to go through it page by page and check if the plugins, design elements, content, and other aspects of the site are working well.
Another option is to check some pre-built demo sites with the same theme. Or, you could go to the theme author’s web page, and from there, visit live sites that have used the same theme you’ve chosen to see their final appearance.
Next, I’ll be sharing some additional steps you should take when making a website. Some of these are advanced topics but if you get familiar with them you will be able to succeed on your online journey.
Speed up the site building by using dedicated software.
Alternatively, you can speed up the process of building your website by using specialized software, such as WebEasy Professional 10.
This tool will allow you to create a professional website with drag-and-drop simplicity. It can be used by anyone, without any coding knowledge, making it the perfect choice for individuals and small businesses.
WebEasy Professional 10 comes with a great number of ready-to-use templates and allows various useful integrations such as Google Maps, Social Media, and E-Commerce tools, it is also compatible with mobile devices.
Visit WebEasy and learn more>>Writing and preparing content for your new website
The word ‘content’ can refer to everything visible on your website. That’s why it is essential to create unique and creative content if you want to communicate a clear message to your visitors. Badly-created content frustrates and confuses the visitor and compels them to leave your page.
Before you start writing, ask yourself the following questions:
- Will it be relevant and exciting for your targeted audience?
- How should it be presented to your targeted audience?
Moreover, do you know that search engines reward sites that produce top content by ranking them higher in their search results?
This is why businesses allocate quite a lot of their time and resources to create quality content that is not only informative but also relevant to their audiences. Unique, up-to-date, and relevant is what your content should be!
Writing essential content
Once your website’s framework is created, it’s time to work on the content before your launch. It’s perfectly fine to have the necessary information and a few blog posts on your site when it goes live – but the best way to build your site up is to continue creating quality content that can increase its rank, the engagement on it, and its visibility.
It depends on what kind of website you are making, but below I’ll talk about the most common pages people have on their websites.
About us page
If a visitor wants to know about your company’s business and the type of products or services it offers, they will head straight to the ‘About Us’ page on your site. That’s why it is important to use this page wisely and put all of your essential information here. The ‘About Us’ page introduces your company to new visitors – the right content here can help you to build viable relationships and instill trust in your audience.
Here, you can be candid about what your company does and its plans for the future. If your site sells something, make sure that you mention those products and services here, as well.
Everything you write here should be easy to understand, because your prospects may not be aware of the technical jargon of your industry. Furthermore, try to keep the content creative and use the page to portray your company’s persona and brand rather than treating it as another sales pitch.
Use a more conversational tone to increase your conversion rate as this will help increase the chances of your visitors responding to a CTA (call to action).
If you wish to put a face to your cyber identity, i.e. your website, you could also upload pictures of yourself and your team, introducing them all one by one. This will help build trust amongst your visitors as it gives your site a more personal touch – in effect, this will give your credibility a significant boost.
Contact us page
This page serves two purposes:
- It is used by visitors that want to get in touch with you.
- It serves as proof to visitors that yours is a legitimate business with an office and an actual point of contact.
So, include your contact information and your company’s address here, to assure your audience of your reliability and the fact that you can cater to their needs. Apart from the regular contact form, the following information should also be mentioned on this page:
- The name of the contact person along with their role in the company.
- Your company’s name.
- Your company’s email address.
- The address of your company (if you have a physical building).
- Your company’s legal information.
- The privacy and support policy your company follows.
- The business days and hours for your company.
If your theme allows for it, add a map that shows your location to visitors as well.
Blog page
The blog section has the potential to attract leads and convert them into buyers. But most website owners have difficulty deciding on blog posts topics. I recommend that you let your company’s objectives guide you on that front.
You can also share your insights related to topics that will interest your readers and your industry at large. Your blog posts can be comprehensive guides or shorter pieces of content with some supporting information and technical details. Provide your readers with detailed information that they won’t be able to find anywhere else online about your topic.
Service/product page
This page is mainly used to list and describe your products and services – consider it an online catalog for your business. To ensure that the page content is effective and accurate, you will need to:
- Post high-quality pictures (not stock photos) of all of your products from various angles for your customers to see.
- Share a detailed description of your product, one that covers all of the critical aspects, in the description box.
Furthermore, if your website supports various options of payment, mention them clearly to inform your customers. Any information regarding your return policy, the rights and liabilities of both parties in the transaction, and return or exchange options can also be mentioned here.
Optimizing your website for Google search
Search Engine Optimization (SEO) is one of those areas that many people take for granted. One might think it is something you do not have to worry about, while others think it’s something you can’t do on your own.
The truth is that even if you’re a complete beginner, you can make your website accessible to search engines by applying basic techniques. Advanced SEO tools are great, but not necessary for a beginner.
You can improve your website’s SEO by following a few simple steps.
Get to know the Search Console
One of the first steps toward creating better SEO is connecting your web page to the Search Console.
This robust set of instruments created by Google will let you monitor your website at all times. You will get to know what your site looks like in Google’s eyes. You will see if there are any errors you should worry about. It is also possible to have Google alert you when someone mentions your site on the Internet.
For starters, it will be enough just to connect everything and start with the basics. As your website grows, you can learn more about Search Console and improve your SEO even further.
Apply title tags on all pages
Most beginners will simply give a name to their new website and write content on the page. While the name and content are important, it is also crucial to know that search engines check the title tags of each web page to understand what it is about.
A title tag is an HTML element that enables Google to recognize your site. Title tags are used on search engine result pages and social media, as well as web browsers that read this information to provide you with the correct data.
It’s essential to write compelling SEO title tags. You should include your targeted keywords with the title tag. It should be 50-60 characters long because that is the length Google can correctly display on the search engine results page.
According to Moz.com, the ideal title tag should be:
“Primary Keyword – Secondary Keyword | Brand Name”
Write unique and fresh content
Content is not optional when running a good website. While it is true that some websites can make it without a blog, those are rare, and usually run by professionals. Most websites should not avoid content.
But when it comes to content, you have to be careful. Google, like humans, does not like copycats. Make sure that you write unique content, and that it is relevant to what you do.
Speed up your website
Website speed is one of the factors Google considers when ranking you on its search page results. Since there is so much content out there, Google will give an advantage to websites that load faster.
Let’s say you have content similar to your competitor. Both articles are unique and well-written, but your site takes five extra seconds to load. Who do you think will rank higher on Google’s search page results?
Make sure that you’re hosting your website with a reliable web host like Bluehost. Good web hosting can do wonders for website speed. Optimize website images, and if you’re using a CMS like WordPress, make sure that you’re using a quality theme that does not load unnecessary files.
Optimize your website for mobile
Smartphones and tablets are everywhere. Even Google has started prioritizing mobile sites, so having one is something that you must have if you want good SEO results.
Using a website builder will be helpful in this case because you will be able to build a mobile-friendly site quickly (unless it is automatically created for you).
Internal and external links
Links are an essential factor, not only in SEO but for your entire website. This means that you should carefully link inside your site, and link one article to another when appropriate. But don’t overdo it. An average article of about a thousand words should have 1-3 internal links.
You should also start linking to high authority sources and try to get backlinks to your website. You can begin by writing guest posts, posting on social media, forums, or leaving relevant comments on other websites in your niche.
Don’t expect quick results
SEO takes time. And we are not talking about hours or days, but weeks and months. Whatever you do SEO-wise, you will have to be patient. While many try to predict how Google behaves, the truth is that no one actually knows its next steps and the way that it functions.
So, even after making changes, Google might need up to a month to recognize those changes. Just be patient and keep your eye on the site.
Testing your website before and after the launch
Testing your site before launching is crucial to ensure its success. Here are several types of tests:
Beta testing
With all of the work involved in making your own website, the prospect of a test run can be quite overwhelming. However, testing your site before its launch is essential.
Below are a few points that you should check before launching your website:
- Check content for spelling or punctuation mistakes.
- Check design elements like the alignment of images and fonts.
- Review possible development issues such as broken links.
- Check SEO details like the meta title and description tags.
- Inspect administration areas including your back-up systems and any issues related to your web host.
Post-launch testing
Once you’ve launched your site, you need to have a firm strategy in place regarding the next steps for your website’s growth and maintenance.
Some areas that should be covered include the following:
- Adequate backup.
- Collection of visitor’s feedback.
- A maintenance team available as needed.
- Preparations for promotion and measurement of various metrics.
Promoting your website and getting more traffic
Once you are done setting up a website, your work doesn’t stop there. You will have to work hard on your new site to get it in front of people.
Even if you have money, promotional campaigns have to be planned and executed. You can pay for advertising and start counting new visitors on a daily basis. But chances are that you can’t afford to spend thousands of dollars per month for paid advertisements, so let’s see what you can do to promote your website without spending a fortune.
Guest posting
If you have not done this already, start following your competitors. Read what they write about, and instead of cursing them for their success, try to benefit from their exposure. If you know information about your shared field, you can write about it. So, do not be afraid to get their contact information and ask for a guest post.
By writing something unique, you will provide value to the other blog. In return, you can ask the blog admin to have your author biography printed at the bottom of the article. Hopefully, you will even be allowed to mention your business or website. This will allow you to expand and reach new people that you couldn’t reach before.
Social media
Facebook, Twitter, Instagram, and the other social networks out there are great promotional platforms. Let people share your content, and don’t forget to contribute as well.
Follow others, and others will follow you. Show them your website, and do not forget to have social media icons on your site. Also, adding a social media bar on your site will prompt people to share your content more easily. 54.1% of bloggers in our 2020 blogging study say that they get the most traffic from social networks.
Use a personal email signature
If you’re sending a lot of emails, make sure that you include a signature. A simple email signature can be expanded with links to your latest blog articles or specific items from your site.
Some people will ignore this, but some will remember your site name or click on the link to read more.
Quora
If you have ever tried searching for an answer, the chances are Google has returned a link to Quora.com. This platform connects people, where one side asks something, while the other side gets an opportunity to provide an answer.
This is your opportunity to shine. Start following questions on Quora, and sooner than you think, you will get a chance to write answers. Here you are allowed to mention your business and share your articles, but you are not allowed to spam.
So, for example, if you have an article that answers a part of a question, make sure to link to it when writing a unique answer on Quora. If it was helpful, and if you’re lucky enough, this answer will be among the top ones that will also show on Google, and that will help you to promote your website.
Content Aggregation
Numerous content aggregation platforms work similarly to social media. You create an account and start following people who share interesting articles. While this is great, what you want to do here is share your content. So if you don’t already have a blog, create one now and start producing articles that you can share with others.
If you’re good enough, people will start following you, and post/share your articles through the network.
Comment on other websites
Comments are a strong promotional platform. Due to how common spam has become, the value of real comments has become even higher. So while reading other articles, don’t forget to leave valuable feedback.
When possible, mention your blog or even include a link to a resource from your site. But be careful; there’s a thin line between sharing a resource and spamming people.
Collaboration
Similarly to guest posting, you can start collaborating with other people. This doesn’t have to include only posting. You can help each other by word of mouth, social media, and comments. Maybe you will exchange ads, banners, or help each other in some unique way.
Evergreen content
If you put effort into creating content, it is just a matter of time until others will realize that. Having a piece of content that’s valuable to others will hopefully make them link to you for free.
This is often easier said than done because, among millions of new posts that go live online daily, it can be hard to get your page to stand out. But once you start building an audience, your world will change.
Proven ways to monetize your website
Now that you’ve learned about making a website, populating it with the right kind of content, and promoting it, it’s time to monetize your efforts. You can make some real money via your site using the following tactics and strategies:
Affiliate marketing
Affiliate marketing can help you to earn a commission by letting other brands and companies use your website and blogs for marketing their products. Many online businesses and advertisers are on the search for relevant sites and blogs in the same niche as them to help them sell their products.
When you build your own website, consider this strategy for making money through your site.
Ads placement
This refers to the white space on your website where Google Ads can be posted. When your website’s traffic skyrockets, you can turn this space into a money-making machine in two ways:
- Use Google AdSense to start, handle and maintain a flow of revenue, or;
- Sell this white space on your site directly to other brands and companies to display their ads on your website.
Many sites have an “Advertise With Us” page where they sell spaces at fixed prices to other brands – you can do that as well. Potential advertisers might want to see your website’s statistics. You can generate these with various tools like Google Analytics to help your ad clients make an informed investment based on your viewership and engagement numbers.
Online store
Selecting a theme that provides e-commerce support can later help you turn your site into an online store. If you are a business that’s already selling a list of products and services, you can use your website to target online customers as well. For this to work, you’ll need to:
- Increase your site’s security; and
- Invest in a secure and reliable payment gateway.
Creating an online store with WordPress and WooCommerce
The most famous WordPress plugin for online businesses is WooCommerce.
It offers many extensions and themes that are either free or come at a premium charge, all of which can help you to create an online store. WooCommerce enables you to create an online shop, upload your products and services, manage and modify them as well as handle all of your payment and shipping methods.
Due to its popularity, easy usage, and multiple extensions, WooCommerce is a part of more than 30% of all online stores.
Combining WooCommerce and WordPress can help you to create your website and convert it into an online store in a matter of days.
Fortunately, because of their friendly user interface, these tools also save you from a steep learning curve. It’s easier than ever to design your store, update your product list, and add all of the attractive features to entice your customers and have them revisit your website.
WordPress is widely used because it is user-friendly and versatile – you won’t need to spend a lot of time learning the mechanics of how to create a website with WordPress.
Numerous developers, coders, and programmers work with WordPress so that you don’t have to worry about how to code your own website. People constantly design themes and develop eCommerce plug-ins along with new features that you can add to your WordPress site.
The sky’s the limit to what you can do with WordPress as it can help you to create large commercial websites, small portfolio sites, and everything in between.
FAQs before setting up a website
Here are some helpful facts and common questions people often ask before they begin creating a website.
There are many tools available online that you can use to build a website with zero technical skills.
Most of the software that I mention in this guide offers easy-to-use functionality based on pre-designed templates or themes. This gives you the ability to make changes and design a website with visual editors where you just add your own content and images (some of them even offer drag and drop features). The visual editors operate similarly to Microsoft Word and PowerPoint programs.
So, whether you are 14 or 80 years old, you can build your own website without any web programming or coding skills.
It depends on various factors, but if you choose to create your own website with WordPress, then it would cost you less than $50. Hosting with BlueHost will only be $2.75 a month, which includes a custom domain. But if you wish to go premium, then investing in a theme will cost you between $40 – $120. Also, you might want to splurge on a few premium plugins that could cost you a few hundred dollars more.
If you choose to go with a website builder such as Squarespace, you can start your site for $12 per month, which makes it about $150 per year.
Alternately, a custom site could make you dig deep into your pockets. For a custom site, you could be required to pay somewhere between $1,000 to $3,000 for a custom website design from an expert, and going with a web development agency could cost even more.
The most popular (and best) CMS on the web today is WordPress. This software is used by both small businesses and Fortune 500 companies.
WordPress gives you complete freedom and its open-sourced (free) software. However, it requires web hosting in order to install it with one click, which you do have to pay for.
This is one of the most common questions people ask.
Yes, you can create a website entirely for free. For example, on several platforms like Wix.com, WordPress.com, or Weebly.com you can set up a free website. However, let me explain to you some of the pros and cons of these website builders:
Pros
* You get a chance to test and try the software before you commit to paying for it.
Cons
* If you sign up for a free account, you will use the service on a subdomain of the platform. Your business website name will look like this: “websitename.wordpress.com” or “website.wix.com”. Using these types of sites shows a lack of authority in your business.
* Your free site will be subject to the rules and restrictions set by the platform. Free platforms will limit the features that you can use and they can even place their own ads on your website.
If you’re serious about creating your website, you’ll have to start paying for full services and a custom domain name sooner or later.
Wix, Weebly, and Squarespace (have a 14-day free trial period) are definitely among the top candidates selected when people choose a freemium website builder.
We’ve done some research and reviewed the most popular website builder you can use to get online.
There is no such thing as just one best way of setting up a website.
There is a variety of software and website solutions designed to complete the task, depending on your requirements. Some available tools are universal and can be used to create any type of website. However, some do a better job to get the desired result for specific sites.
For example, WordPress is by far the most popular software for blogging or for websites that include a blog section. You can also create a simple or a complex eCommerce website with WordPress.
In recent years, there have emerged different website builders. Some of them have become very popular, such as Wix, Squarespace, or GoDaddy builder. These tools might be a good fit for you if you are creating a portfolio or a static website.
Yes, you can code a simple static website using HTML and CSS. However, this is often not an easy task if you want to add even some simple functionality to your website.
That’s why people often resort to using beginner-friendly software that is designed to make your life easier and avoid learning coding skills. If you wish to learn some basic HTML, read our HTML Tutorial for beginners.
Since WordPress is the most popular option, it means that there are more themes and extensions available. And since those allow you to do more with your site, the natural conclusion is that WordPress is better than Wix and Squarespace website builders.
However, using WordPress can require a learning curve, while most website builders are easier to use with their drag and drop feature.
As one of the most widely-used CMS systems out there, WordPress has a library of tutorials and guides that will teach you how to create a WordPress website.
As far as research about how to build a website is concerned, you won’t have to look anywhere else since here at First Site Guide we can provide you with all of the information you need about WordPress.
Thousands of businesses have gone online so there is a high chance that the domain name you want is taken or the “.com” extension isn’t available. If this happens, then:
* Search if your chosen domain name is available. You can access Domain Tools to check whether it is available.
* Sign up for Domain monitoring which will alert you whenever your desired domain names become available.
* If the “.com” extension isn’t available, buy a different extension.
* Try different keywords. If your primary name isn’t available, you can go with a different related name or maybe a different keyword (can even be a slogan or catchphrase).
BlueHost allows you to skip the registration of a name until later so that you can focus on creating your website.
Conclusion
I hope you have found all of the information that you need about how to make a website yourself quickly.
If you are uncomfortable with the process and still uncertain about how to create a website on your own, be reassured that nothing about a website is permanent. Your design, colors, and content can continuously evolve. Your website can always be changed according to what you learn about your target audience and your niche. Just do your best, and keep looking for ways to improve your site to make it the perfect extension of your business.

An extremely successful site… Well done to everyone who contributed, well done… Goodbye
l I love
Thank you so much for your amazing website and tools. I have been at this for a year and I still don’t have a clue what I am doing. This was a big blessing for me! Thanks guys!
Loved reading this post. Very informative even for me as an upcoming web dev.
Great article. Very knowledgeable and understandable to read. After successfully creating a website it is important to work on SEO skills to increase traffic to your site. I appreciate that you gave some tips on how to do that. Thanks for sharing this.
Thanks Nylon…we’re glad that you like our tips. All the best with your site!
As someone just beginning to entertain constructing a website, I found your article truly informative and a tremendous help. I am looking to create a webpage to feature my photography where I’ll continually be making changes such as adding new images. I’m planning to offer images for sale as well. I have decided on using Squarespace as my platform, but before finalizing my decision, I wanted to seek your advice if I made the right choice, or if you would recommend another platform such as WordPress. Thanks so much for any insight you can provide.
Kind regards,
Al Schotz
Hi Al!
Sorry for the late reply…you’ve made a good decision on Squarespace. It is the best platform for photographers who want to display their work and share it with professionals.
Good luck with your site!
This is a great article and you are bang on with your points about making a website. Be clear about what you really need and want to accomplish at this point- you are right to this point. It can be really great for people like me who are looking for grabbing more knowledge about it.