
Navigation menus (usually referred to only as menus) are a vital part of every website. Imagine them as an interactive map of a blog. They allow displaying the entire site’s structure and, at the same time, menus help visitors to navigate through different sections and pages more comfortably.
Today, it is hard to find a blog without a navigation menu. Whether you’ve stumbled upon a news portal with thousands of posts and numerous categories, food blog, fashion blog or a simple one-pager blog, a menu will probably be visible on top, very close to the header.
So, except in unusual circumstances, a navigation menu is a must-have feature. Because of that, creating a WordPress menu is something that should be on top of your to-do list.
WordPress menus
Luckily, designing WordPress menus can be fun. Instead of coding and thinking about how it will work on a blog, WordPress developers have built an intuitive and user-friendly system. It lets you put together menu pieces by using a simple drag & drop interface.
[VIDEO] Creating Menus: ► Subscribe for more useful videos
The design of a menu in WordPress depends on a theme. It can look big or small. Some WordPress menus are animated and dynamic. Other ones are regular and static. Some can have entire posts, maps or forms stacked up within the navigation. It all depends.
If you don’t have a nice menu to work with, you can blame the theme developer for that. But before you start screaming, have in mind that the entire thing is completely customizable. Also, many fantastic plugins can transform your plain old WordPress menu into an application of a kind.

Today, we are not going into details about plugins and detailed customization. Instead, we’re going to focus on adding standard navigational elements in WordPress that every beginner can start using immediately.
What can you put in a WordPress menu?
Without installing additional extensions, WordPress menus allow you to add pages, posts, custom links, and categories.
How many menus and menu locations can you expect?
There are no limitations to how many WordPress menus can you create. So, feel free to build various ones and swap between them when necessary. By having the ability to create numberless menus, you can create separate navigation lists, social menus or you can even add menus to sidebars.
Although all WordPress themes come with at least one location where you can display a menu, most of them offer a few places to work with. When having more complex sites, it will be necessary to display menus in more than one area so that visitors can feel more comfortable when navigating between pages.
How to create your first WordPress menu
To get to the Menu editor in WordPress, please navigate to Appearance -> Menus.
If this is a fresh installation of a site, you can expect an empty page divided into two segments. On the left side, a few tabs hold all the available elements which can be added to a menu. On the right side, you get to create new lists and adjust their structure and settings. Before you can see the settings, you should create a new menu:
- Come up with a recognizable name and fill it in
- Click on the “Add Menu” button on the right side
Instantly, the right aspect of the screen will change and now you will see sections where you can edit the menu structure and its settings. But first things first; let’s add some elements to your new menu.
Add menu elements
For this step, your primary focus should be on the left section of the editor. As we mentioned earlier, you will find tabs that hold pages, posts, custom links, and categories. In most cases, an average WordPress blog uses pages and categories as menu elements. But that doesn’t mean that you shouldn’t add other components there as well.
- Open any of the tabs
- Select pages, posts, and categories or add custom links
- Click on the “Add to Menu” button on each tab before switching to the next one
Adding posts, pages, and categories is easy since you only have to select them from the list. But if you are adding a custom link, you should have the full URL of a page (example: http://www.google.com). Also add a name (label) that will be visible for that link (example: Google)
Arrange menu items (drag&drop)
Once you add more than one menu item from the left to the right side of the editor, the elements will appear under Menu Structure. Here, WordPress allows you to drag&drop items and thus rearrange them into any position that you fancy.
By clicking on the little arrow icon on the right side of each element, WordPress will reveal a few extra settings. Then, you can quickly change the label of the menu item (a name which appears on the list). Also, here you can control the arrangement of menu items by clicking appropriate links – for example, move the object up and down, send it to the top or place it under another piece to create a submenu.
You can also easily remove the element from the menu by clicking on the red “Remove” link found on the bottom of the card. Don’t worry; this action will not delete the selected page, post or category, but it will only remove it from the menu that you are editing. If this were a custom link, it would delete it so make sure you remember the URL if you decide to add the same custom link again.
How to create a submenu
Submenus are nested menu items that depend on each other. The elements of a submenu are called parent and child menu items. In order to view a submenu, a user usually has to hover the mouse cursor or click on the parent item. Submenus are used to organize content into categories and to show a more compact navigation menu that’s easier to comprehend.
To create a submenu with a drag&drop technique, move one item below the other – but make sure to move it just a little bit to the right side before releasing the left mouse button.
If you just don’t like to drag&drop items (and truth to be told, sometimes it can be frustrating to achieve what you had in mind), WordPress allows you to control the elements via simple links:
- Add both parent and child items to the menu
- Click the little arrow on the menu item you meant as a child (the indented one)
- Click the “Under ‘parent’ section” link where “parent” will be the label of the item above it
If you decide to remove a submenu item, you can just move it a little bit to the left. Alternatively, click the little arrow on the item and select “Out from ‘parent’ section” where “parent” will again be a label of the item above it.
Menu Settings
Before saving the newly created menu, there are two more important options you should take care of.
- Auto add pages – anytime a new top-level Page (the main one, that has no parent) is created, it will automatically be added to this menu
- Display location – if a theme allows you to use multiple menus, select its location from the list
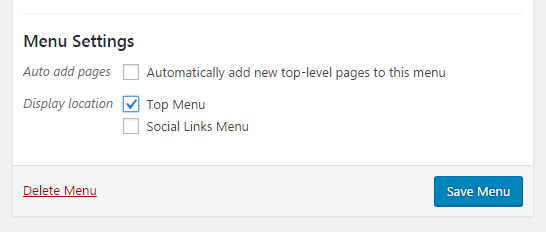
When you are happy with the structure, don’t forget to click on the “Save Menu” button which can be found both on the right top and bottom of the editor.
Screen Options
On the very top of the page, you can find Screen Options tab. Once clicked, the tab will display a few more settings that let you control menu settings.
- Boxes – in addition to standard elements, you can show Tags and Formats which can be then added to menus
- Advanced menu properties – add Link Target, Target Attribute, CSS Classes, Link Relationship (XFN) and Description
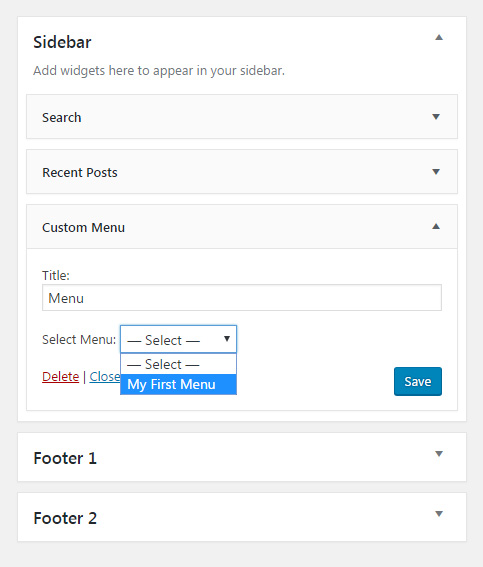
How to add a menu to a sidebar
Even though themes have predefined areas for adding menus, you can easily add custom ones to a sidebar or any other widget-ready areas.
- Go to Appearance -> Widgets
- Find “Custom Menu” widget from the left side
- Drag and drop it to the right side to any widget-ready area you have (like a sidebar)
- Choose a name
- Select a menu you previously created
- Click on “Save” button
If you are not comfortable working with widgets, please follow the link to learn more about customizing widgets in WordPress.
Conclusion
Creating a website without a navigation menu is just like slapping your visitors straight to the face. So, before enabling a site to the public and promoting it, make sure to create a functional WordPress menu that will help you and visitors to move around the site more quickly. A good navigation menu can also help you rank better on search engines.
We hope that this tutorial helped you with the first step towards WordPress menus and that you will be able to create new ones without difficulties. Don’t forget to create submenus if needed, and use additional locations for displaying navigation menus. It is also possible to add menus to widgetized areas. But if you want more control over WordPress menus, it will be necessary to change a theme or install additional plugins.
