
A website owner must be familiar with WordPress default user roles and capabilities to provide access to the specific dashboard areas/admin panel to specific users. This is necessary to manage any WordPress site and define what users can do based on the role assigned to them.
WordPress comes with a complete user role management system with a variety of types of user roles. The system also defines what a particular user is allowed to do or what a user is not allowed to do. With the development of your WordPress website, it is necessary to understand user roles and permissions.
A website owner can easily limit a user to specific tasks such as installing a plugin, creating a page on the website, editing posts by other authors, moderating comments, and more. Preventing other users from having administrative access ensures the site’s security. This also keeps the website safe from any accidental changes that could result in the breakdown of the site.
Let’s examine what the user roles and capabilities are in WordPress and how you can use them while managing your WordPress site.
What is the user role and capability in WordPress?
What is a user role? A user role describes permissions established for selected users to accomplish a group of tasks. In a default WordPress installation, there are pre-defined roles with different sets of pre-defined permissions. Every user role has a specific number of tasks that they are allowed to perform, which are known as “capabilities.”
WordPress user roles and permissions define the controls and rights for your website, ranging from super admin to a subscriber. Each and every user role has a defined set of capabilities and permissions which are assigned to them.
Capability refers to a specific set of activities that a user is allowed to perform on the site. Every WordPress user role is well-defined. There are no misunderstandings about the areas that each user role can access and the actions that they can perform.
There are a variety of capabilities, including “moderate_comments”, “publish_posts”, “edit_posts”, and “edit_users”. Although every user role has a pre-defined set of capabilities, new capabilities can be added and/or removed from each user role. The user roles make it possible for WordPress websites to have several authors and hundreds of registered users. This accessibility has converted WordPress from a simple blog publication platform to a public platform that is skilled in operating membership sites, online publications, and many other kinds of sites that host many users.
For example, a WordPress user role includes capabilities such as:
- Managing comments;
- Writing blog posts;
- Adding pages;
- Installing or updating plugins or themes; and
- Adding new users.
User roles are easy to use. They make WordPress sites accessible for multi-author concepts.
The super admin role has full access to all areas of a site, whereas the subscriber role has the least access. The subscriber role is only allowed to read posts but not to write or edit them. The contributor role can write posts but is not allowed to publish them. The author and editor roles are almost the same with a small difference, while the administrator has access to all of the features which are included in administration for a single website.
New roles can be individually added and removed by using plugins. The website administrator is allowed to edit and publish the posts, manage plugins, create pages, moderate comments, manage themes and other users, and much more.
Let’s scroll down to examine what we are going to cover in this article:
WordPress user roles
[VIDEO] Adding New Users: ► Subscribe for more useful videos
Six pre-defined user roles are available in WordPress:
1. Super administrator
2. Administrator
3. Editor
4. Author
5. Contributor
6. Subscriber

Let’s start with a brief description of WordPress user roles:
Administrator
This role is assigned to the most powerful user. The administrator role is assigned when a website is created. The administrator is at the top of the pyramid as it is assigned to the owner or to the main developer of the site. They have access to all of the settings, features, and options of WordPress.
The WordPress administrator role can update WordPress, including all of its plugins and themes that are installed on the website. Administrators can add new users to the website. Administrators also have the authority to assign user roles and permission to others.
In short, an administrator can do almost anything on their website.
Editor
The editor user role allows you to edit or view any content on the WordPress site. Editors can read posts, leave comments, edit and delete posts, publish posts, upload files to the media library, edit and delete pages and content from users higher than themselves such as administrators, manage categories, and they can also moderate comments.
Editors are only one level behind the Administrator. They have full access to the post screen, so they can delete and edit anyone’s posts, add categories and tags, upload media, go to pages, and edit or delete anything in the area of the pages. When it comes to comments, editors can approve, spam or trash any comments.
However, the editor doesn’t have permission to add widgets, plugins, WordPress settings. An editor also cannot add or remove users.
Author
The author role can log in to the WordPress Admin area. Compared to the editor role, they have a minimal set of permissions.
The author role can read posts, comment on posts, edit and delete their posts and publish their own posts. Authors cannot create new categories. They have to choose from the existing categories. The author can see comments but cannot approve or delete them. They can’t add widgets or create any sort of plugins on the site.
This role is designed to be for someone who creates the right kind of content for your website and is trusted to manage and publish their own content.
Contributor
The Contributor user role can add and edit new posts, but they cannot publish any of their posts. This user role can write blog posts and articles, but it doesn’t have permission to publish them. This means that after they write a post, it is moved to draft, and an administrator or editor will review it. Also, while writing their posts, they are not allowed to create new categories, and they have to select categories from the existing ones. However, a contributor can add tags to their posts. The main disadvantage of this role is that the contributor cannot add any images to their posts. They also can’t upload any of the files.
The contributor role can view comments, including those pending moderation, but they are not allowed to approve or delete any of the comments. They don’t have any access to settings, themes or plugins.
The contributor user role has very few permissions in WordPress, and the ability to submit content for review is its default permission.
Subscriber
The Subscriber user role has very limited capabilities, and remains so, unless the default capabilities are changed. Users who are assigned the subscriber user role can log in to the WordPress website, can update their profile info, change their password, and have a very limited ability to modify the WordPress dashboard.
Subscribers are not allowed to write or publish articles. They can’t touch the administration area. This user role is important for those people who often read blogs or comment actively. It makes it easy and fast for people to comment on a blog.
The subscriber role is also assigned to users who have subscribed to any website using mailing lists, RSS feeds, or other features to receive updates from the website.
Super administrator
The super administrator role in WordPress has been created for the multisite network capability of WordPress. This role has complete responsibility for all of the websites within one network, and they can manage all of the features of the sites.
Super administrators have complete authority to delete or cancel other users, even the administrators. Because of this, it is very important to only assign this role to trusted team members. A super administrator can control many parts of your business, your network and other users both negatively and positively.
The super administrator role can create new websites, and manage its plugins and themes. They can also add, delete and manage content on a multisite network. This role controls the networks, all of their settings, and security matters. The very first user who sets up a multisite network is known as the default super administrator.
How to add a new user to a WordPress website
There are three ways of adding new users to a website:
- Manually add a new user;
- Users create their own registration; or
- Create a paid membership website where only specific people can register and pay.
Manually adding new users to a WordPress website
This option is best when you only need to add a few people as users on your site. This is very easy to do manually with the WordPress built-in management system.
Manually adding new users is an option for the following:
- Small Businesses with a small number of employees who are managing their website.
- Non-Profit organizations with a few volunteers maintaining their website.
- A blog website that hosts posts with multiple authors, for example a fashion blog that is written by several friends.
- Online shops where multiple people manage shipping, inventory, and more.
To add a new user to your site manually, just follow these simple steps:
Go to the “Users” section in your WordPress website’s dashboard and click on the “Add New” link.

On the new page, a form will appear with the following options to complete.
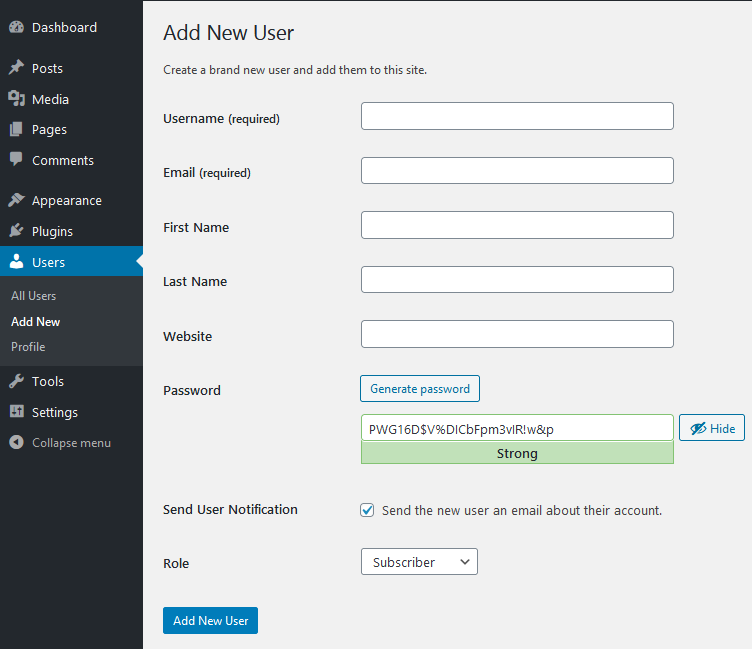
Here we need to enter some information:
- Username (Required)
- Email (Required)
- First Name
- Last Name
- Website
- Password
- Send User Notification
- Role
Username: A Username is mandatory. Try to enter a simple and easy user name for ease of use. Keep in mind that you cannot easily change a username later.
Email Address: In this field, you need to enter the email address of the user. It is also mandatory. Double-check the email to ensure that it is correct because it might be needed in the future to reset the password and for email notifications.
First name: In this section, enter the first name.
Last name: In this section, enter the last name.
Website: In this section, enter the website URL.
- Note: You can leave First name, Last name, and Website fields blank as they are optional.
Password: In this field, you need to set a password for the new user with which they will be able to login into the WordPress website. It is always recommended to set a strong password that is not easily guessable.
WordPress also provides a password generator tool to generate strong passwords. You can generate a password by just clicking on the “Generate password” button, and it will automatically generate a strong password for you.

Send User Notification: Under the password field is a checkbox for “Send User Notification”. By checking this box, the new user will receive email notifications about their account.
Role: In this last section, select the user role from the drop-down menu as shown in the image below.

After filling in the required information, click on the “Add New User” button at the bottom of the page and a new user will be created on the website.
Open your website so that users can register themselves
This method can be used if you want to let users register themselves. Using this method will save you a lot of time compared to adding all of the site users manually. It takes far less effort if you let them create their own account.
To enable this feature, just go to Settings:
- Select “General” settings from WordPress admin.

- Check the box “Anyone can Register.”

Below is a New User Default Role, which is set to the subscriber role by default. From that drop-down menu, you can select the default new user role.
Tip: It is better to allow users to register as subscribers or contributors. If you allow them to register as authors or editors, they can publish any post on your site without your knowledge.
Creating a paid membership program for your website
This method allows you to create a paid membership program for website users. This also gives you the option of sharing your content with specific people. Only those who purchase a subscription or apply for site membership can get access. Your content becomes premium, protected behind a paywall, and not everyone can access it. By using this feature, you can sell online course books and much more.
To implement this method, you will need to add a WordPress membership plugin to the site. For this purpose, you can use the “MemberPress” plugin. It is the best and most reliable plugin to use.
How to delete a user from WordPress
In this section, we will explain how to delete a user. Just as you can add any user, you can also delete them.
- Go to the “Users” section in your WordPress website’s dashboard.

- Here you will see all of the users that are registered on the website.
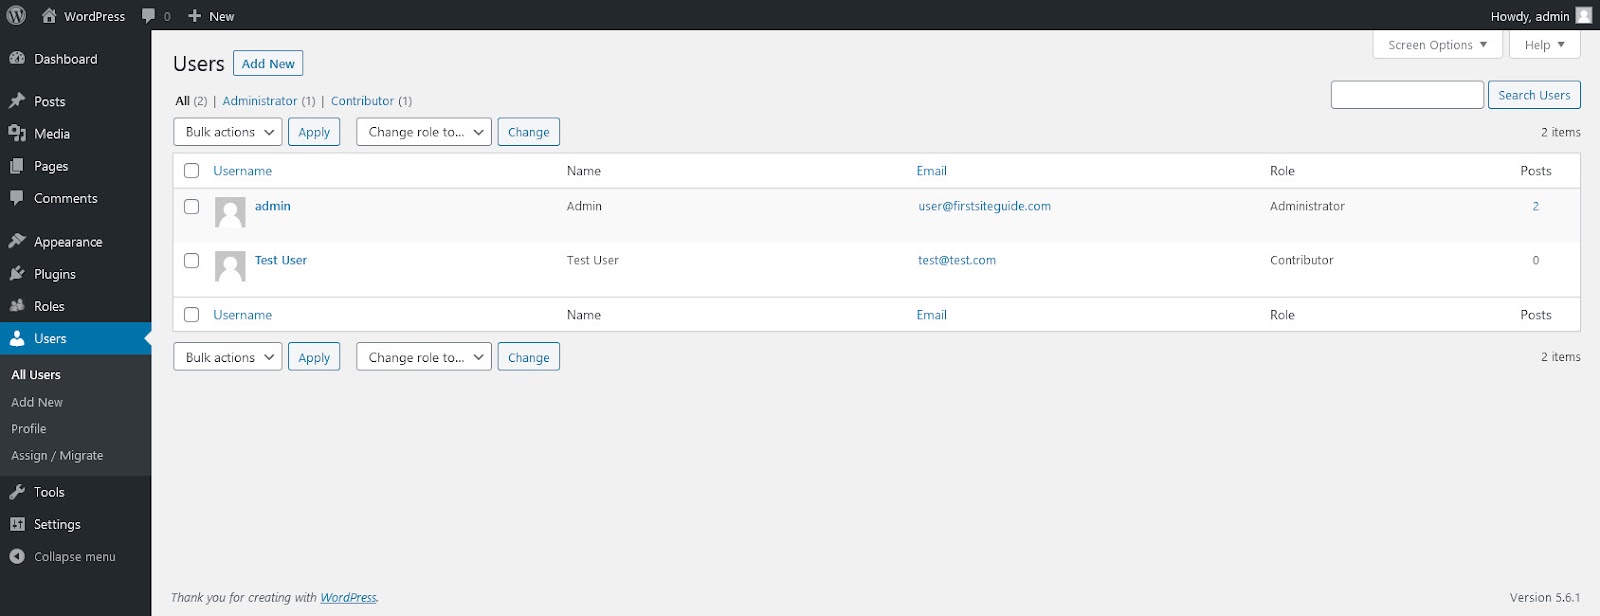
- From the list of users, select the user that you want to delete. Hover your cursor over the user you wish to delete and click on the delete link that comes up.

- This will take you to the “Delete Users” confirmation page. It will show two options, which are :
- Delete all content.
- Attribute all content to:

- Now, select the” Attribute all content to:” and then choose a new user for this post.
- Click the “Confirm Delete” Button, and the user will be deleted from the website.
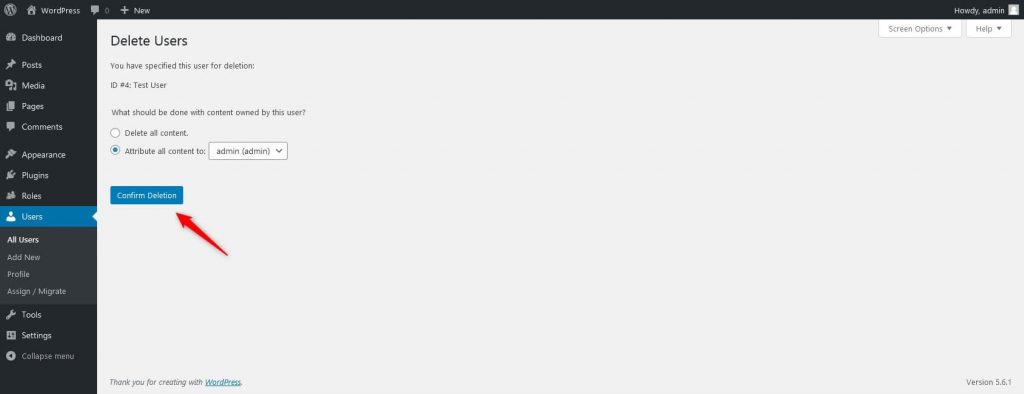
The steps here are described so that you can save your content, and it will also protect your old content as well. This should only be done when you are not sure about what you want to do with deleted posts.
How to change the user role in WordPress
In this section, we will show you how to change a previously assigned user role into a new role. This method is handy when you want to change the role of a user based on their responsibility.
To change a user’s role, follow these steps:
- Log in to the WordPress dashboard.
- There is an option given at the bottom left side of the menu bar with the name ‘Users’. Navigate to it and then choose All Users from the option User → All Users.

- A new screen will appear, and you will see a list of all registered users. Hover your mouse cursor over the user you want to edit and click on the “Edit” link. (You can also search for a user through the search option available in the top right corner.)

- A new page with the user’s profile will appear. You can edit the user profile’s information as well as their role.
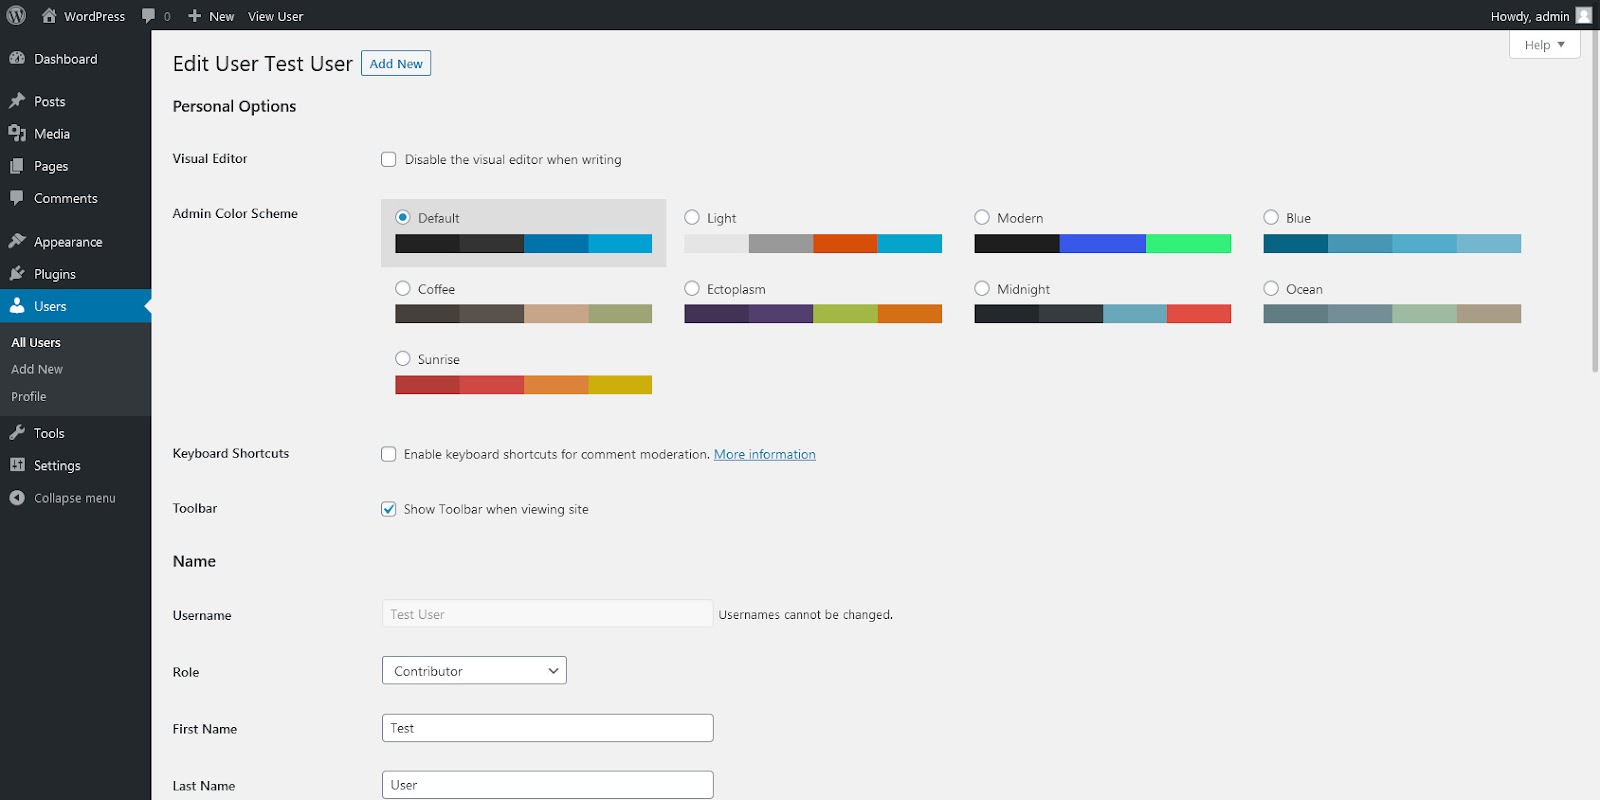
- To change the user’s role, click on the “Role” dropdown menu and select the new role that you want to assign to the user.
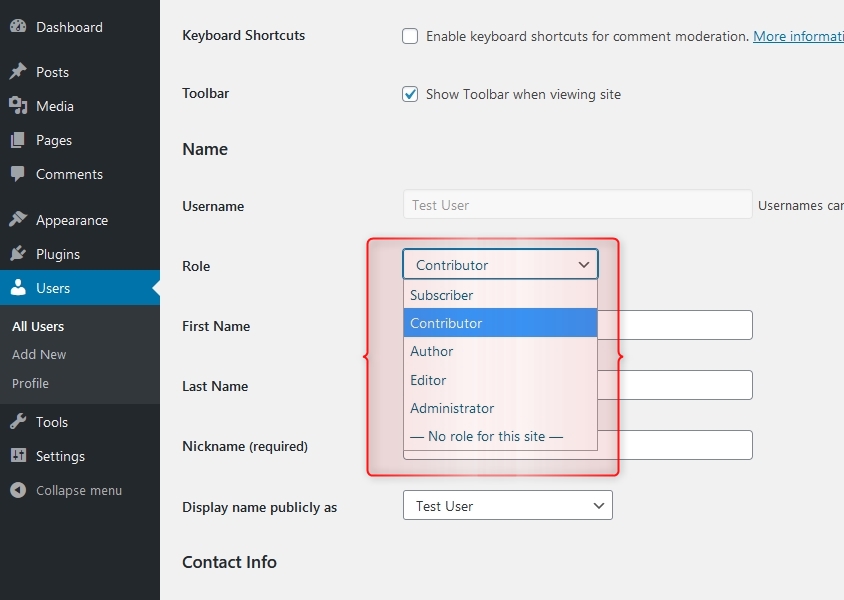
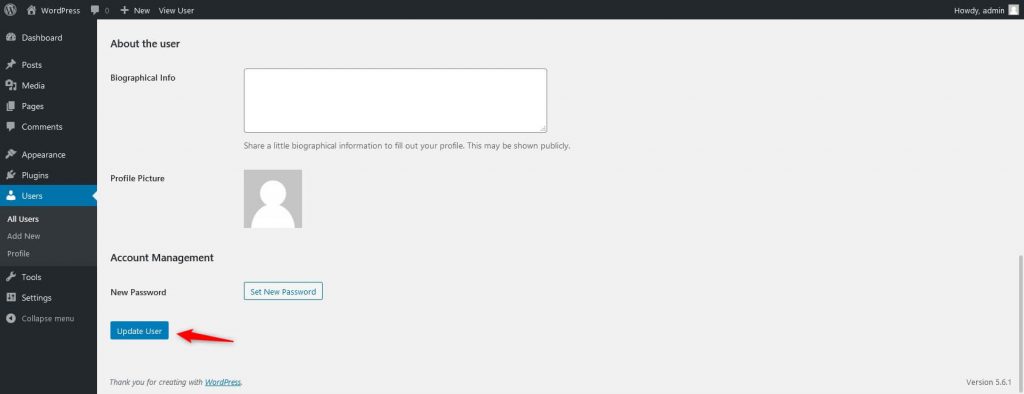
- After selecting the user’s new role, click on the ‘Update User’ Button located at the bottom of the page, and the user role will be updated.
Above are the simple steps to change user roles in WordPress.
How to customize existing (default) user roles
Although WordPress provides different types of user roles by default, sometimes there are scenarios when a site owner wants to change the capabilities of an existing role.
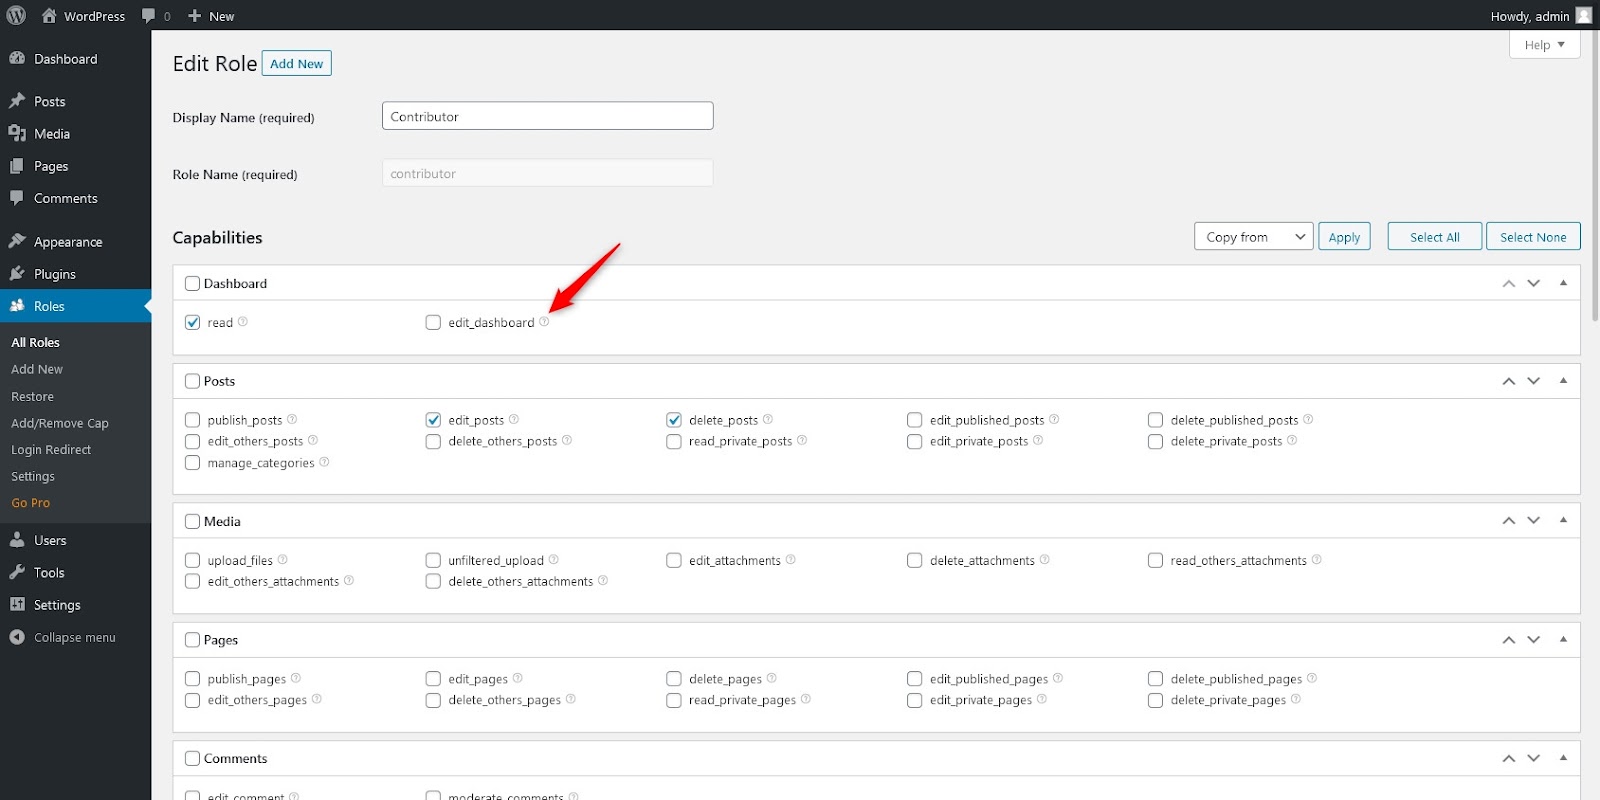
For instance, a user with a contributor role cannot publish posts, set categories, approve or disapprove comments, or upload media files (even on their own posts). They also don’t have access to the settings menu to make changes with plugins, themes, or other website settings.
Perhaps a site owner wants to edit the capabilities of the contributor role. For example, they want to allow the contributor to upload media files to their posts. How can they do that?
Fortunately, this is very easy in WordPress. There is a plugin with the name WPFront User Role Editor that allows a site owner to edit the capabilities of their existing user roles.
This plugin is available free of charge (a premium version is also available). The free version can be installed directly from the WordPress plugin repository by logging in to the dashboard. For this tutorial, we will use the free version.
To install the free version, go to the plugins section of the dashboard and click on “Add New”.

In the search field, type the name of the plugin ‘WPFront User Role Editor’ and click on the install button.

Once the installation is complete, activate the plugin by clicking on the “Activate” button.
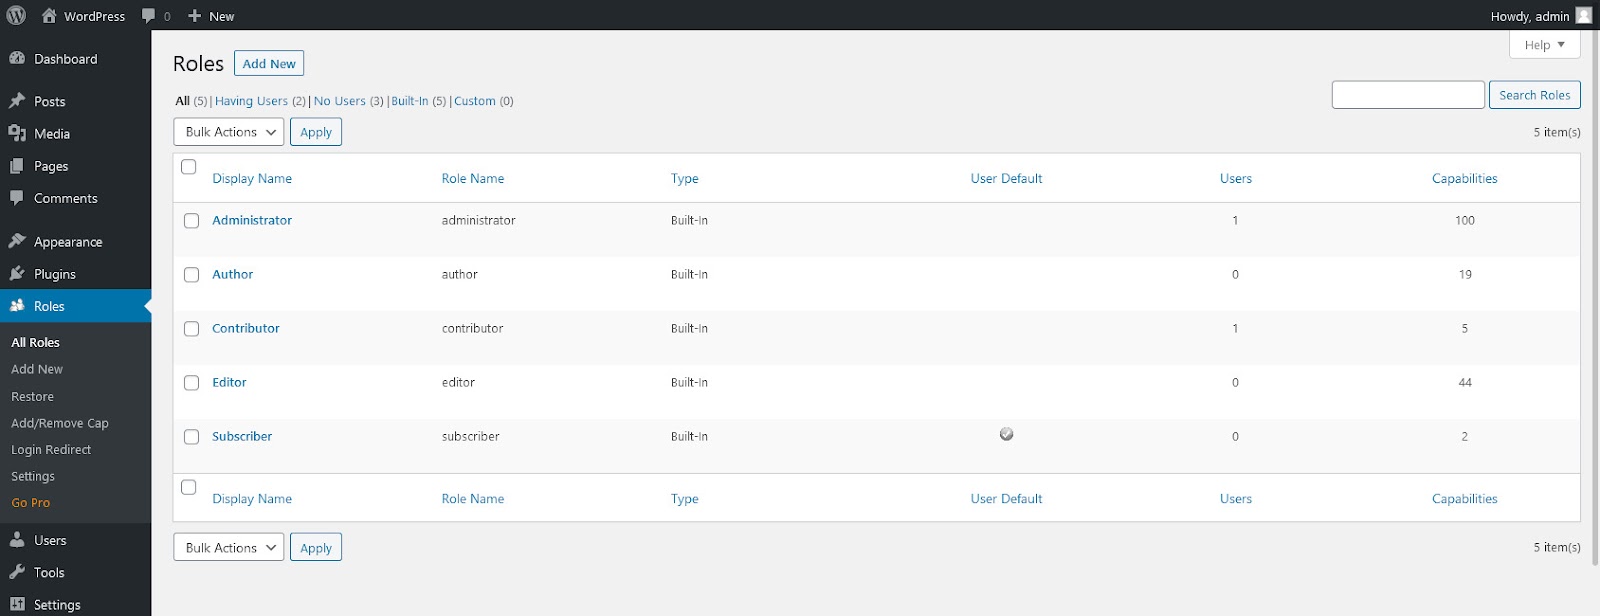
Now, a new menu item with the name “Roles” has been added to the dashboard by this plugin.

To edit the capabilities of the contributor role, simply click on the “All Roles” menu item under the “Roles” menu item.

Now you’ll see the contributor role listed on the roles page along with the other user roles.
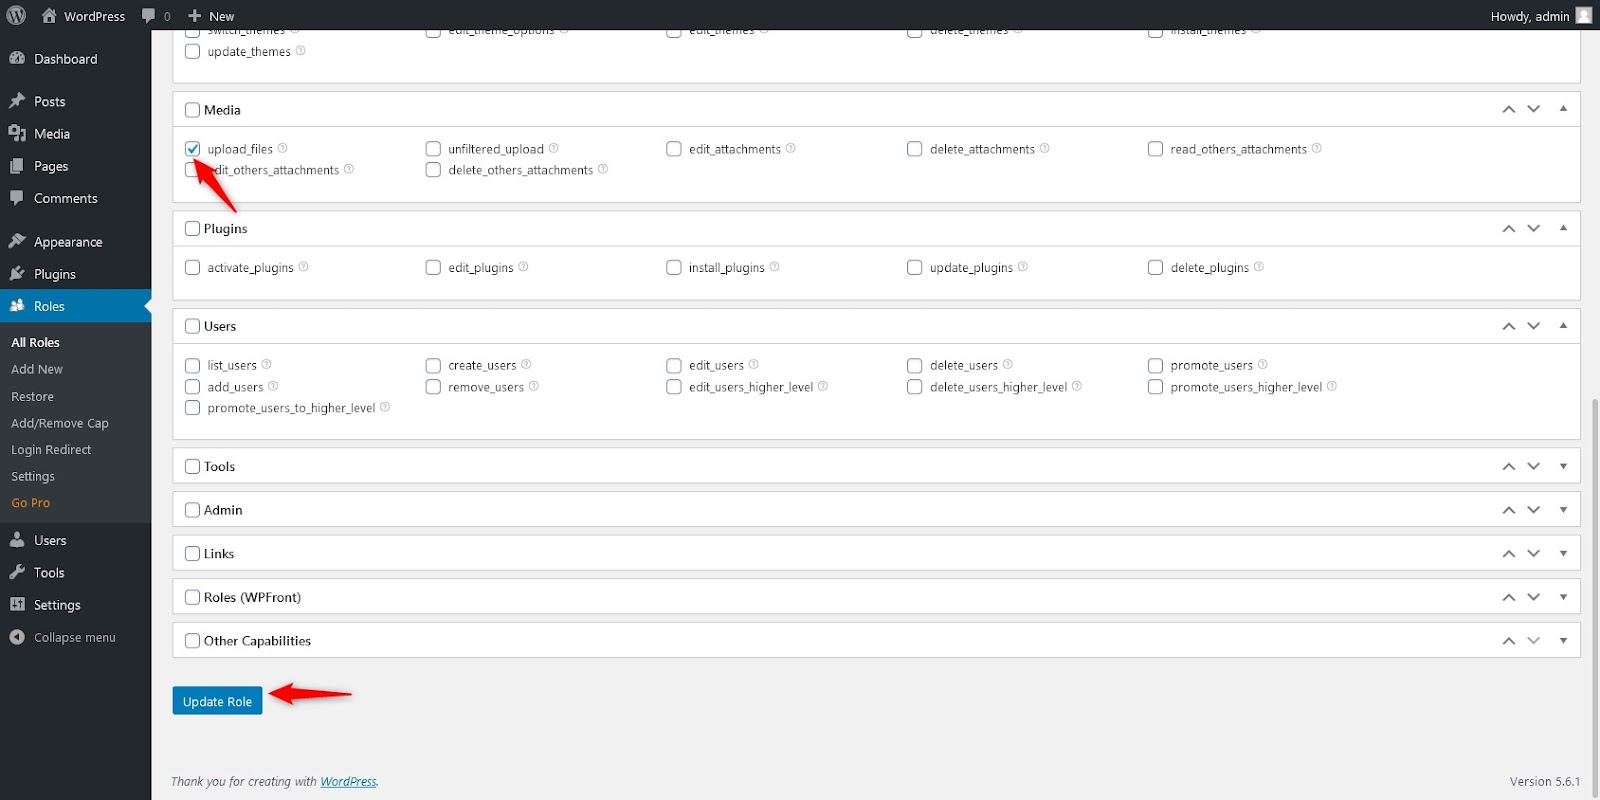
To set the capabilities of the “Contributor” role, click on it. A new page will appear that will allow you to edit the capabilities of the contributor role.
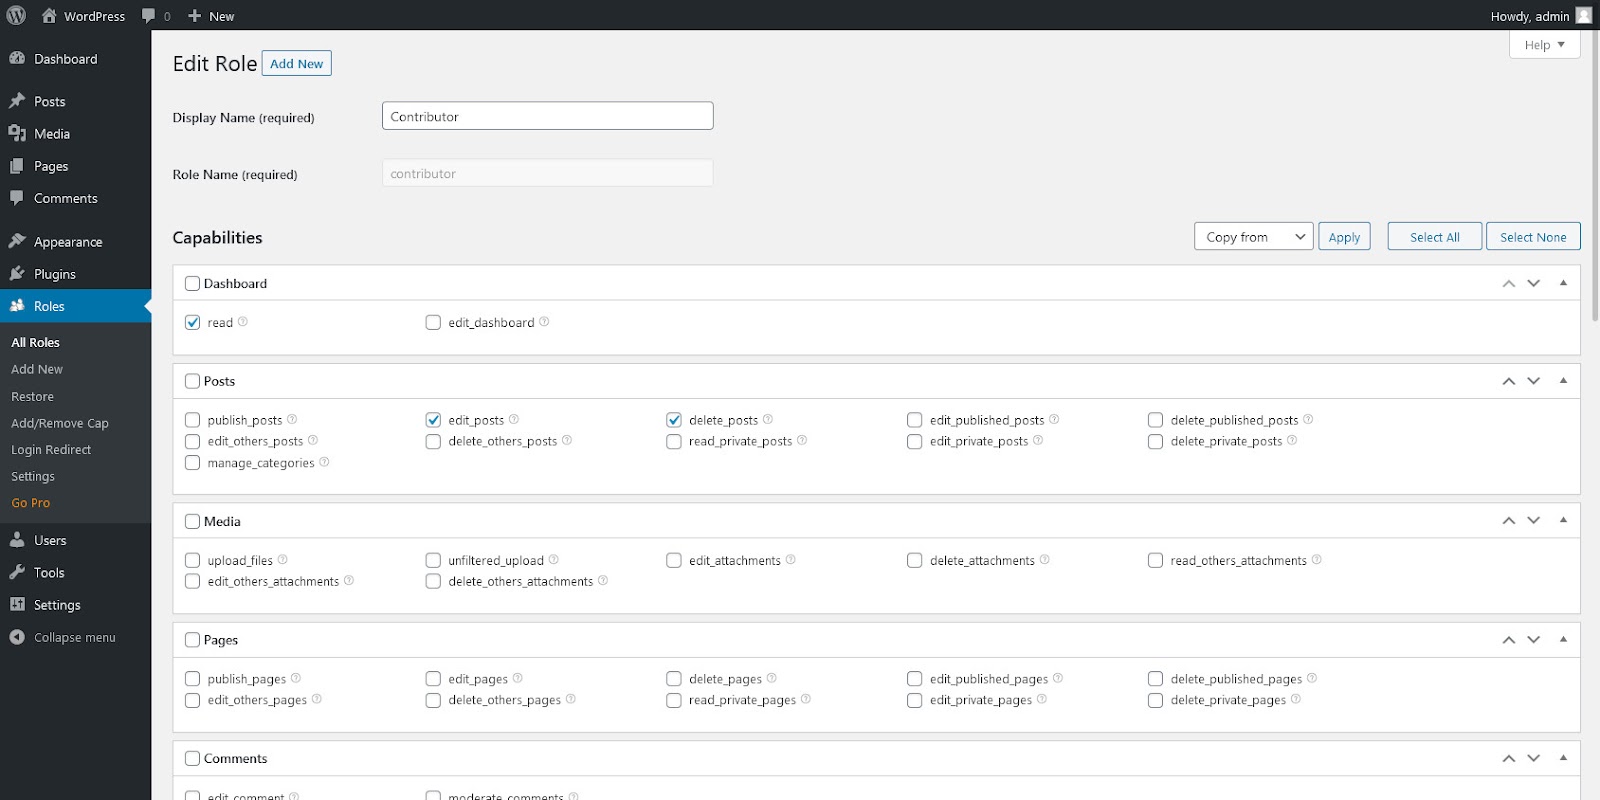
You can set the capabilities by simply checking or unchecking the relevant boxes.
If you want to allow the contributor to upload media files, then check the option “upload_files” under the “Media” tab and click on the “Update Role” button at the end to save your changes. After the changes have been saved, a user with the contributor role will be able to upload media files.
If you have no idea what capabilities you should assign to a specific role, you can click on the help icon. It will take you to a new browser tab with a description about that specific role.
If you want to reset the user roles for your site, click on the “Restore” link under the “Roles” menu item to restore the default capabilities of any user roles on your website.

The current section explains how to customize existing WordPress user roles. In the next section, you’ll learn how to create a user role with custom capabilities.
How to create user roles with custom capabilities
WordPress provides six default user roles with different capabilities and you can customize the capability of each user role, as we have seen in the last section. But what if you want to create a new user role with custom capabilities based on your needs?
Well, the good news is that you can easily do this by using the same plugin that we used to customize the capabilities of pre-defined roles: the WPFront User Role Editor plugin.
In this section, you’ll learn how to create new user roles with custom capabilities using the WPFront User Role Editor plugin. It’s also possible to create user roles via code, but in this article we are keeping it simple. By using WPFront User Role Editor plugin, a site owner can easily create, delete, edit/rename, manage roles, define capabilities, or reset roles to the default value from within the WordPress Admin Panel.
Now, let’s see how you can create a new user role in WordPress using the WPFront User Role Editor plugin. First of all, you will need to install this plugin. You can follow our guide about how to install a plugin in WordPress.
Once the new plugin is installed, activate it.
Adding a new role
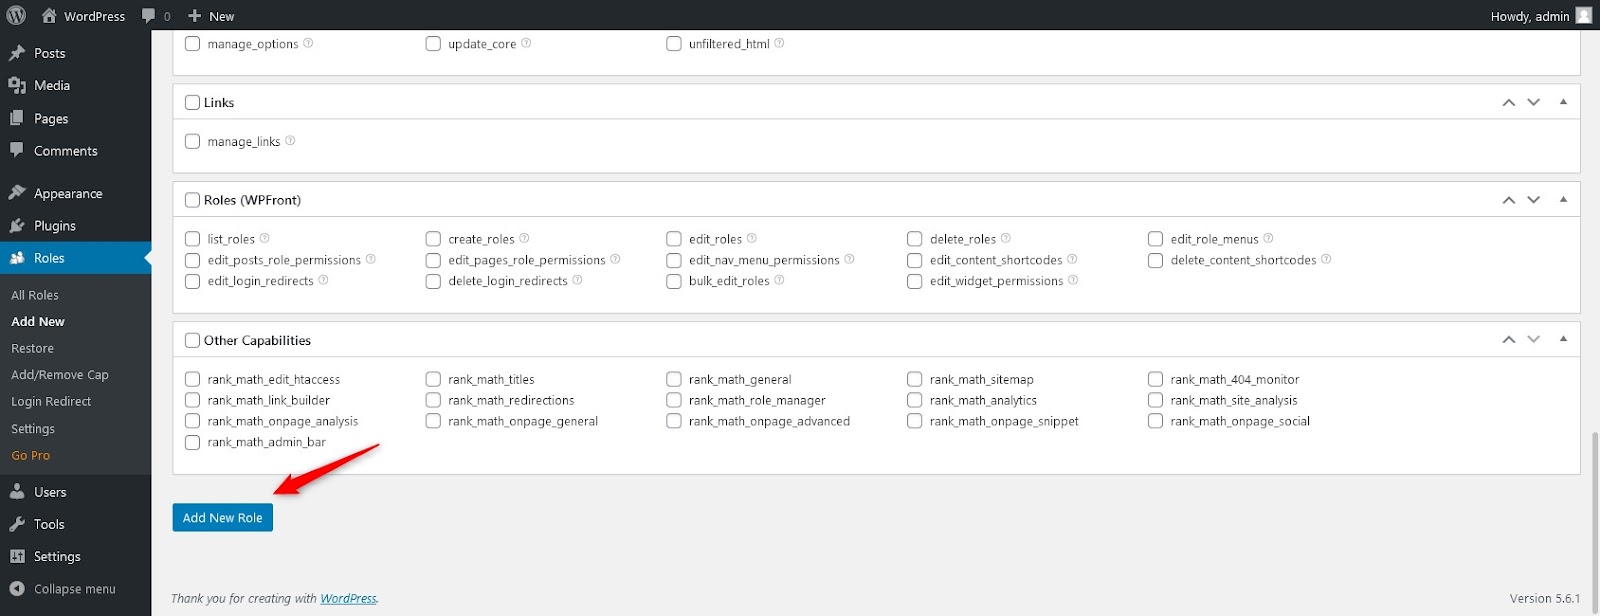
Hover your cursor over the dashboard’s left side panel and click on the “Add New” link under the “Roles” menu item to create a brand new user role with custom capabilities.

Type the “Display Name” and the “Role Name” into the required fields. The display name will be used in the WordPress dashboard, while the “Role Name” will be used internally by WordPress, and it must be unique.
After assigning the “Display Name” and the “Role Name,” select the capabilities you want to assign to this new user role. Capabilities are categorized based on their functionality so that it is easy to select the capability you need.

There are also “Select All” and “Select None” buttons at the top to check or uncheck all capabilities with a single click.

After selecting the capabilities, click on the “Add New Role” button at the bottom of the page, and you’re done! A new user role will be added to the website, and you will be able to assign it to any user on the website.
How to monitor WordPress user activity
Do you wish to keep track of user activities happening inside the dashboard area to avoid any malicious activities, attacks, or hacking attempts?
It is always good to keep a site log of user activities such as last login details, page or post edits, tag or category changes, image upload, changes in theme or plugins, and many other activities that WordPress users perform on a site.
The “User Activity Log” plugin can help you to monitor all of the activities happening inside your website.
Install the plugin from the WordPress plugin repository and activate it. Once the plugin is activated, it will start tracking and/or monitoring the actions users perform on the website.
This plugin records the date and time when a particular action has been performed, displays the user name (profile) that made that specific change, and provides the user’s IP address.
To see the log of the activities performed by users, click on the “User Activity Log” menu item added by the “User Activity Log” plugin in the dashboard menu.
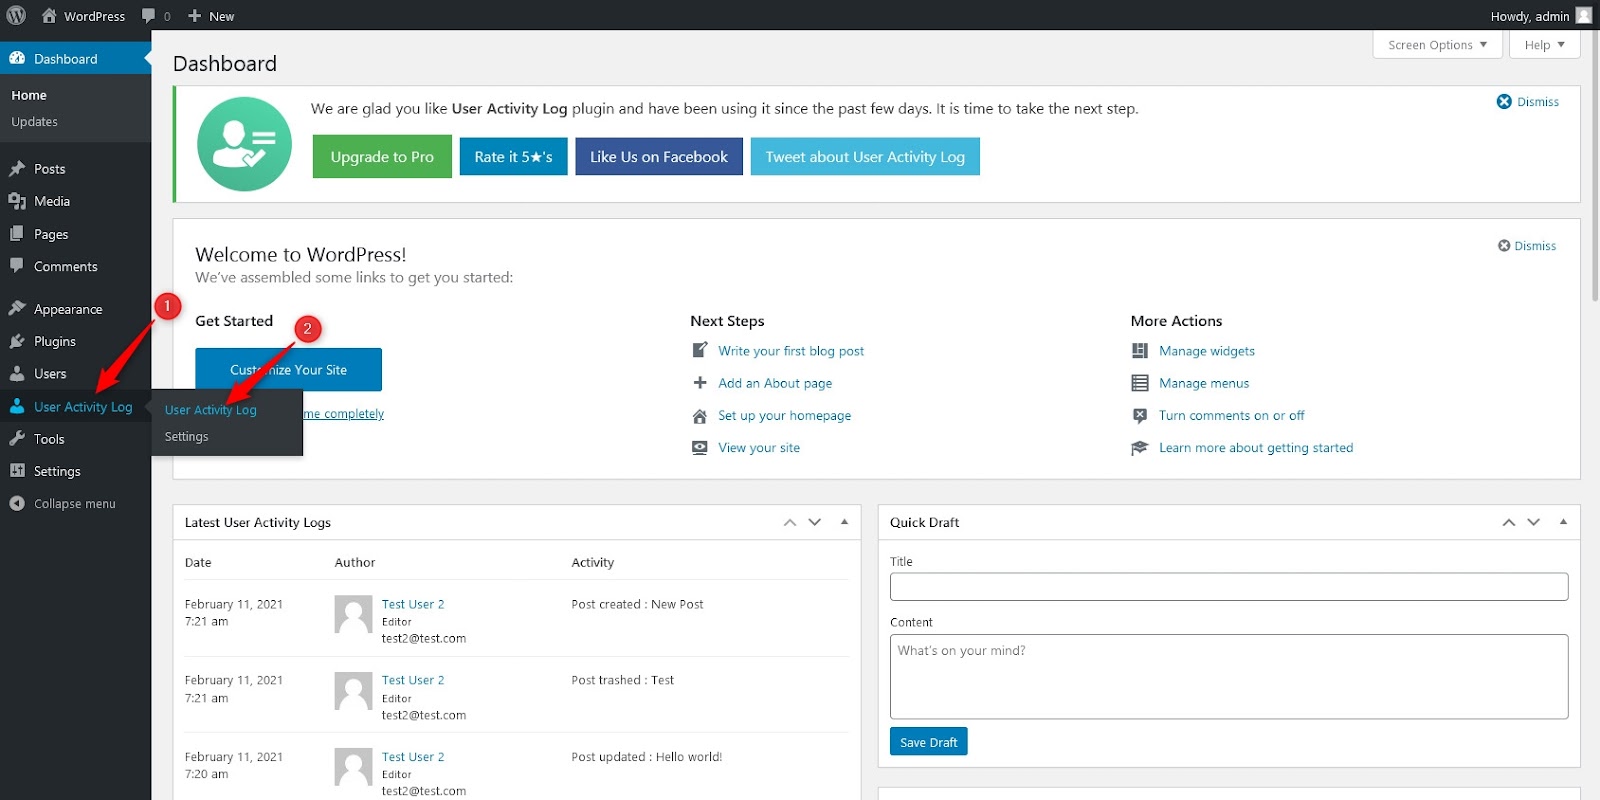
Here, you will be able to see which action was taken by which user at which time.

This plugin also provides some additional settings under the “Settings” menu item.

For example, in the “General Settings” tab, you can select the number of days that you want to keep a log for. A site owner can also delete all of the previous activity logs under this tab.

If you want to receive an email notification whenever a specific user role or user logs in, you can set that up under the “User Settings” tab.

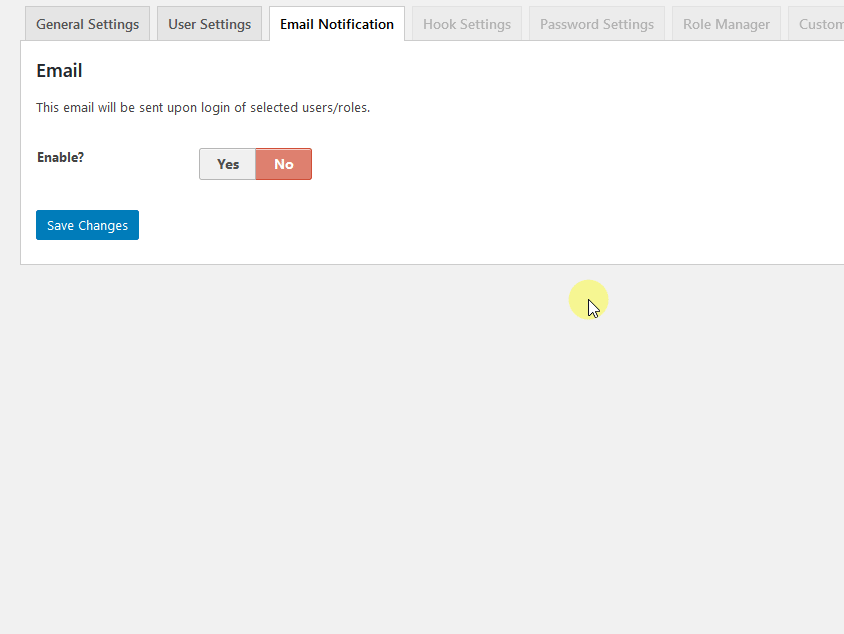
You can also establish the content of the email under the “Email Notification” tab after toggling the option from “No” to “Yes.”
The “User Activity Log” plugin records the following activities, as well as many others:
- Publishing, editing, and deletion of posts;
- Tag and Category changes;
- Comment moderation;
- Media Files uploaded on the site;
- Plugin installation;
- Changes in widgets and menus; and
- Activation or deactivation of themes.
Conclusion
In this article, we have explained WordPress user roles. When it comes to users and their roles, WordPress is very flexible. Along with the pre-defined user roles, you can easily create or customize user roles with your desired set of capabilities. However, be cautious when assigning capabilities to a user, as someone with too much power and knowledge can damage your site. For this reason, it’s a good idea to keep close eye on the WordPress user roles and capabilities allocated to the users on your WordPress site.
We hope that this article will be helpful for all WordPress users, especially beginners. And if you have any questions or concerns, let us know!
